jit.gl.lua
jit.gl.lua embeds the Lua scripting language inside a Jitter OpenGL object. jit.gl.lua serves as both a general purpose Lua scripting object and a 3D graphics scripting object. It is very similar to the js object for JavaScript with the addition that OpenGL commands can be used directly. OpenGL is what Jitter uses for 3D graphics rendering. Normally, access to the 3D drawing functionality is wrapped in higher level jit.gl objects (e.g. jit.gl.gridshape). jit.gl.lua however exposes OpenGL directly in its scripting environment for more precise, dynamic control over OpenGL's 3D drawing commands.
The Lua scripting environment inside jit.gl.lua interacts with Max and Jitter in two ways: through patcher messages and through commands from Jitter's OpenGL rendering system. If you have done Lua scripting in other contexts, that knowledge is directly applicable to working with jit.gl.lua. jit.gl.lua simply adds extra functionality to the standard Lua environment, and this is what is covered in this documentation. For more information on Lua, visit the Lua homepage. For documentation on the OpenGL commands, what they do, and how to use them, please visit the OpenGL website. Of particular note are the OpenGL man pages, which are available for each command. They explain what type of arguments a command requires, what it does, and any possible errors that may arise from improper use.
The 'this' Variable
In jit.gl.lua, there is a special variable called . represents the jit.gl.lua object the Lua script is running inside. Whenever you need to modify or query the properties of embedding jit.gl.lua object, use the variable. A common idiom when scripting with jit.gl.lua is to use the drawto attribute of jit.gl.lua when creating other jit.gl objects. All jit.gl objects must belong to a rendering context in order to be used. In Jitter, rendering contexts are given names, so jit.gl objects join a rendering context using the context's name. This attribute is called .
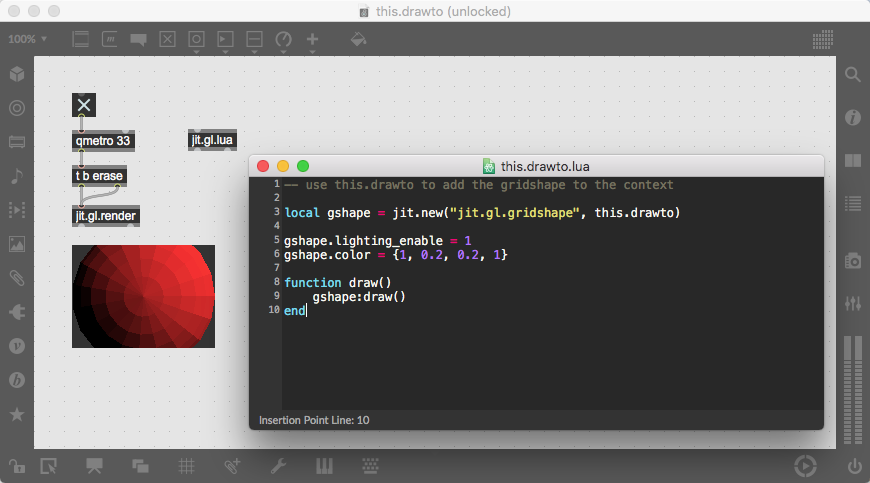
When other jit.gl objects are created in a script, they too have to belong to a context, so we typically attach them to the same context as the jit.gl.lua object, which can be accessed by referring to .
Messages and Functions
Global functions in jit.gl.lua can be called by sending messages to the jit.gl.lua object. If a script contains the code
function apply()
	print("the apply() function was called")
end

sending the message apply to a jit.gl.lua object will call the function above.
If the message is followed by any extra strings or numbers, these will be passed as arguments to the function. While a function can have any name and be called by a message, there are a few function names that have special significance. There are two groups of these functions: one for handling patcher input and another for Jitter OpenGL messages.
Patcher Interaction Functions
The patcher handling, the functions are , , , , , and .function float(v)
print("float", v, "inlet", this.last_inlet)
end
function int(v)
print("int", v, "inlet", this.last_inlet)
end
function list(...)
local values = {...}
print("list", table.concat(values, ", "), "inlet", this.last_inlet)
endWhen a number is sent to a jit.gl.lua inlet, the messages is called and passed the value. When an integer is sent, the message is called. Similarly, a list of values triggers the function with the elements of the list set as arguments to the function. The list can be captured into a table by using the Lua idiom
-- variable arguments captured into a table
local thelist = {...}
When the patcher is loaded, the function is called, and when it is closed, the function is called. will only be called when the patcher containing the jit.gl.lua object is called. This happens once during the patcher lifetime, so if a script is reloaded, will not be called again. To perform any setup each time a script is loaded, use the function.
OpenGL Callback Functions
The Opengl methods are , , . They are called in response to events in the Jitter OpenGL rendering system. The OpenGL callback functions are used to manage OpenGL resources and draw to the rendering destination. It is important to remember that OpenGL commands can only be used inside the three OpenGL callback functions.
Whenever a jit.gl.lua object is asked to draw itself by the jit.gl.render object, it calls the function. When the function is called OpenGL commands can be used to draw to the rendering destination. Any OpenGL related attributes set on the jit.gl.lua object objet such as will be applied before the draw function is called, so they can be used initialize the drawing state before any OpenGL commands are called in the draw function.
The and functions on the other hand are used to manage OpenGL resources. is called when the OpenGL context is created and the first frame is about to be rendered. is called when the context is about to be destroyed. When both functions are called, the OpenGL context is active so any OpenGL command can be used. Typically the function is used to create OpenGL resources such as display lists while the function is used to destroy them.
local gl = require("opengl")
local GL = gl

function dest_changed()
   -- context is new
end

function dest_closing()
   -- context is closing
end

function draw()
   -- draw a line
   gl.Begin(GL.LINES)
      gl.Vertex(-1, 0, 0)
      gl.Vertex(1, 0, 0)
   gl.End()
end
Inlets and Outlets
Creating Inlets and Outlets
jit.gl.lua can have a variable number of inlets and outlets. The number of inlets and outlets are specified by setting the and attriubutes respectively on the jit.gl.lua object itself.
-- 3 inlets, 2 outlets
this.inlets = 3
this.outlets = 2
Since jit.gl.lua has dynamic inlets and outlets, whenever the or attriubutes are set, the change is immediately reflected in the patcher.
Inlet Detection and Data Conversion
Lua has a single number type, so integer and float inputs are both converted to a Lua number. When an input is sent to an inlet, jit.gl.lua's attribute is set, allowing a script to determine what inlet a message was sent to so that inlet-specific behaviors can be designed if needed.
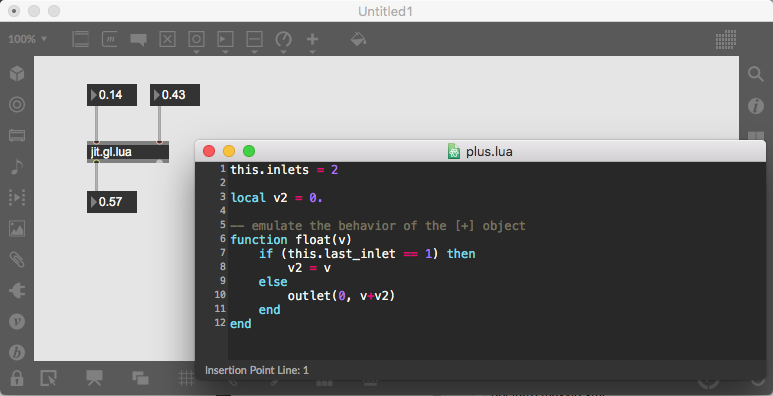
In the script above, the attribute of jit.gl.lua is used to save the input number when it comes in the right inlet. When input comes in the left inlet, it triggers an addition operation and the result is sent out the outlet.
Outlets and Data Conversion
Outlets in jit.gl.lua are accessed through the function. takes two or more arguments. The first argument is the outlet index with 0 as the left-most outlet. The other arguments are the values to be sent out the outlet. Outlets can be sent both string and numerical values. If a numerical value is an integer, jit.gl.lua will convert it to an Max integer type, otherwise it will be a Max float type.
Jitter Bindings
Creating Jitter Objects
Jitter objects can be created in a jit.gl.lua script using the function. When called, will create and return a Jitter object. The arguments to are the classname of the object and any additional arguments that the object's constructor might take. For example, to create a jit.xfade object:
xfade = jit.new("jit.xfade")
to create a jit.gl.gridshape object:
-- classname of the object, the context name
gshape = jit.new("jit.gl.gridshape", this.drawto)
Once created, the messages and attributes of the object are exposed to Lua in the usual Lua fashion. In Lua, functions belonging to an object are called using the ':' operator, which is a kind of object-oriented syntax sugar. This operator passes the object itself in as an implicit first argument.
gshape = jit.new("jit.gl.gridshape", this.drawto)

function draw()
   -- use ':' to call the gridshape's draw function
   -- equivalent to gshape.draw(gshape)
   gshape:draw()
end
All Jitter object messages can be called this way. Attributes are acessed more like properties stored in a table and can be accessed using the '.' operator. For example:
gshape = jit.new("jit.gl.gridshape", this.drawto)
-- set some of the gridshape's attributes
gshape.shape = "cylinder"
gshape.automatic = 0
gshape.poly_mode = {1, 1}  -- set an attribute that takes a list of values

-- print the shape attribute
print("gridshape using shape", gshape.shape)
Some attributes consist of a array of values such as gridshape's above. These can be set with a list of values stored in a table. When getting an array attribute, the list of values will be returned in a table as well.
jit.matrix
There are two ways to create a jit.matrix object in jit.gl.lua. One is using the function as described above. The other is by using the convenience function. Both are equivalent in terms of functionality. The function takes the same arguments as are used when creating a jit.matrix object in a patcher. The arguments are the matrix name (optional), planecount, type, and dimensions.
-- equivalent to jit.new("jit.matrix", 4, "char", 720, 480)
mat1 = jit.matrix(4, "char", 720, 480)

-- a named matrix
mat2 = jit.matrix("frame")
jit.listener
Certain Jitter objects such as jit.window send messages out an outlet in response to patcher and user events. Since Jitter objects in scripts have no outlets, this information has to be accessed another way. In jit.gl.lua, the jit.listener object is used to attach to an object and listen to any notifications it may send out.
-- listener function
function wincb(event)
  print(event.subjectname)
  print(table.concat(event.args, ", "))
end

win = jit.new("jit.window", "x")
-- list to the window with wincb as the callback function
listener = jit.listener(win.name, wincb)
jit.listener takes two arguments: the name of the object to listen to and the function to call when the listener gets notified of some information. The second argument can either be a function directly or the name of a global function. This code is equivalent to the code above:
function wincb(event)
   print(event.subjectname)
   print(table.concat(event.args, ", "))
end

win = jit.new("jit.window", "x")
listener = jit.listener(win.name, "wincb")
Notice that the second argument in this code is a string naming the function to call as opposed to the function itself.
jit.gl Functions
In addition to the low-level OpenGL bindings discussed below, jit.gl.lua has bindings to Jitter-specific OpenGL functionality for working with Jitter textures and jit.gl objects at a lower level than usual.
-- v2 and v3 are optional
jit.gl.texcoord(v1, [v2], [v3])

-- also can take a table
jit.gl.texcoord({v1, [v2], [v3]})creates multi-texturing texture coordinates so that if there are textures bound on different units, they will each get texture coordinates to be properly displayed on the geometry.
local gl = require("opengl")
local GL = gl

function draw()
   gl.Color(1, 1, 1, 1)
   jit.gl.bindtexture("tex1", 0)
   jit.gl.bindtexture("tex2", 1)
   gl.Begin(GL.QUADS)
      jit.gl.texcoord(0, 0) gl.Vertex(-1, -1, 0)
      jit.gl.texcoord(1, 0) gl.Vertex(1, -1, 0)
      jit.gl.texcoord(1, 1) gl.Vertex(1, 1, 0)
      jit.gl.texcoord(0, 1) gl.Vertex(-1, 1, 0)
   gl.End()
   jit.gl.unbindtexture("tex2", 1)
   jit.gl.unbindtexture("tex1", 0)
end
jit.gl.bindtexture(texname, texunit)
-- draw some geometry
jit.gl.unbindtexture(texname, texunit)and are used to bind and unbind texture. The first argument is a texture name and the second argument is the texture unit to assign the texture to. Every graphics card has a fixed number of slots called texture units. The number of texture units a card has determines how many textures can be used simultaneously. This number is usually 8 but can be 16 or even 32. To see how many texture units your card has, go to the Options Menu > OpenGL Status. Under the OpenGL Limits > Textures item, you'll see MAX_TEXTURE_UNITS and a value next to it. This is the number of texture units your card supports.
jit.gl.begincapture(texname)
-- draw some geometry
jit.gl.endcapture(texname)and are used to render drawing commands to a texture instead of to a window. The only argument is the texture name.
local gl = require("opengl")
local GL = gl

local pi = math.pi

local tex = jit.new("jit.gl.texture", this.drawto)
tex.dim = {1024, 1024}

function draw()
   -- capture to texture
   jit.gl.begincapture(tex.name)
      gl.Color(1, 1, 1, 1)
      gl.Begin(GL.LINES)
      for i=0, pi, pi/100 do
         gl.Vertex(math.cos(i), math.sin(i*2.4))
         gl.Vertex(math.cos(i+pi), math.sin(i*2.4+pi))
      end
      gl.End()
      -- end capturing to texture
   jit.gl.endcapture(tex.name)

   -- draw the result
   gl.Color(1, 1, 1, 1)
   jit.gl.bindtexture(tex.name, 0)
   gl.Begin(GL.QUADS)
      gl.TexCoord(0, 0) gl.Vertex(-1, -1, 0)
      gl.TexCoord(1, 0) gl.Vertex(1, -1, 0)
      gl.TexCoord(1, 1) gl.Vertex(1, 1, 0)
      gl.TexCoord(0, 1) gl.Vertex(-1, 1, 0)
   gl.End()
   jit.gl.unbindtexture(tex.name, 0)
end
-- arguments can be either a table or list of values
screenpos = jit.gl.worldtoscreen(worldpos)
-- arguments can be either a table or list of values
worldpos = jit.gl.screentoworld(screenpos)converts world coordinates into screen coordinates. performs the inverse operation, converting screen coordinate into world coordinates. Both functions can take either a table of values or a list of x, y, z values. The z-coordinate in is typically a value in the range [0, 1] where 0 represents the near clipping plane and 1 the far clipping plane, which can be used to cast a ray into the OpenGL scene as the code below demonstrates:
function castray(x, y)
   local raystart = jit.gl.screentoworld(x, y, 0)
   local rayend = jit.gl.screentoworld(x, y, 1)
   return raystart, rayend
end
jit.gl.draw_begin(jit_gl_object)
jit.gl.draw_end(jit_gl_object)
and operate on jit.gl objects. All jit.gl objects share a set of common attributes know as ob3d (or object 3D) attributes. Whenever a jit.gl object draws itself, it sets up the OpenGL state to reflect the settings of its attributes such as and among others. When an object is drawn, the following sequence of calls takes place:
draw_begin(ob3d)
draw(ob3d)
draw_end(ob3d)
Sometimes it's useful to have explicit control over this sequence of calls within a jit.gl.lua script and and enable this kind of control. sets up OpenGL state based on the object's ob3d attributes while reverses the process. These calls must be used in pairs, otherwise OpenGL errors may occur.
gshape = jit.new("jit.gl.gridshape", this.drawto)
gshape.automatic = 0

function draw()
   -- equivalent to gshape:draw()
   jit.gl.draw_begin(gshape)
   gshape:drawraw()
   jit.gl.draw_end(gshape)
end
Vector Math Functions
The vector math functions in jit.gl.lua are located in the module and are organized into six categories. These categories are:
- vec.vec2
- vec.vec3
- vec.vec4
- vec.quat
- vec.mat3
- vec.mat4
OpenGL Bindings
Detailed documentation on each function in the OpenGL module can be found on the jit.gl.lua OpenGL Bindings page. There are also bindings for the OpenGL Utility (GLU) functions at jit.gl.lua OpenGL GLU Bindings. This section describes common usage and techniques.
The OpenGL bindings in jit.gl.lua enable direct access to OpenGL commands. Nearly all of the OpenGL commands are available through the bindings. Wherever possible the arguments to an OpenGL function in Lua match the arguments described in the OpenGL man page for that command. Since OpenGL is a C interface, type information and the number of arguments a command must take are fixed. Lua does not have this restriction, so in an effort to simplify the interface into OpenGL, functions that only vary based on type and the number of arguments have been collapsed into a single function. For example, the OpenGL command for specifiying a vertex of geometry as the following variations:
void glVertex2s(GLshort x, GLshort y);
void glVertex2i(GLint x, GLint y);
void glVertex2f(GLfloat x, GLfloat y);
void glVertex2d(GLdouble x, GLdouble y);
void glVertex3s(GLshort x, GLshort y, GLshort z);
void glVertex3i(GLint x, GLint y, GLint z);
void glVertex3f(GLfloat x, GLfloat y, GLfloat z);
void glVertex3d(GLdouble x, GLdouble y, GLdouble z);
void glVertex4s(GLshort x, GLshort y, GLshort z, GLshort w);
void glVertex4i(GLint x, GLint y, GLint z, GLint w);
void glVertex4f(GLfloat x, GLfloat y, GLfloat z, GLfloat w);
void glVertex4d(GLdouble x, GLdouble y, GLdouble z, GLdouble w);
In Lua, all of the variations are contained within a single function:
-- The same function, different number of arguments
gl.Vertex(x, y)
gl.Vertex(x, y, z)
gl.Vertex(x, y, z, w)
In OpenGL, enumerations play an important role for specifying different modes of behavior. An enumeration is simply a number with a particular meaning. For example, OpenGL has a lot of functionality that can be enabled and disabled such as depth testing, blending, etc. To enable or disable a particular bit functionality, an enumeration specifiying the functionality is passed to the glEnable or glDisable command. In C this looks like:
glEnable(GL_DEPTH_TEST)
glDisable(GL_BLEND)
The Lua bindings for OpenGL also have enumerations. These are stored in the same location as all of the OpenGL functions, which is simply a giant table. Often times it is convenient to have the Lua code look as much like the C code as possible so that when copying example code or switching between C and Lua there is minimal cognitive overhead. We can do this by aliasing the OpenGL module table to the variable 'GL'. When jit.gl.lua loads a script, it autmatically makes available the table, which contains all of the OpenGL functions and enumerations. The following idiom allows us to write code that more closely resembles C-style OpenGL code:
-- set the OpenGL module to the variable 'gl'
local gl = require("opengl")
-- alias the OpenGL module to the variable 'GL' to emulate the C enumeration style
local GL = gl

function draw()
   gl.Enable(GL.DEPTH_TEST)
   gl.Disable(GL.BLEND)

   -- draw some geometry
end
Color Functions
In addition to the OpenGL module, jit.gl.lua also has a color module built in. The color module contains funtions for translating betwee RGB space and Hue-Saturation-Luminance (HSL) space. It also contains a large number of pre-defined color values. The color values are given in RGB form. Here are some examples:
chocolate = {0.823529, 0.411765, 0.117647}
lightcoral = {0.941176, 0.501961, 0.501961}
slateblue = {0.415686, 0.352941, 0.803922}
There are 115 colors in total. For the full list, see the jit.gl.lua Color Bindings documentation.
The main functions in the color module are and . While colors in both spaces are defined by three values, an optional fourth value representing the alpha channel can also be passed in. The alpha channel is not involved in any of the calculations, but is simply passed through untouched.
hsl = RGBtoHSL(rgb)
hsl = RGBtoHSL(r, g, b)
hsla = RGBtoHSL(rgba)
hsla = RGBtoHSL(r, g, b, a)

rgb = HSLtoRGB(hsl)
rgb = HSLtoRGB(h, s, l)
rgba = HSLtoRGB(hsla)
rgba = HSLtoRGB(h, s, l, a)
For example, the code below converts an RGBA color to an HSLA color, lightens it, and then gets back the result into RGBA space.
color = {1, 0.2, 0.2, 0.5}
hsla = RGBtoHSL(color)
-- lighten the color
hsla[3] = hsla[3]*1.1
color = HSLtoRGB(hsla)
The other three functions in the color module are for manipulating HSL colors. They are designed so that the color manipulation functions can be chained without having to assign any results to a variable. These functions are , , and .
res = hue(hsla, hue_offset)
res = saturate(hsla, saturation_scale)
res = lighten(hsla, luminance_scale)
offsets the hue of an HSLA color by a given amount. and scale the saturation and luminance components of an HSLA color respective.
-- lighten the color
color = HSLtoRGB(lighten(RGBtoHSL{1, 0.2, 0.2, 0.5}, 1.1))
See Also
| Name | Description |
|---|---|
| Lua in Max | Lua in Max |