The Parameters Window
The Parameters Window provides an overview of all the parameters currently associated with a Max for Live device, whether they are built into the UI objects or defined via pattr objects.
Displaying the Parameters Window
- Choose Parameters from the View menu when a device patcher window is the frontmost window. The Parameters window will appear.
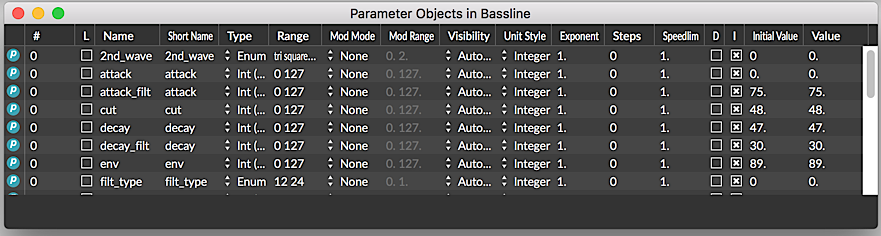
- The # column displays the setting for the attribute, which can be used to set the order in which parameters are recalled when a device is loaded. By default, all attributes are recalled sequentially/at one time. By setting an attribute to have a lower order number, you can recall parameter values in complex patches whose initial values may need to be calculated based on initial or preset values so that the dependencies are preserved.
- The L column displays the setting for the attribute, which can be used to link the Scripting Name used with the pattr family of objects and patcher scripting to the and attributes. If the attribute names are linked, the box is checked and the name of the parameter is shown in a different color text.
- The Name column displays either the attribute or the attribute, depending on whether or not they are linked. The attribute sets the name that appears in Live's automation view.
- The Short Name column displays either the attribute or the attribute, depending on whether or not they are linked. The attribute sets the name that appears as a part of the UI object's display.
-
The Type column displays the attribute used to set the type of data associated with
the object. The choices are:
Float: floating point number
Int: integer with a range of up to 256 values
Enum: enumerated list (used for objects such as multislider and umenu objects)
- The Range column displays the attribute that sets either a minimum/maximum or a list of possible values associated with the object's output.
- The Mod Mode column displays the attribute that sets the type of parameter modulation applied to the parameter. The clip modulation modes are described here.
- The Mod range column displays the attribute that sets the low and high range values within which a parameter is modulated. Some clip modulation modes use these parameter ranges for truncating modulation data.
- The I column displays the attribute checkbox that enables or disables setting an initial value as a part of a UI object's state.
- The Initial Value column displays the initial value of the parameter if the attribute is checked.
-
The Unit Style column displays the attribute used when adding
labels to UI object displays. The unit style type for display can be set using the
object's
Inspector .
The choices are:
Int: integer
Float: floating point
Time: output values will have a ms (milliseconds) label. Larger values automatically display seconds and milliseconds.
Hertz: output values are labeled in Hz (Hertz). Larger values automatically display in kHz.
deciBel: output values are labeled in dB
%: output values are displayed as an integer percentage value
Pan: output values are labeled as Left/Right pan integer values based on the range set for the object. When a range value between negative and positive integer values (e.g. -100. 100.), negative values will be labeled as left or right channel settings (-100L, 100R). If the range settings are have an upper range value of 0, the value will be reported as . only Left channel values will be displayed. If the range settings are have an lower range value of 0, the value will be reported as .
Semitones: displays values as negative/positive integer semitones for tuning displays
MIDI: displays integer values in the range 0 - 127 as MIDI note numbers (e.g. C#-2).
Custom: the label is user-definable, and is settable using the UI object's Inspector .
Native: displays the native unit style - The Exponent column displays the exponential value used when calculating the object's output.
- The Steps column displays the the precision of the object's output when clicking and dragging. (The computer's keyboard can be used to enter any value.)
- The Value column displays the current value.
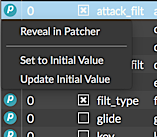
Locating a Parameter Object
- Click on the blue info icon in the left column for the parameter you want to locate and choose Reveal in Patcher from the pop-up menu. The object associated with the parameter will be highlighted.

Setting Parameter Object Values
-
Double-click in the Value column for a parameter setting to show a
cursor and text box. Type in a new value or symbol for the initialization
value, followed by a carriage return.
You can also adjust the user interface object manually, click on the blue info icon in the left column for the parameter you want to set a value for and choose Update Initial Value. - Click on the blue info icon in the left column for the parameter you want to set a value for and choose Set to Initial Value from the pop-up menu. The UI object will change to reflect the new initial value.
- Choose Save from the File menu to save the new initialization settings.
See Also
| Name | Description |
|---|---|
| Max For Live | Max For Live |