Tutorial 18: Mapping MIDI to MSP
One of the greatest assets of MSP is the ease with which one can combine MIDI and digital signal processing. The great variety of available MIDI controllers means that you have many choices for the instrument you want to use to control sounds in MSP. Because Max is already a well developed environment for MIDI programming, and because MSP is so fully integrated into that environment, it is not difficult to use MIDI to control parameters in MSP.
The main challenge in designing programs that use MIDI to control MSP is to reconcile the numerical ranges needed for the two types of data. MIDI data bytes are exclusively integers in the range 0 to 127. For that reason, most numerical processing in Max is done with integers and most Max objects (especially user interface objects) deal primarily with integers. In MSP, on the other hand, audio signal values are most commonly decimal numbers between -1.0 and 1.0, and many other values (such as frequencies, for example) require a wide range and precision to several decimal places. Therefore, almost all numerical processing in MSP is done with floating-point (decimal) numbers.
Often this ‘incompatibility’ can be easily reconciled by linear mapping of one range of values (such as MIDI data values 0 to 127) into another range (such as 0 to 1 expected in the inlets of many MSP objects). Linear mapping is explained in Tutorial 29 of the Tutorials and Topics manual from the Max documentation, and is reviewed in this chapter. In many other cases, however, you may need to map the linear numerical range of a MIDI data byte to some nonlinear aspect of human perception -- such as our perception of a 12-semitone increase in pitch as a power of 2 increase in frequency, etc. This requires other types of mapping; some examples are explored in this tutorial chapter.
In this tutorial patch, we use MIDI continuous controller messages to control several different parameters in an FM synthesis patch. The synthesis is performed in MSP by the subpatch which was introduced in Tutorial 11, and we map MIDI controller 1 (the mod wheel) to affect, in turn, its amplitude, modulation index, vibrato depth, vibrato rate, and pitch bend.

An FM synthesis subpatch is the sound generator to be modified by MIDI
If we were designing a real performance instrument, we would probably control each of these parameters with a separate type of MIDI message -- controller 7 for amplitude, controller 1 for vibrato depth, pitchbend for pitch bend, and so on. In this patch, however, we use the mod wheel controller for everything, to ensure that the patch will work for almost any MIDI keyboard. While this patch is not a model of good synthesizer design, it does let you isolate each parameter and control it with the mod wheel.
In the lower right corner of the Patcher window, you can see that keys 0 to 5 of the computer keyboard can be used to choose an item in the pop-up umenu at the top of the window.

Use ASCII from the computer keyboard to assign the function of the MIDI controller
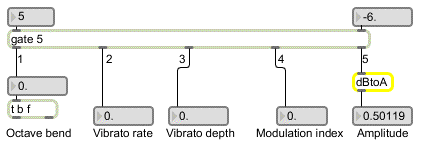
The umenu sends the chosen item number to gate to open one of its outlets, thus directing the controller values from the mod wheel to a specific place in the signal network.

gate directs the control messages to a specific place in the signal network
We will look at the special mapping requirements of each parameter individually. But first, let's review the formula for linear mapping.
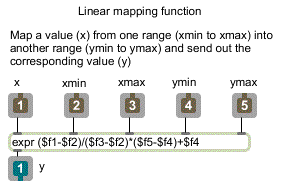
The problem of linear mapping is this: Given a value x which lies in a range from xmin to xmax, find the value y that occupies a comparable location in the range ymin to ymax. For example, 3 occupies a comparable location within the range 0 to 4 as 0.45 occupies within the range 0 to 0.6. This problem can be solved with the formula:
y = ((x - xmin) * (ymax - ymin) / (xmax - xmin)) + ymin
For this tutorial, we designed a subpatch called to solve the equation. receives an x value in its left inlet, and -- based on the values for xmin, xmax, ymax received in its other inlets -- it sends out the correct value for y. This equation will allow us to map the range of controller values -- 0 to 127 -- onto various other ranges needed for the signal network. The subpatch appears in the upper right area of the Patcher window.

The contents of the map subpatch: the linear mapping formula expressed in an expr object
Once we have scaled the range of control values with , some additional mapping may be necessary to suit various signal processing purposes, as you will see.
As noted in Tutorial 4, we perceive relative amplitude on a multiplicative rather than an additive scale. For example we hear the same relationship between amplitudes of 0.5 and 0.25 (a factor of 1/2, but a difference of 0.25) as we do between amplitudes of 0.12 and 0.06 (again a factor of 1/2, but a difference of only 0.06). For this reason, if we want to express relative amplitude on a linear scale (using the MIDI values 0 to 127), it is more appropriate to use decibels.
• Click on the toggle to turn audio on. Type the number (or choose ‘Amplitude’ from the umenu) to direct the controller values to affect the output amplitude.
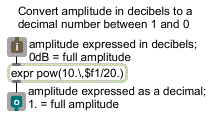
The item number chosen in the umenu also recalls a preset in the preset object, which provides range values to . In this case, ymin is and ymax is , so as the mod wheel goes from 0 to 127 the amplitude goes from -80 dB to 0 dB (full amplitude). The decibel values are converted to amplitude in the subpatch called . This converts a straight line into the exponential curve necessary for a smooth increase in perceived loudness.

The contents of the dBtoA subpatch
• Move the mod wheel on your MIDI keyboard to change the amplitude of the tone. Set the amplitude to a comfortable listening level.
With this mapping, the amplitude changes by approximately a factor of 2 every time the controller value changes by 10. This permits the same amount of control at low amplitudes as at high amplitudes (which would not be the case with a straight linear mapping).
Our perception of relative pitch is likewise multiplicative rather than additive with respect to frequency. In order for us to hear equal spacings of pitch, the frequency must change in equal powers of 2. (See the discussions of pitch-to-frequency conversion in Tutorial 17 and Tutorial 19.)
• Type the number (or choose ‘Octave Pitch Bend’ from the umenu) to direct the controller values to affect the carrier frequency. Move the mod wheel to bend the pitch upward as much as one octave, and back down to the original frequency.
In order for the mod wheel to perform a pitch bend of one octave, we map its range onto the range 0 to 1. This number is then used as the exponent in a power of 2 function and multiplied times the fundamental frequency in expr.

Octave bend factor ranges from 20 to 21
20 = 1, and 21 = 2, so as the control value goes from 0 to 1 the carrier frequency increases from 220 to 440, which is to say up an octave. The increase in frequency from 220 to 440 follows an exponential curve, which produces a linear increase in perceived pitch from A to A.
Mapping the MIDI controller to the modulation index of the FM instrument is much simpler, because a linear control is what's called for. Once the controller values are converted by the subpatch, no further modification is needed. The mod wheel varies the modulation index from 0 (no modulation) to 24 (extreme modulation).
• Type the number (or choose ‘Modulation Index’ from the umenu) to direct the controller values to affect the modulation index. Move the mod wheel to change the timbre of the tone.
This instrument has an additional low-frequency oscillator (LFO) for adding vibrato to the tone by modulating the carrier frequency at a sub-audio rate. In order for the depth of the vibrato to be equal above and below the fundamental frequency, we use the output of the LFO as the exponent of a power function in pow~.

Calculate the vibrato factor
The base of the power function (controlled by the mod wheel) varies from 1 to 2. When the base is 1 there is no vibrato; when the base is 2 the vibrato is ± one octave.
• You'll need to set both the vibrato rate and the vibrato depth before hearing the vibrato effect. Type and move the mod wheel to set a non-zero vibrato rate. Then type and move the mod wheel to vary the depth of the vibrato.
The clumsiness of this process (re-assigning the mod wheel to each parameter in turn) emphasizes the need for separate MIDI controllers for different parameters (or perhaps linked simultaneous control of more than one parameter with the same MIDI message). In a truly responsive instrument, you would want to be able to control all of these parameters at once. The next chapter shows a more realistic assignment of MIDI to MSP.
Summary
MIDI messages can easily be used to control parameters in MSP instruments, provided that the MIDI data is mapped into the proper range. The subpatch implements the linear mapping equation. When using MIDI to control parameters that affect frequency and amplitude in MSP, the linear range of MIDI data from 0 to 127 must be mapped to an exponential curve if you want to produce linear variation of perceived pitch and loudness. The subpatch maps a linear range of decibels onto an exponential amplitude curve. The pow~ object allows exponential calculations with signals.