Using Max with Other Applications
The Max application has two virtual sources — two sets of inputs and outputs
that let you send MIDI data to and from other programs that are running on your computer.
MIDI Setup Window
displays of these virtual sources.
The output devices “from Max/MSP 1” and “from Max/ MSP 2” are virtual sources of
MIDI for other programs. You can select them MIDI inputs in another application
and your application will receive MIDI data from Max.
The input devices “to Max/MSP 1” and “to Max/MSP 2” are virtual destinations — sources
of MIDI input to Max from other programs. In order to use them, you must select
“to Max/MSP 1” or “to Max/MSP 2” as MIDI output devices in another application.
Sending MIDI data to Max from another application
- Start the Max application
- Choose MIDI Setup... from the Edit menu to show the MIDI Setup Window.
- Verify that the input sources “to Max/MSP 1” and “to Max/MSP 2” are on (i.e. that the “on” checkboxes are checked).
- Start the application you want to send MIDI data from.
- In the other application, set the MIDI output source to either “to Max/MSP 1” or “to Max/MSP 2.”
The following example shows how to select “to Max/MSP 1” as a MIDI
output destination in Ableton Live using the MIDI channel strip:

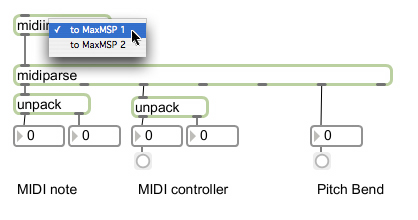
- Double-click on any Max object (midiin, ctlin, notein, etc.) you’re using as an MIDI source in your patch and select the source you set for MIDI output in your other application (either “to Max/MSP 1” or “to Max/MSP 2”) from the pop-up menu as the MIDI input source.
The following example shows how to select “to Max/MSP 1” as a MIDI input
destination in a Max patch:

Max will now receive MIDI data sent from your other application.
Sending MIDI data from Max to another application
- Start the Max application.
- Choose MIDI Setup... from the Edit menu to show the MIDI Setup Window.
- Verify that the output sources “from Max/MSP 1” and “from Max/MSP 2” are on (i.e. that the “on” checkboxes are checked).
- Start the application you want to send MIDI data to.
- In the other application, set the MIDI input source to either “from Max/MSP 1” or “from Max/MSP 2.”
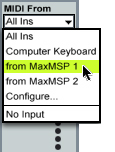
The following example shows how to select “from Max/MSP 1” as a MIDI input
destination in Ableton Live using the MIDI channel strip:

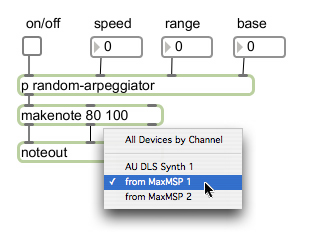
- Double-click on any Max MIDI output object (noteout, midiout, ctlout, etc.) you’re using as an MIDI output in your patch and select the source you set for MIDI input in your other application (either “from Max/MSP 1” or “from Max/MSP 2”) from the pop-up menu as the MIDI output source.
The following example shows how to select “from Max/MSP 1” as a MIDI output destination in a Max patch:

Max will now send MIDI data to your other application.
By default, Max creates two “virtual” MIDI ports for both input and output.
To create additional virtual ports to your MIDI system in addition to
to/from Max/MSP 1 and to/from Max/MSP 2, you will need to send
messages to the Max application.
At the present time, CoreMIDI is the only driver which supports the creation of virtual MIDI ports.
Adding Additional Virtual MIDI Ports
- Double-click anywhere in an unlocked Patcher window to show the Object Palette
- Click on the message box icon. The Object Palette will disappear and a message box will appear with an active text cursor.
-
To create a virtual input port, type<portname> <drivername>into the message box, replacing <portname> with the name you want to give to your virtual input port and <drivername> with the name of the driver you want to use.Note that the message starts with a semicolon.
- Lock the patcher window, and click in the message box to send the message to Max.
The process for creating virtual output ports is the same, except that you type
<portname> <drivername>
into the message box.
Virtual MIDI ports are not saved with your other Max setup preferences; they must be recreated whenever you restart Max. You can do this by adding a loadbang object and a message box to your Max patch.