Comb filter: comb~
The minimum delay time that can be used for feedback into a delay line using tapin~ and tapout~ is determined by the signal vector size. However, many interesting filtering formulae require feedback using delay times of only a sample or two. Such filtering processes have to be programmed within a single MSP object.
An example of such an object is comb~, which implements a formula for comb filtering. Generally speaking, an audio filter is a frequency-dependent amplifier; it boosts the amplitude of some frequency components of a signal while reducing other frequencies. A comb filter accentuates and attenuates the input signal at regularly spaced frequency intervals -- that is, at integer multiples of some fundamental frequency.
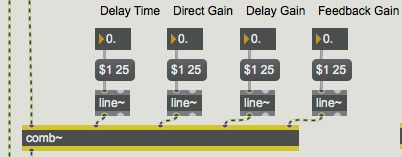
The comb~ object sends out a signal that is a combination of a) the input signal, b) the input signal it received a certain time ago, and c) the output signal it sent that same amount of time ago (which would have included prior delays). In the inlets of comb~ we can specify the desired amount of each of these three (a, b, and c), as well as the delay time (we'll call it d).
yt = axt + bx(t-d) + cy(t-d)
The bx(t-d) term in the equation is called the feedforward and the cy(t-d) term is the feedback.
The fundamental frequency of the comb filter depends on the delay time, and the intensity of the filtering depends on the other three parameters. Note that the scaling factor for the feedback (the right inlet) should usually not exceed 1, since that would cause the output of the filter to increase steadily as a greater and greater signal is fed back.
Trying out the comb filter
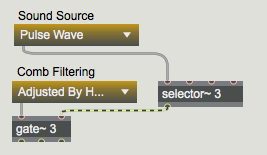
The tutorial patch enables you to try out the comb filter by applying it to different sounds. The patch provides you with three possible sound sources for filtering -- the audio input of your computer, a band-limited pulse wave, or white noise -- and three filtering options -- unfiltered, comb filter with parameters adjusted manually, or comb filter with parameters continuously modulated by other signals.
A comb filter has a characteristic harmonic resonance because of the equally spaced frequencies of its peaks and valleys of amplification. This trait is particularly effective when the comb is swept up and down in frequency, thus emphasizing different parts of the source sound. We can cause this frequency sweep simply by varying the delay time.
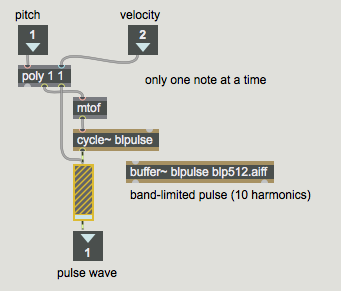
Band-limited pulse
The effects of a filter are most noticeable when there are many different frequencies in the source sound, which can be altered by the filter. If we want to apply a comb filter to a pitched sound with a harmonic spectrum, it makes most sense to use a sound that has many partials such as a sawtooth wave or a square wave.
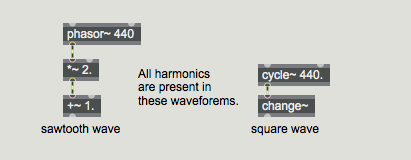
The problem with such mathematically derived waveforms, though, is that they may actually be too rich in high partials. They may have partials above the Nyquist rate that are sufficiently strong to cause inharmonic aliasing. (This issue is discussed in more detail in Filter Tutorial 3.)
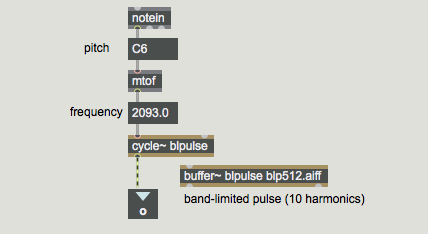
For this tutorial we're using a waveform called a band-limited pulse. A band-limited pulse has a harmonic spectrum with equal energy at all harmonics, but has a limited number of harmonics in order to prevent aliasing. The waveform used in this tutorial patch has ten harmonics of equal energy, so its highest frequency component has ten times the frequency of the fundamental. That means that we can use it to play fundamental frequencies up to 2,205 Hz if our sampling rate is 44,100 Hz. (Its highest harmonic would have a frequency of 22, 050 Hz, which is equal to the Nyquist rate.) Since the highest key of a 61-key MIDI keyboard plays a frequency of 2,093 Hz, this waveform will not cause aliasing if we use that as an upper limit.
Velocity-to-amplitude conversion: gain~
The subpatch p contains a simple but effective way to play a sound in MSP via MIDI. It uses a poly object to implement voice stealing, limiting the incoming MIDI notes to one note at a time. (It turns off the previous note by sending it out with a velocity of 0 before it plays the incoming note.) It then uses mtof to convert the MIDI note number to the correct frequency value for MSP, and it uses the MSP object gain~ to scale the amplitude of the signal according to the MIDI velocity.
The gain~ object takes both a signal and a number in its left inlet. The number is used as an amplitude factor by which to scale the signal before sending it out. One special feature of gain~ (aside from its utility as a user interface object for scaling a signal) is that it can convert the incoming numbers from a linear progression to a logarithmic or exponential curve. This is very appropriate in this instance, since we want to convert the linear velocity range (0 to 127) into an exponential amplitude curve (0 to 1) that corresponds roughly to the way that we hear loudness. Each change of velocity by 10 corresponds to a change of amplitude by 6 dB. The other useful feature of gain~ is that, rather than changing amplitude abruptly when it receives a new number in its left inlet, it takes a few milliseconds to progress gradually to the new amplitude factor. The time it takes to make this progression can be specified by sending a time, in milliseconds, in the right inlet. In this patch, we simply use the default time of 20 ms.
Varying parameters of the filter
As illustrated in this patch, it's usually best to change the parameters of a filter by using a gradually changing signal instead of making an abrupt change with single number. So parameter changes made to the ‘Adjusted By Hand’ comb~ object are sent first to a line~ object for interpolation over a time of 25 ms.
The ‘Modulated’ comb~ object has its delay time varied at low frequency according to the shape of the band-limited pulse wave (just because it's a more interesting shape than a simple sinusoid). The modulation could actually be done by a varying signal of any shape. You can vary the rate of this modulation using the mod wheel of your synth (or just by dragging on the number box). The gain of the x and y delays (the two rightmost inlets) is modulated by a sine wave ranging between 0.01 and 0.99 (for the feedback gain) and a cosine wave ranging from 0.01 to 0.49 (for the feedforward gain). As the amplitude of one increases, the other decreases.
Summary
The comb~ object allows you to use very short feedback delay times to comb filter a signal. A comb filter creates frequency-dependent increases and decreases of amplitude in the signal that passes through it, at regularly spaced (i.e., harmonically related) frequency intervals. The frequency interval is determined by the inverse of the delay time. The comb filter is particularly effective when the delay time (and thus the frequency interval) changes over time, emphasizing different frequency regions in the filtered signal.
The user interface object gain~ is useful for scaling the amplitude of a signal according to a specific logarithmic or exponential curve. Changes in amplitude caused by gain~ take place gradually over a certain time (20 ms by default), so that there are no unwanted sudden discontinuities in the output signal.
See Also
| Name | Description |
|---|---|
| Sound Processing Techniques | Sound Processing Techniques |
| comb~ | Apply a comb filter effect |
| gain~ | Gain control |