Video and Graphics Tutorial 9: Building live video effects
Intro
Jitter really shines when it comes to creating custom visual effects. With a little ingenuity, you can quickly move beyond the toolbox of distortion, compositing, and color effects found in video software. In this section, we’ll learn some of the basic skills needed to build your own effect.
In many cases, standard Matrix effects objects will do the trick, but when you get into HD (high definition) video processing and complex effect chains, they won’t always deliver the performance you are looking for. In this tutorial, we will also learn how to lean on the jit.gl.pix and jit.gl.slab objects for some extra image processing power.
Setup
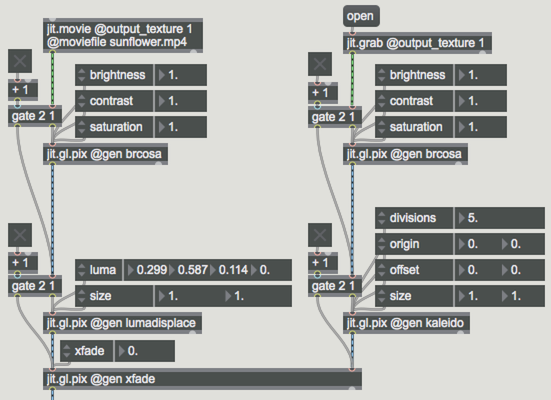
Here we see a jit.world object and a jit.movie and jit.grab object patched into a new object, jit.gl.pix.
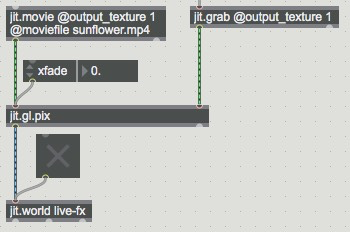
Notice that the jit.world and jit.grab objects are both set with the @output_texture 1 attribute, which causes them to output texture data. Texture data is similar to the standard jitter matrix, but it is handled directly by the GPU and can only be processed by objects that handle textures - the jit.gl.pix object is one of them. The jit.gl.pix object part of the Gen library of objects, and it is designed to process pixels - 4-plane color texture data representing RGBA (red, green, blue, alpha). Note the difference the order of the data - RGBA rather than the ARGB order that standard Jitter objects use. The jit.gl.pix object is similar to jit.gen, but it lets us patch together processes that are automatically compiled to efficient code that runs on the GPU (using a GLSL shader).
- About output_texture — OpenGL Texture Output
Turn on the jit.world and click on the mesage box to enable the jit.grab object. Our jit.gl.pix object in this example acts as a crossfader between the two incoming textures. Adjust the xfade parameter in the main patcher to see it in action. A floating point value of 0. will fade all the way to the left input’s texture and a value of 1.0 will fade all the way to the right, with a linear crossfade at values between. (For a list and discussion of gen objects, see here.) To see how the jit.gl.pix object does its job, double-click on the object to open its patcher window.
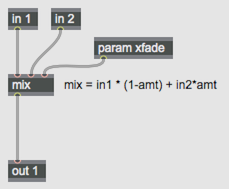
The internal patcher can be used to create a wide variety of effects, allowing it to replace many of the standard Jitter objects. In this case, we are simply using the Gen mix object to crossfade between the two inputs based on a value between 0. and 1. The param xfade object creates a parameter called xfade. Whenever our object receives the message followed by a value (e.g. ), it will output the value from our param object. Go ahead and close the jit.gl.pix window. A jit.gl.pix object will save its internal patch state with the parent patch. We could also save this patch as a .genjit file and call it up later using the patcher name (@gen <thepatchname>, but this one is already in the system as “xfade.genjit”. Try changing the object name to jit.gl.pix @gen xfade (no file extension is needed).

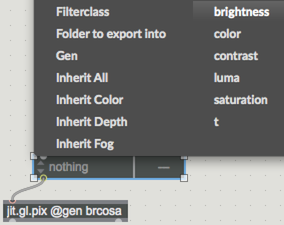
Let’s add another jit.gl.pix using the name of a gen patcher in our file system to call up its internal state. Create a jit.gl.pix @gen brcosa object.

If you double-click this object, you will see that it uses a variety of Gen objects to create an equivalent of the jit.brcosa object. Add the object between your jit.movie and the first jit.gl.pix object so you adjust the brightness, contrast and saturation of the movie texture before mixing it with the live video. Create an attrui object and connect it to the jit.gl.pix, then open the attrui menu. The parameters declared inside of a jit.gl.pix object (with the param object) will show up on the bottom of the list on the left, after “Warp”.
Add three attrui objects - one each for brightness, contrast and saturation - and play with them to see how they affect the image.
Bypassing an effect
A key element in any effect chain is the ability to bypass effects as needed - this allows you to quickly introduce or remove an effect without the need to unlock and repatch. Create a toggle, connect it to the left inlet of a + 1 object, and connect that to the left inlet of a gate 2 1 object. Nove the connection going from jit.movie into jit.gl.pix into the right inlet of the gate, connect the left outlet of gate object to the jit.gl.pix used for the crossfade, and connect the right outlet of the gate to the jit.gl.pix @brcosa object.
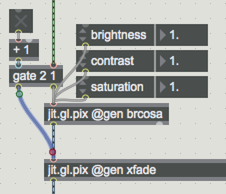
When you turn the toggle on, the brcosa effect is enabled. When you turn it off, it is bypassed.
Another way to bypass an effect is to use a crossfade - allowing you to mix the amount of the effect you want, or to ease it in/out. Add a bline object with an argument-set transition time to autofade in/out of an effect. Lock your patcher and double-click on the bline_crossfade subpatch to see this in action.
Before we move on, duplicate the brcosa effect and bypass and implement them for your jit.grab.
Let’s add a couple more effects to our chain. Make a jit.gl.pix @gen lumadisplace for the jit.movie and a jit.gl.pix @gen kaleido for the camera. Insert them below the brcosa effects, each with a bypass. Double-click the jit.gl.pix objects to open them up or use attrui objects to find the parameters (again, look at the bottom left of the dropdown menu after the “Warp” entry).
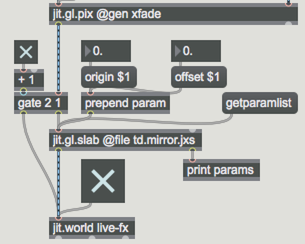
The last object we will explore is the jit.gl.slab object. Like jit.gl.pix, slab (shader lab) objects are made to process data on the GPU. Where jit.gl.pix allows shaders to be patched together with Gen objects, jit.gl.slab directly hosts GLSL fragment shaders.
Make a jit.gl.slab @file td.mirror.jxs to load a simple mirror effect. Double-click the object to reveal the shader code. You can find the relevant parameters by looking for “bind param” entries, or you can find them by using a command to the object. Close the text window and make a message, then connect it to the jit.gl.slab object.
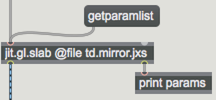
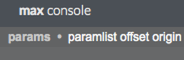
When you send the message, it will return the list of parameters out of the dumpout (right outlet). Connect a print object to the dumpout to see them. In this case, it’s just ‘offset’ and ‘origin’.
Unlike the jit.gl.pix object, attrui does not give us access to custom slab parameters, so you need to access it with the message . In this case, creating a pak param offset 0. 0. object with a couple of flonum inputs will do the work.
Explore Further
For a more in-depth treatment of building a live video effects system, see the Video Processing System article series on Cycling74.com For more detailed info on writing shaders for jit.gl.slab, take a look at Your First Shader as well. Max ships with a number of Shaders designed to work with jit.gl.slab and several jit.gl.pix examples as well. Look for these in Max’s File Browser to explore further.