Video and Graphics Tutorial 10: Composing the Screen
Intro
We’ll look at some new ways of working with with video and geometry together in the render world in this tutorial. From layering and compositing to layout and composition, OpenGL lets us create flexible and dynamic scenes.
Setup
Open the patch. You’ll see we have the typical jit.world (with the name , which we will use later) and a few jit.movie objects with their output_texture attributes enabled. Instead of patching these straight into jit.world as we have been doing, we’ll use each of these in a different way to explore some more possbilities. Turn on jit.world and let’s get started.
Make Some Layers
First add a new object, jit.gl.videoplane @depth_enable 0 @blend_enable 1. Add attrui objects for the scale, position and rotatexyz attributes and connect them, then patch the left-most video into it.
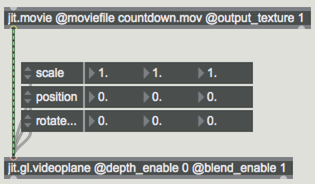
You’ll see it appear in the GL window just as though you had patched into jit.world. The jit.world actually has an embedded videoplane, but this method gives us some more flexibility. Move the plane around using the position and rotatexyz attributes and rescale it to get a sense of how it works in GL space. Now, duplicate your jit.gl.videoplane setup and connect the second jit.movie object to it.
You will probably notice that the two images overlap, with one obscuring the other. Add a message box/toggle pair or an attrui to each jit.gl.videoplane object to control the layering behavior. Higher layers are rendered in front (on top) of lower layers. You can now control which image sits above the other.

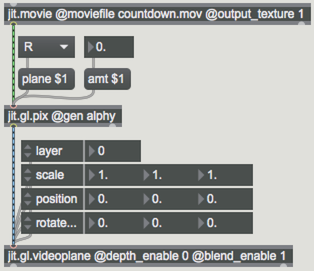
Next let’s add blending. The blend_enable attribute allows blending across layers. The default blend mode will allow the alpha channel information to perform the blend. In this patch we will use a jit.gl.pix object that lets us substitute any plane in our texture for the alpha channel. Add the jit.gl.pix @gen alphy in between the jit.movie and the jit.gl.videoplane. Using the umenu/message box pair to set the plane parameter selects which plane will act as the alpha - red, green, blue, alpha or luminance (the average of R, G and B). Similarly, the amt parameter adjusts the overall transparency of the resulting alpha layer. Add a copy of the jit.gl.pix to the second jit.gl.videoplane and experiment with blending the two images.
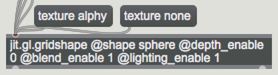
An OpenGL scene can have any number of video and geometry elements together in a scene. Add a jit.gl.gridshape object with @depth_enable 0 @blend_enable 1 and @lighting_enable 1. Now give it attruis for scale, position, rotatexyz, and layer, just like you did for the videoplanes (you can just copy/paste them).
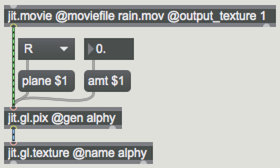
Now let’s add a jit.gl.texture @name alphy object under the third movie, with the jit.gl.pix alpha patch between them. The @name attribute to will allow us to call on the texture in a moment.
Create a message box that contains the message and connect it to the jit.gl.gridshape object. When you click it, the movie going into the jit.gl.texture will texture the surface of our geometry. To remove the texture, send your jit.gl.gridshape object the message . If you know you want to keep a texture attached to your shape, simply patch the output of the texture source to the GL object you wish to texture.
Using the alpha controls and layer attributes, you can now compose and layer the screen however you want.
- Depth Testing vs Layering — Depth Testing vs Layering
A common element to any 3D render space that we have not looked at yet is the camera. Add a jit.gl.camera object with attrui objects for the position, rotatexyz, lookat, and locklook attributes.
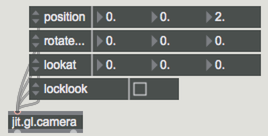
There are a lot of ways to create sophisticated camera movement, but for now, just try exploring these parameters. The locklook attribute allows you to move the camera while having it focus on a particular point in space no matter where it moves. Notice that the rotation is automatically adjusted when you change the position in this mode. The lookat parameter determines where the camera is focused in virtual space. If you want to remove blending and have layers determined based on depth, set @depth_enable to 1.
Finally, add an enable attribute to your objects to turn them on (1) or off (0).
Using jit.gl.node and jit.gl.cornerpin
Now that we have composed a scene, let’s look at an object called jit.gl.node, which allows us to render the entire scene as a texture which can then be processed or reused in a number of ways. One way to think of jit.gl.node is that it’s like a small jit.world inside of your jit.world, with the ability to add "child" objects and even more jit.gl.node objects.
Make an object called jit.gl.node @capture 1. Now connect its center outlet to the inlets of our jit.gl.videoplane and jit.gl.gridshape objects. Don’t worry if your objects seem to disappear.
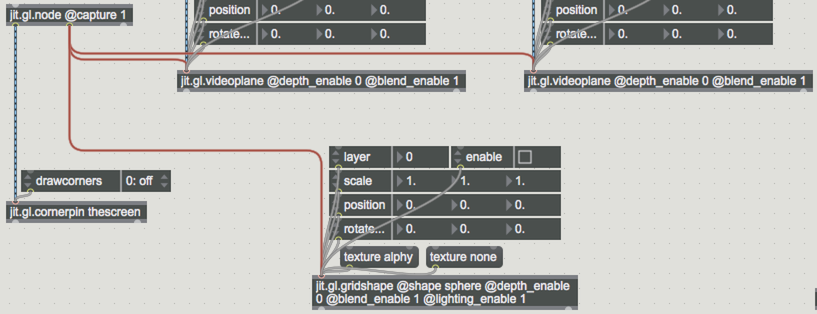
Objects connected to the middle outlet of jit.gl.node are all rendered in the node instead of directly to the jit.world. The @capture 1 attribute causes jit.gl.node to output the internal render as a texture instead of displaying it in the master context.
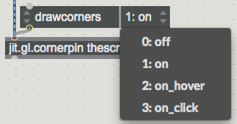
Now add a jit.gl.cornerpin thescreen object and connect the left outlet of jit.gl.node to it. You’ll see that your scene shows up again and has 4 targets at the corners of the window. Click and drag a target to adjust the corners, in turn skewing the image to fit in the resulting map. You can hide the corners using the drawcorners attribute.
The jit.gl.cornerpin object is ideal for mapping an input texture to an output screen of unconventional dimensions.
Background color
You may have noticed that the jit.window has a dark grey background. In many cases you will want to adjust this. You can do so by using the jit.world attribute erase_color. Adjusting the RGBA values will adjust the background color. Try sending the message to get a black background, or choose a value from 0. - 1. for each of the four values in the list to get any colored background you desire. Note that if you set your alpha value low, you will be able to get a smearing effect when you move objects around. The erase_color attribute is used to determine how much of a given color is removed from the render scene each frame.
Explore Further
Try creating images (PNG) and videos (compress as Animation, ProRes 4444, etc.) with transparent backgrounds to import into Jitter and use as practice layers with blending enabled. OpenGL objects also have a “blend” attribute that gives even more control over how layers draw, besides the default alphablend mode. Try changing the value of this attribute for more image effects.
As jit.gl.node allows for capturing scenes to a texture, you can also process this texture like any other image. Try adding jit.gl.slab and jit.gl.pix effects chains after the node output. This opens up the ability to do lots of post-render effects like blurs and glows or image control.