Max for Live MIDI Tools
Max for Live MIDI Tools are a distinct type of Max for Live device designed to manipulate and generate MIDI data in a Live MIDI Clip. These tools offer versatility by allowing you to craft patches capable of generating MIDI data from the ground up or of reshaping existing MIDI data. For example, you could create a MIDI Tool that produces rhythms according to a specific generative algorithm, or use a Transformation to fine tune the properties of notes in a clip. Given this, MIDI Tools unlocks a myriad of creative possibilities and streamline the execution of repetitive algorithmic tasks on MIDI data within the Live environment.
Types of MIDI Tools
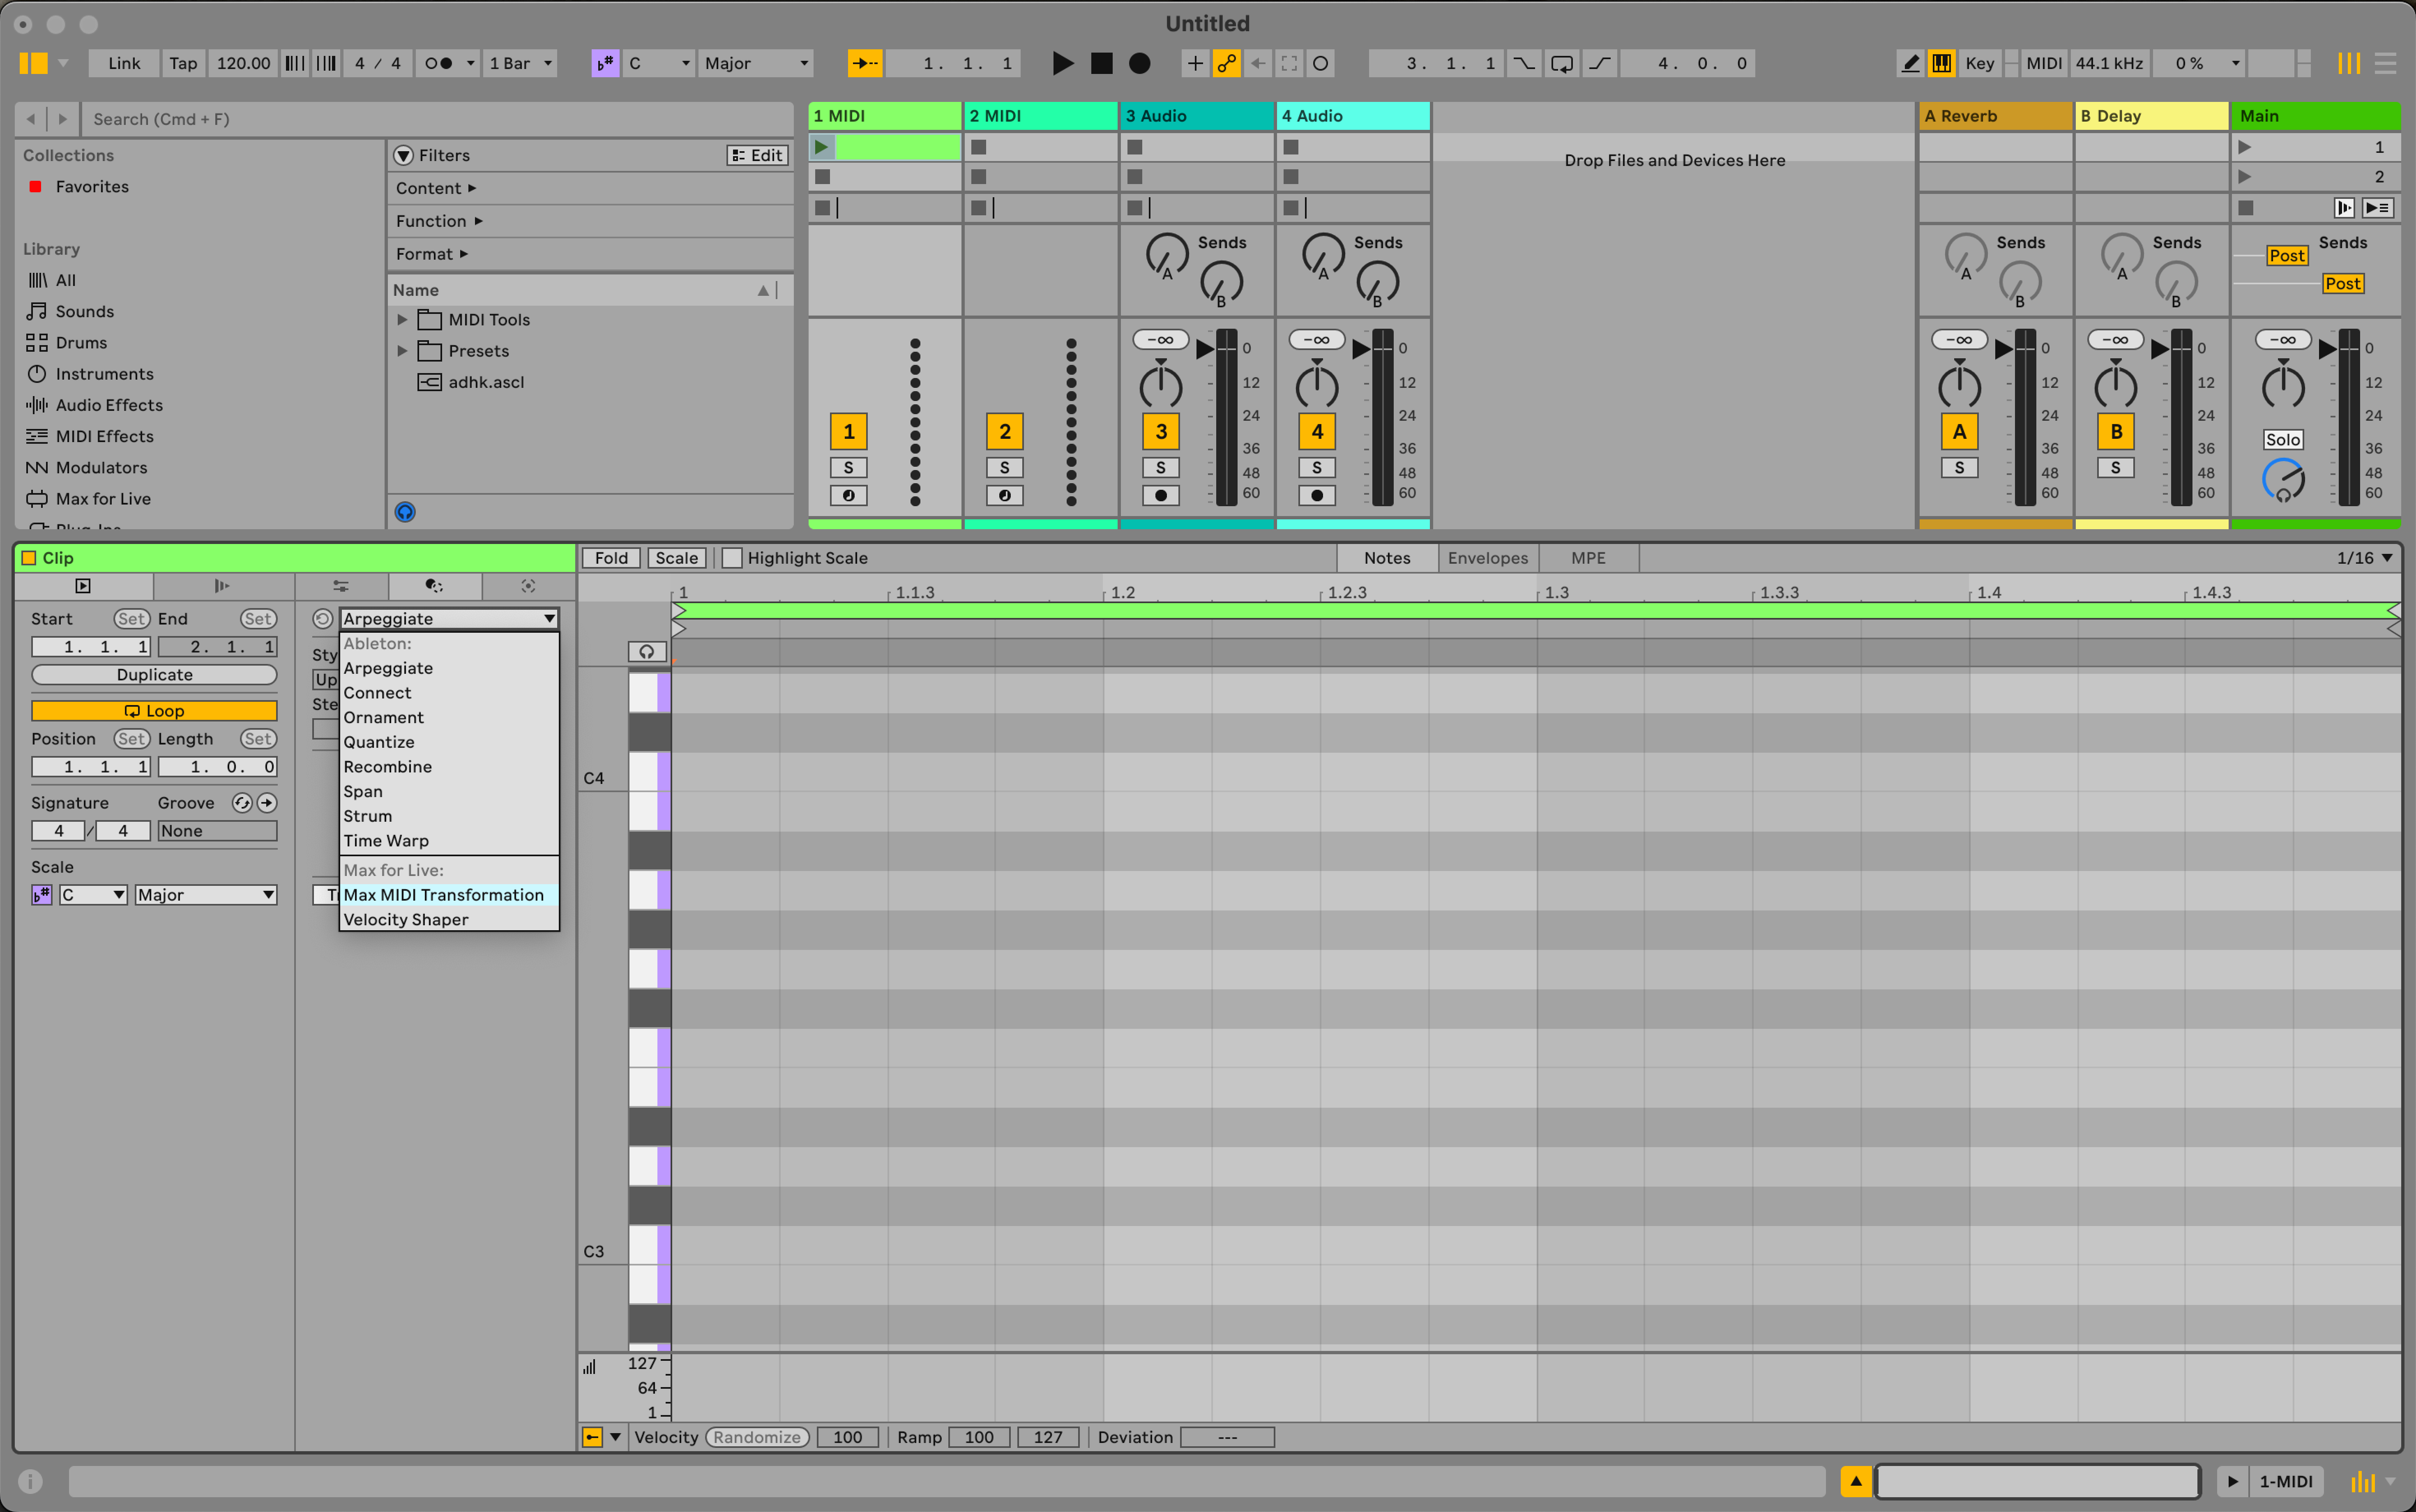
Within the domain of Max for Live MIDI Tools, there are two distinct types of devices in the format: a "Generator" ![]() and a "Transformation"
and a "Transformation" ![]() . A Generator can be used to create new MIDI data from scratch while a Transformation can be used to transform existing MIDI data in a Clip. As you will come to understand later, the differences in patching between these two types of devices are slim and sometimes non-existent. However, there are subtle divergences in how data passes between Live and Max and the expectations with respect to user experience. At the end of the day, the takeaway message is that generation and transformation are two distinct MIDI Tool device types that you need to be aware of. If your aim is to add new notes to a clip, you'll want to create a Generator. If you want to edit the properties of existing notes, you'll want to create a Transformation.
. A Generator can be used to create new MIDI data from scratch while a Transformation can be used to transform existing MIDI data in a Clip. As you will come to understand later, the differences in patching between these two types of devices are slim and sometimes non-existent. However, there are subtle divergences in how data passes between Live and Max and the expectations with respect to user experience. At the end of the day, the takeaway message is that generation and transformation are two distinct MIDI Tool device types that you need to be aware of. If your aim is to add new notes to a clip, you'll want to create a Generator. If you want to edit the properties of existing notes, you'll want to create a Transformation.
Creating a New Max for Live MIDI Tool
To create a new Max for Live MIDI Tool, you can load either the "MIDI Generator Template" or "MIDI Transformation Template" device that are both available in their respective dropdown menus of the Tool Tabs. Once loaded, you can save, which will prompt you to create a copy of it under a new name. Now, you should see a new MIDI Tool available in the Tool Tabs dropdown menu. Clicking its name will load the device.
Anatomy of a MIDI Tool
The basic anatomy of a MIDI Tool can be structured into three parts: an input, an output and some data manipulation between these two points.
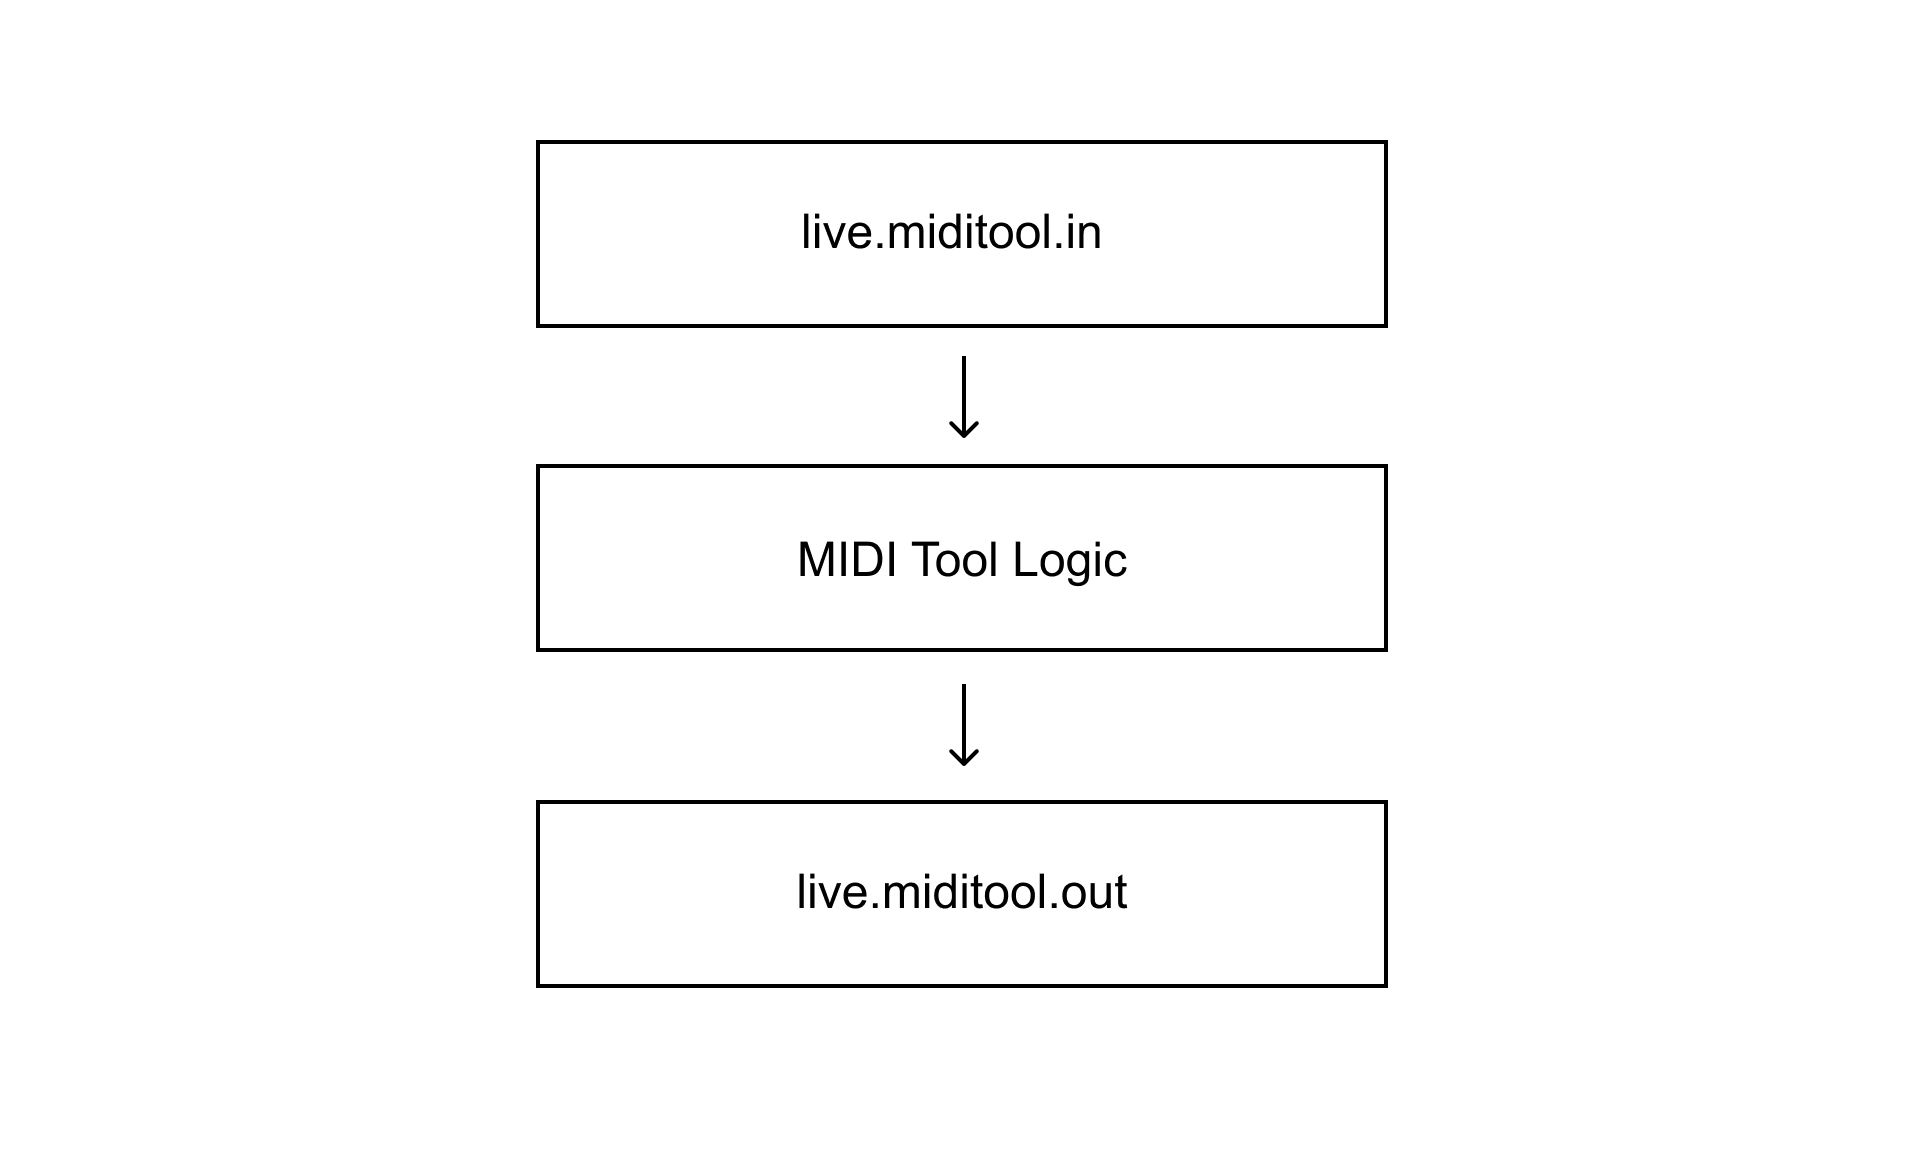
live.miditool.in
In the same way that a MIDI Effect uses notein or midiin to receive MIDI data, or an Audio Effect uses plugin~ to receive audio input, a Max for Live MIDI Tool uses an object called live.miditool.in. This object only works inside of Max for Live MIDI Tools. This object, live.miditool.in, is a kind of "portal" between the currently focused Clip and a loaded Max for Live MIDI Tool. It outputs two valuable bits of information from its outlets: the note information and some contextual information about the Clip itself such as but not limited to the grid interval, selection time and selected scale.
live.miditool.out
Just as live.miditool.in is the only way to receive MIDI data from a Clip, live.miditool.out is the only way to send MIDI data back to a Clip in order to transform some existing notes, or generate new ones. Take note that live.miditool.out also only works inside of a Max for Live MIDI Tool.
MIDI Tool Logic
Between the live.miditool.in and live.miditool.out objects is where the logic of your Max for Live MIDI Tool is defined. In this part of the patch you will receive note and context data from the respective outlets of live.miditool.in as a dict. Using this information, you can then manipulate the note data and send it back to the live.miditool.out object which will update the corresponding Clip in Live. You can also ignore the data that comes out of live.miditool.in and generate your own data from scratch, for instance in a Generator.
Creating A Transformation
Now that you understand what a MIDI Tool is for as well as the general anatomy, let's create a simple Max for Live MIDI Transformation that will transpose all the notes in a Clip by a user-defined amount.
Step 1: Create A New MIDI Tool Transformation
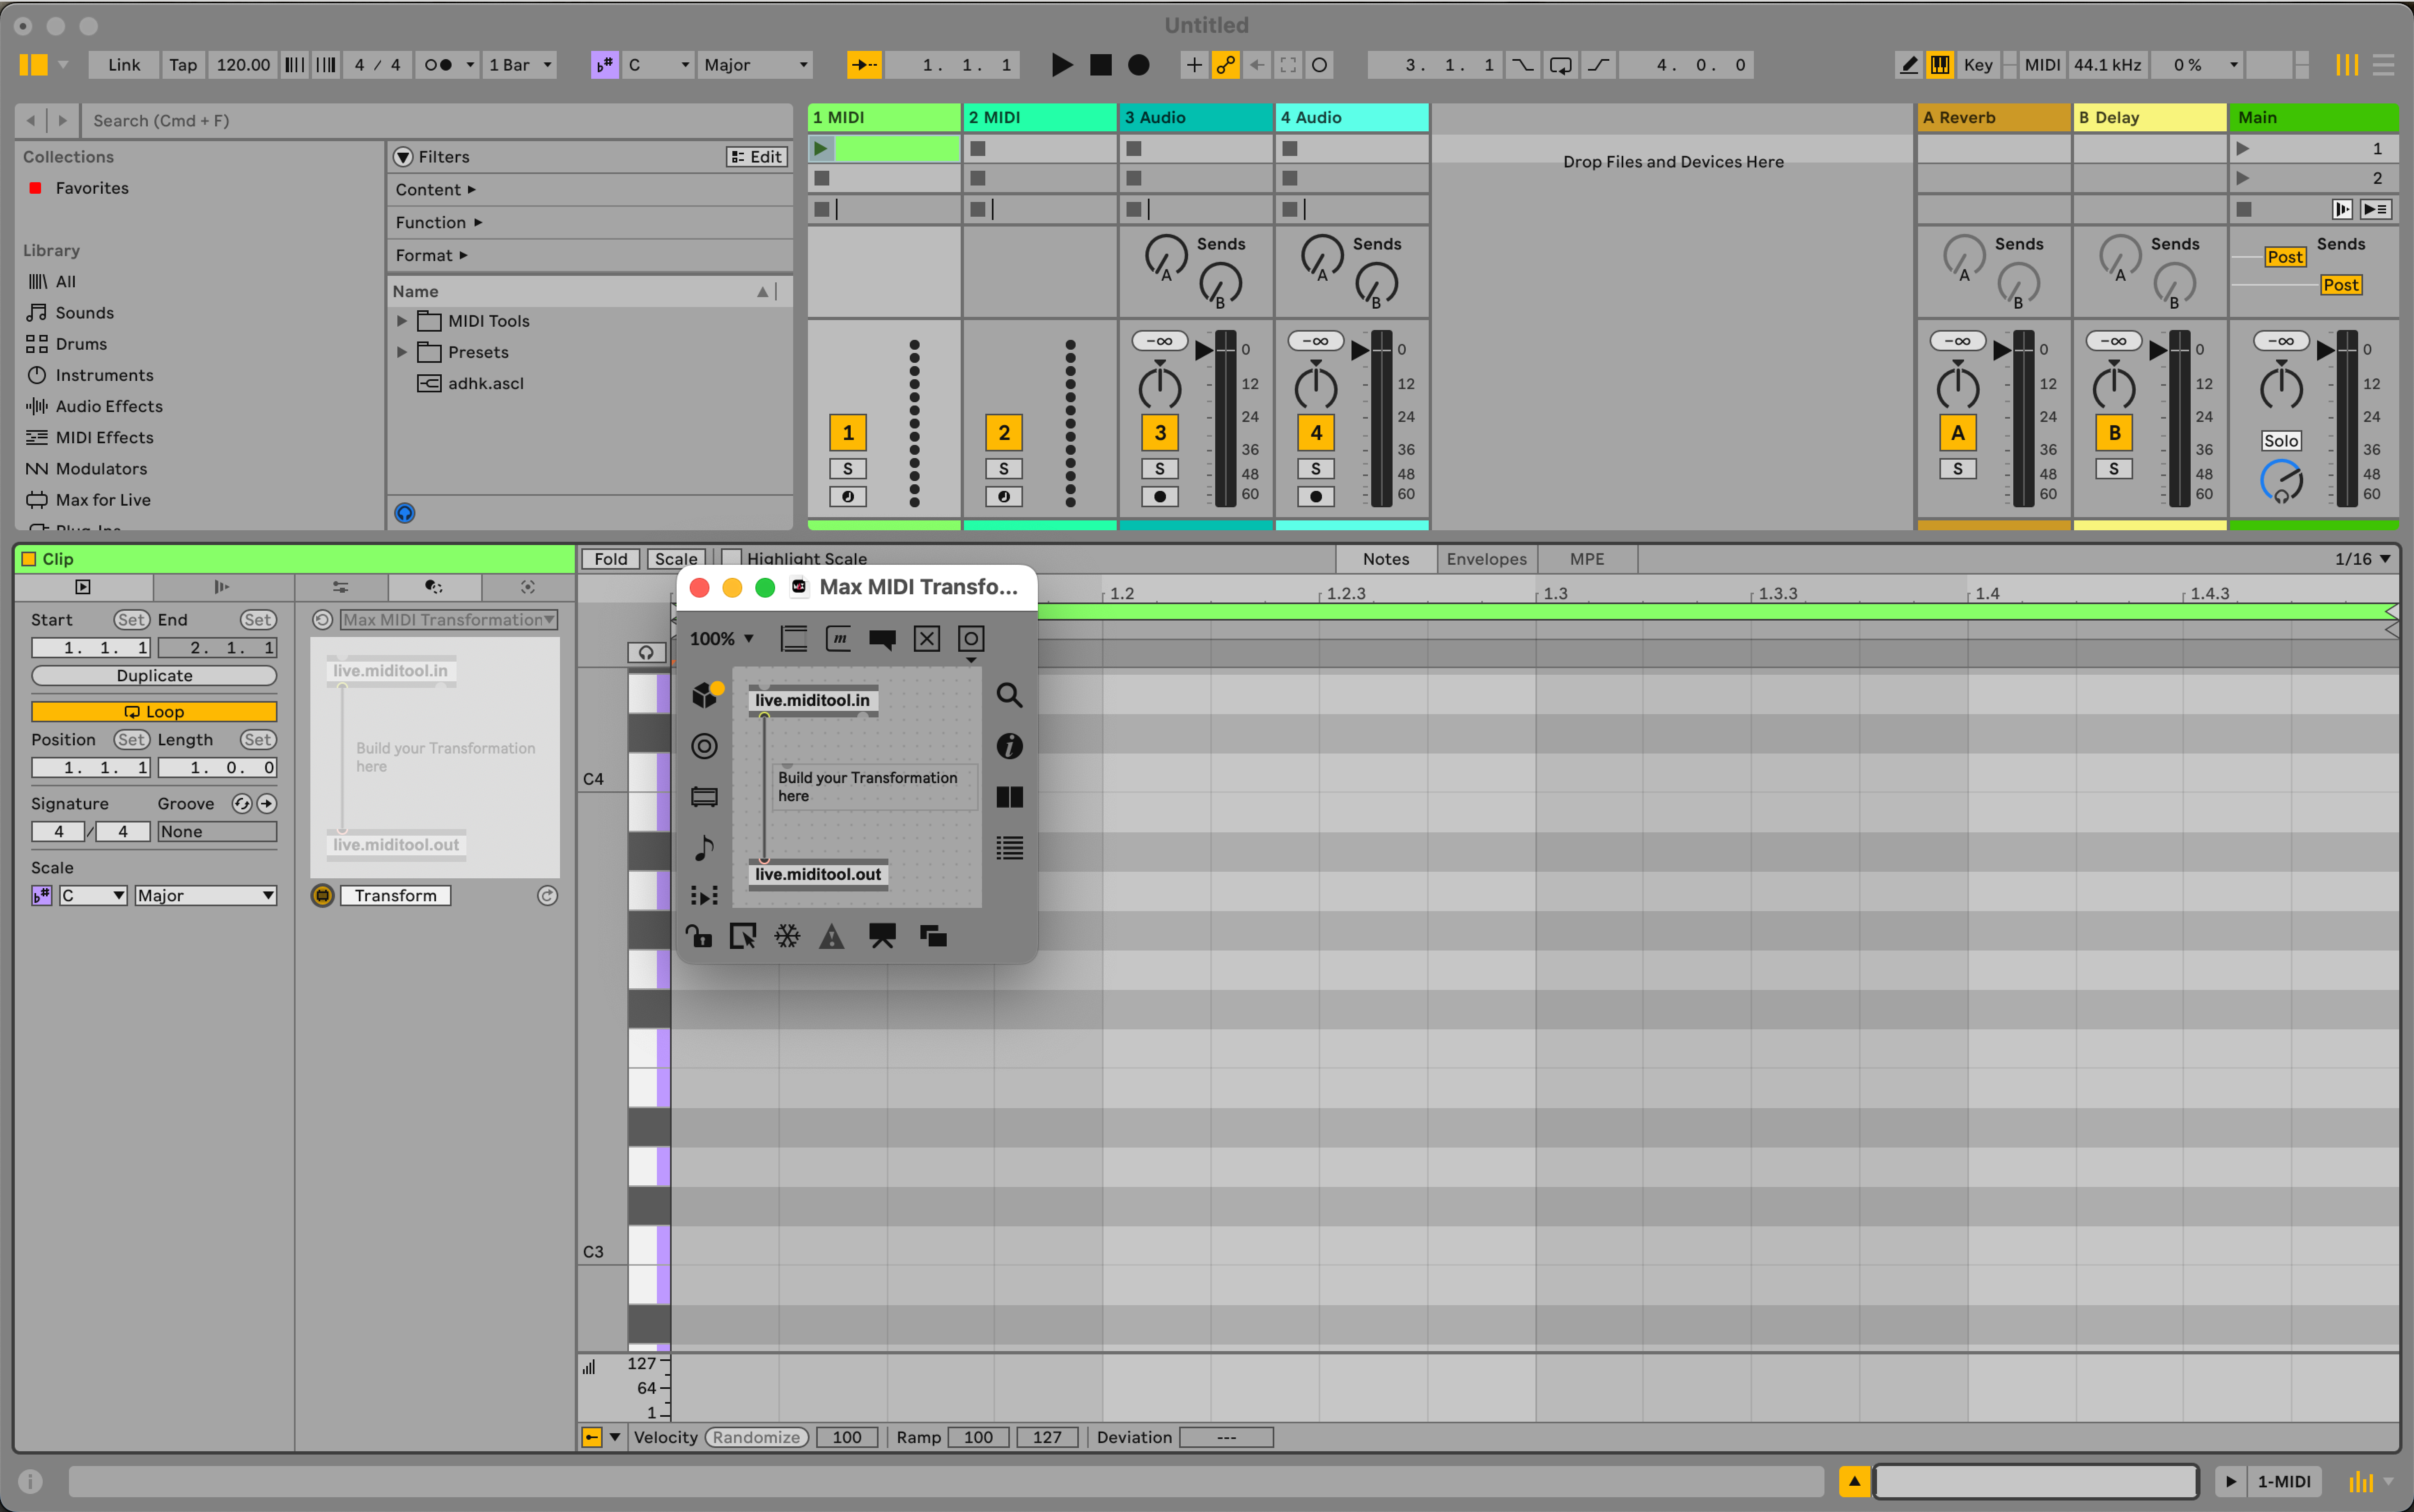
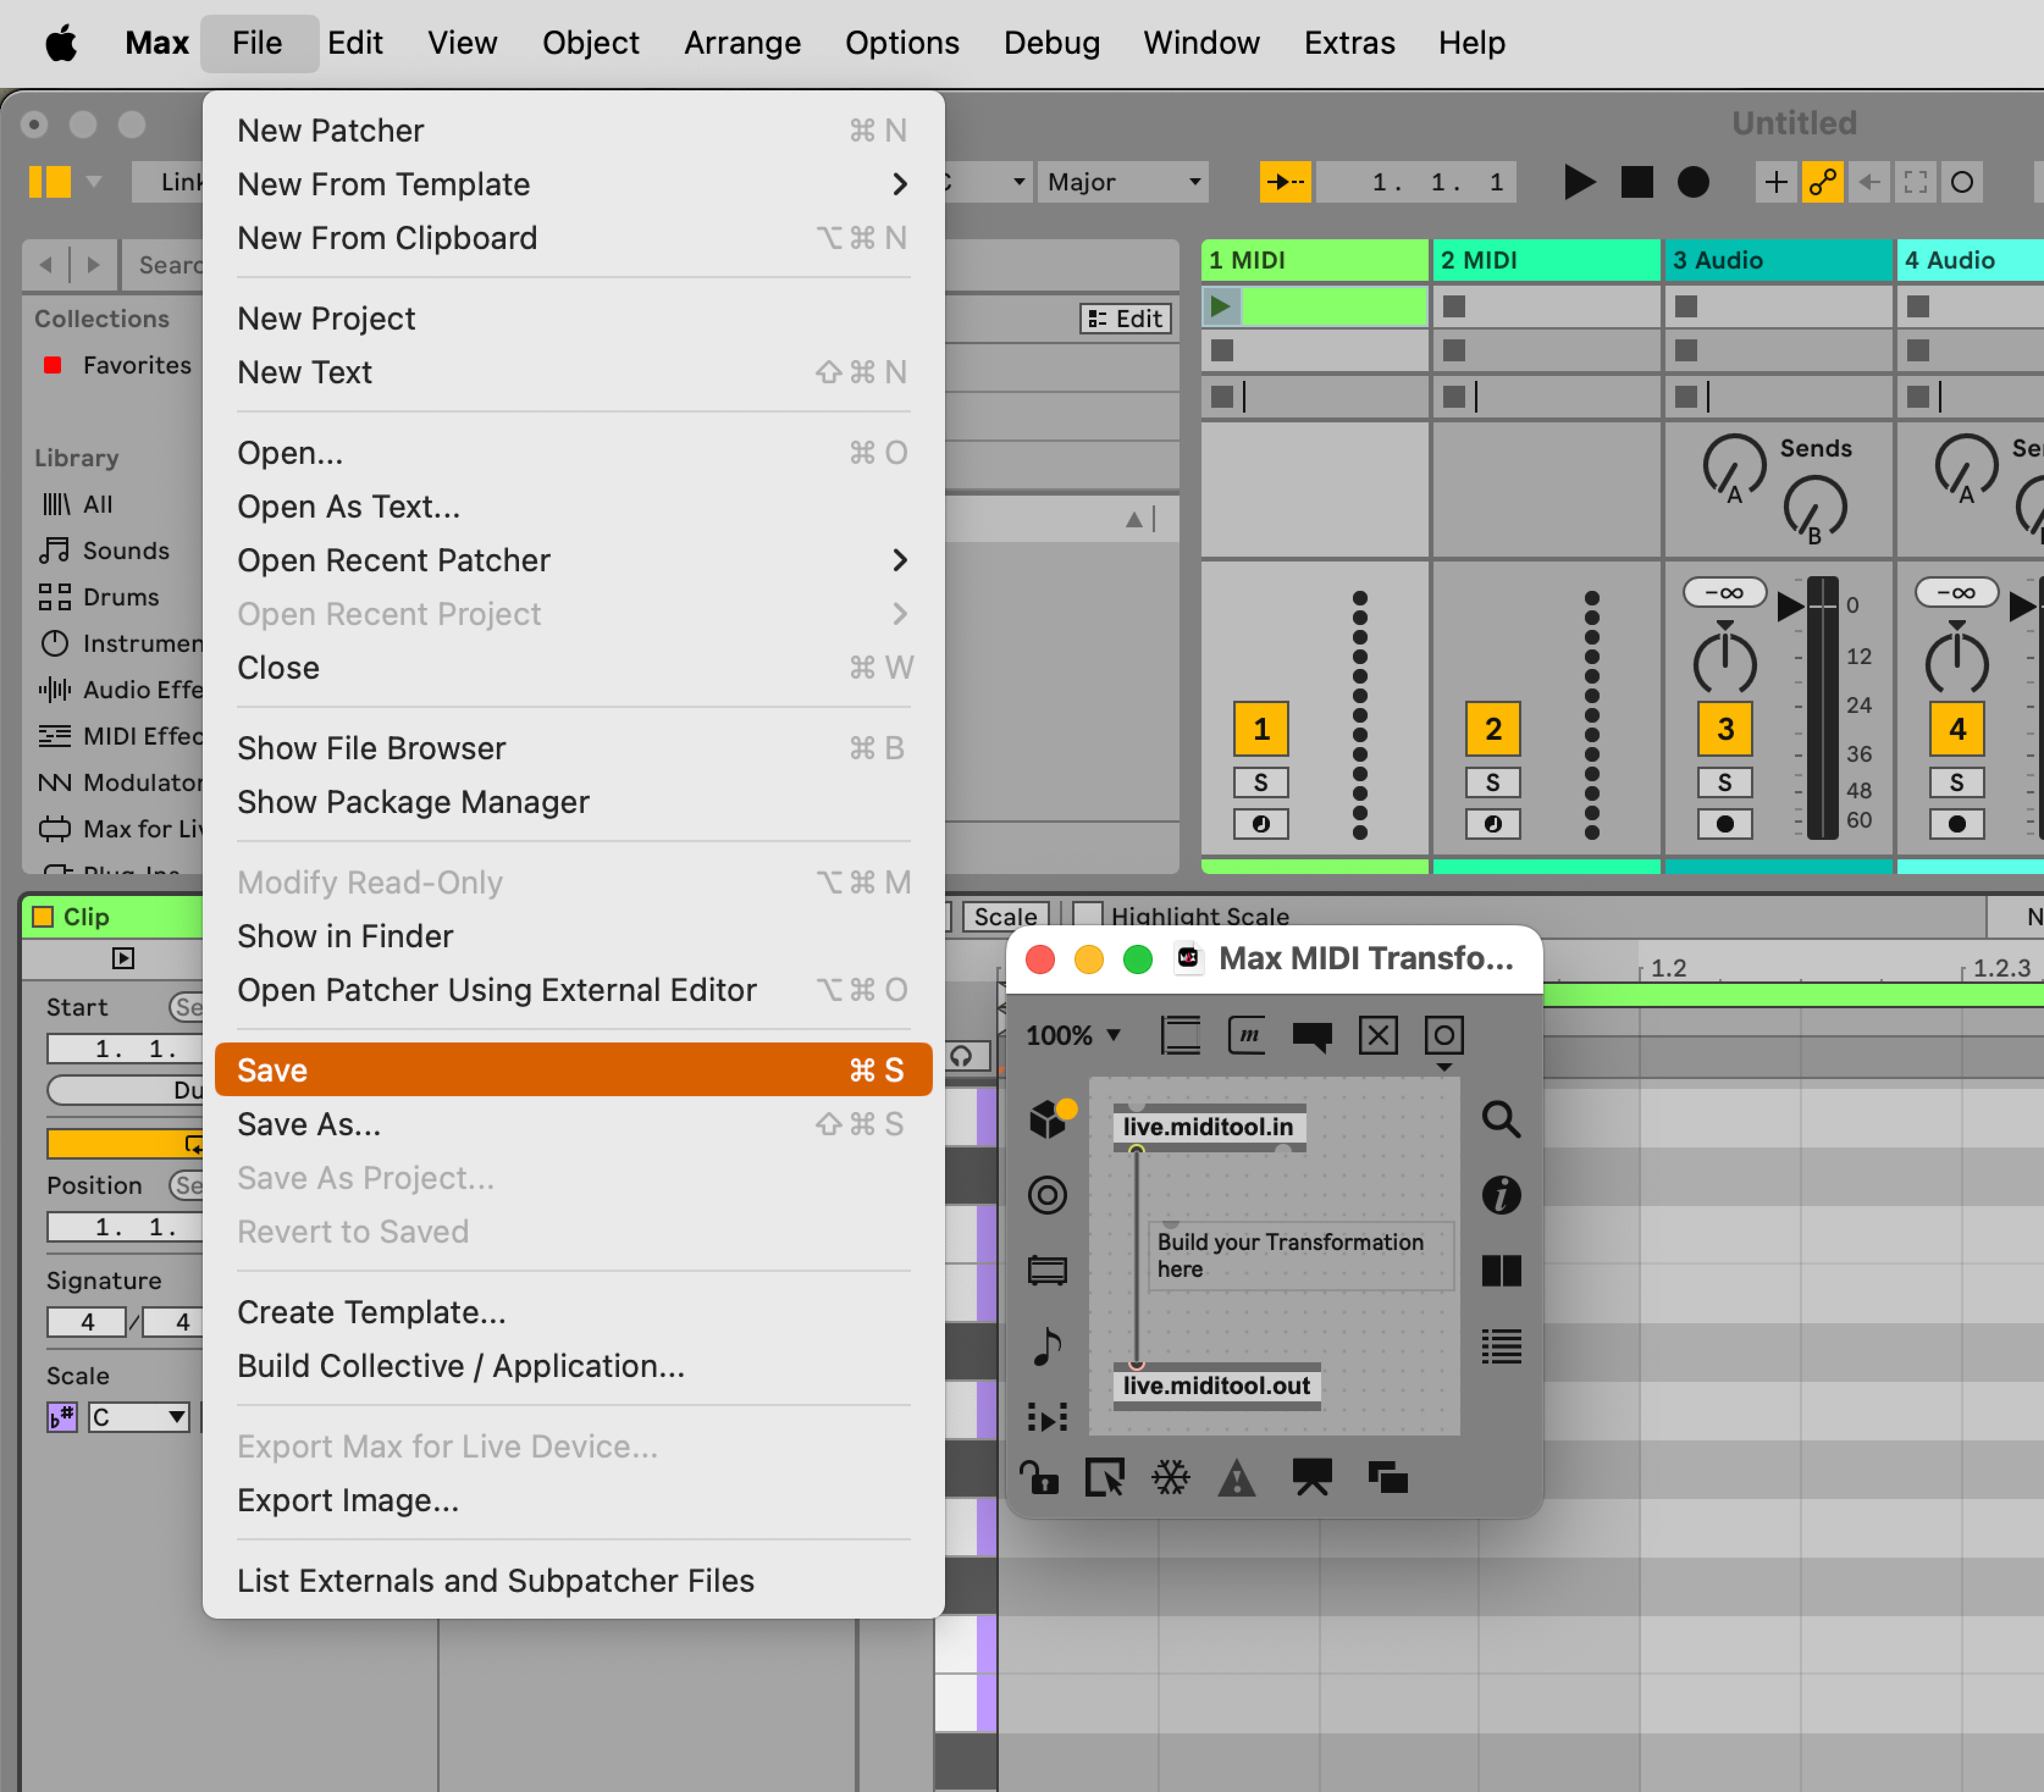
As described above, let's create a new Max for Live MIDI Tool by duplicating the existing "MIDI Transformation Template". Give it a unique name, and then open it in the Max editor by clicking the edit button which is located to the left below the MIDI Tool's interface.
Step 2: Receive Data from the Clip
So now that we have a template MIDI Tool ready to go, let's dive into actually patching, and trying to understand the data output by the live.miditool.in object. Remember, it outputs the note information and some contextual information about the Clip itself from the left and right outlets respectively.
For now, we are mostly going to ignore the right outlet and focus instead on the left outlet which outputs note data. To understand the data better and how it arrives in Max, we can attach a dict.view object to the left outlet of live.miditool.in and then send a to the live.miditool.in object. This will cause the object to output the note data as a dictionary of the Clip that is currently in focus.
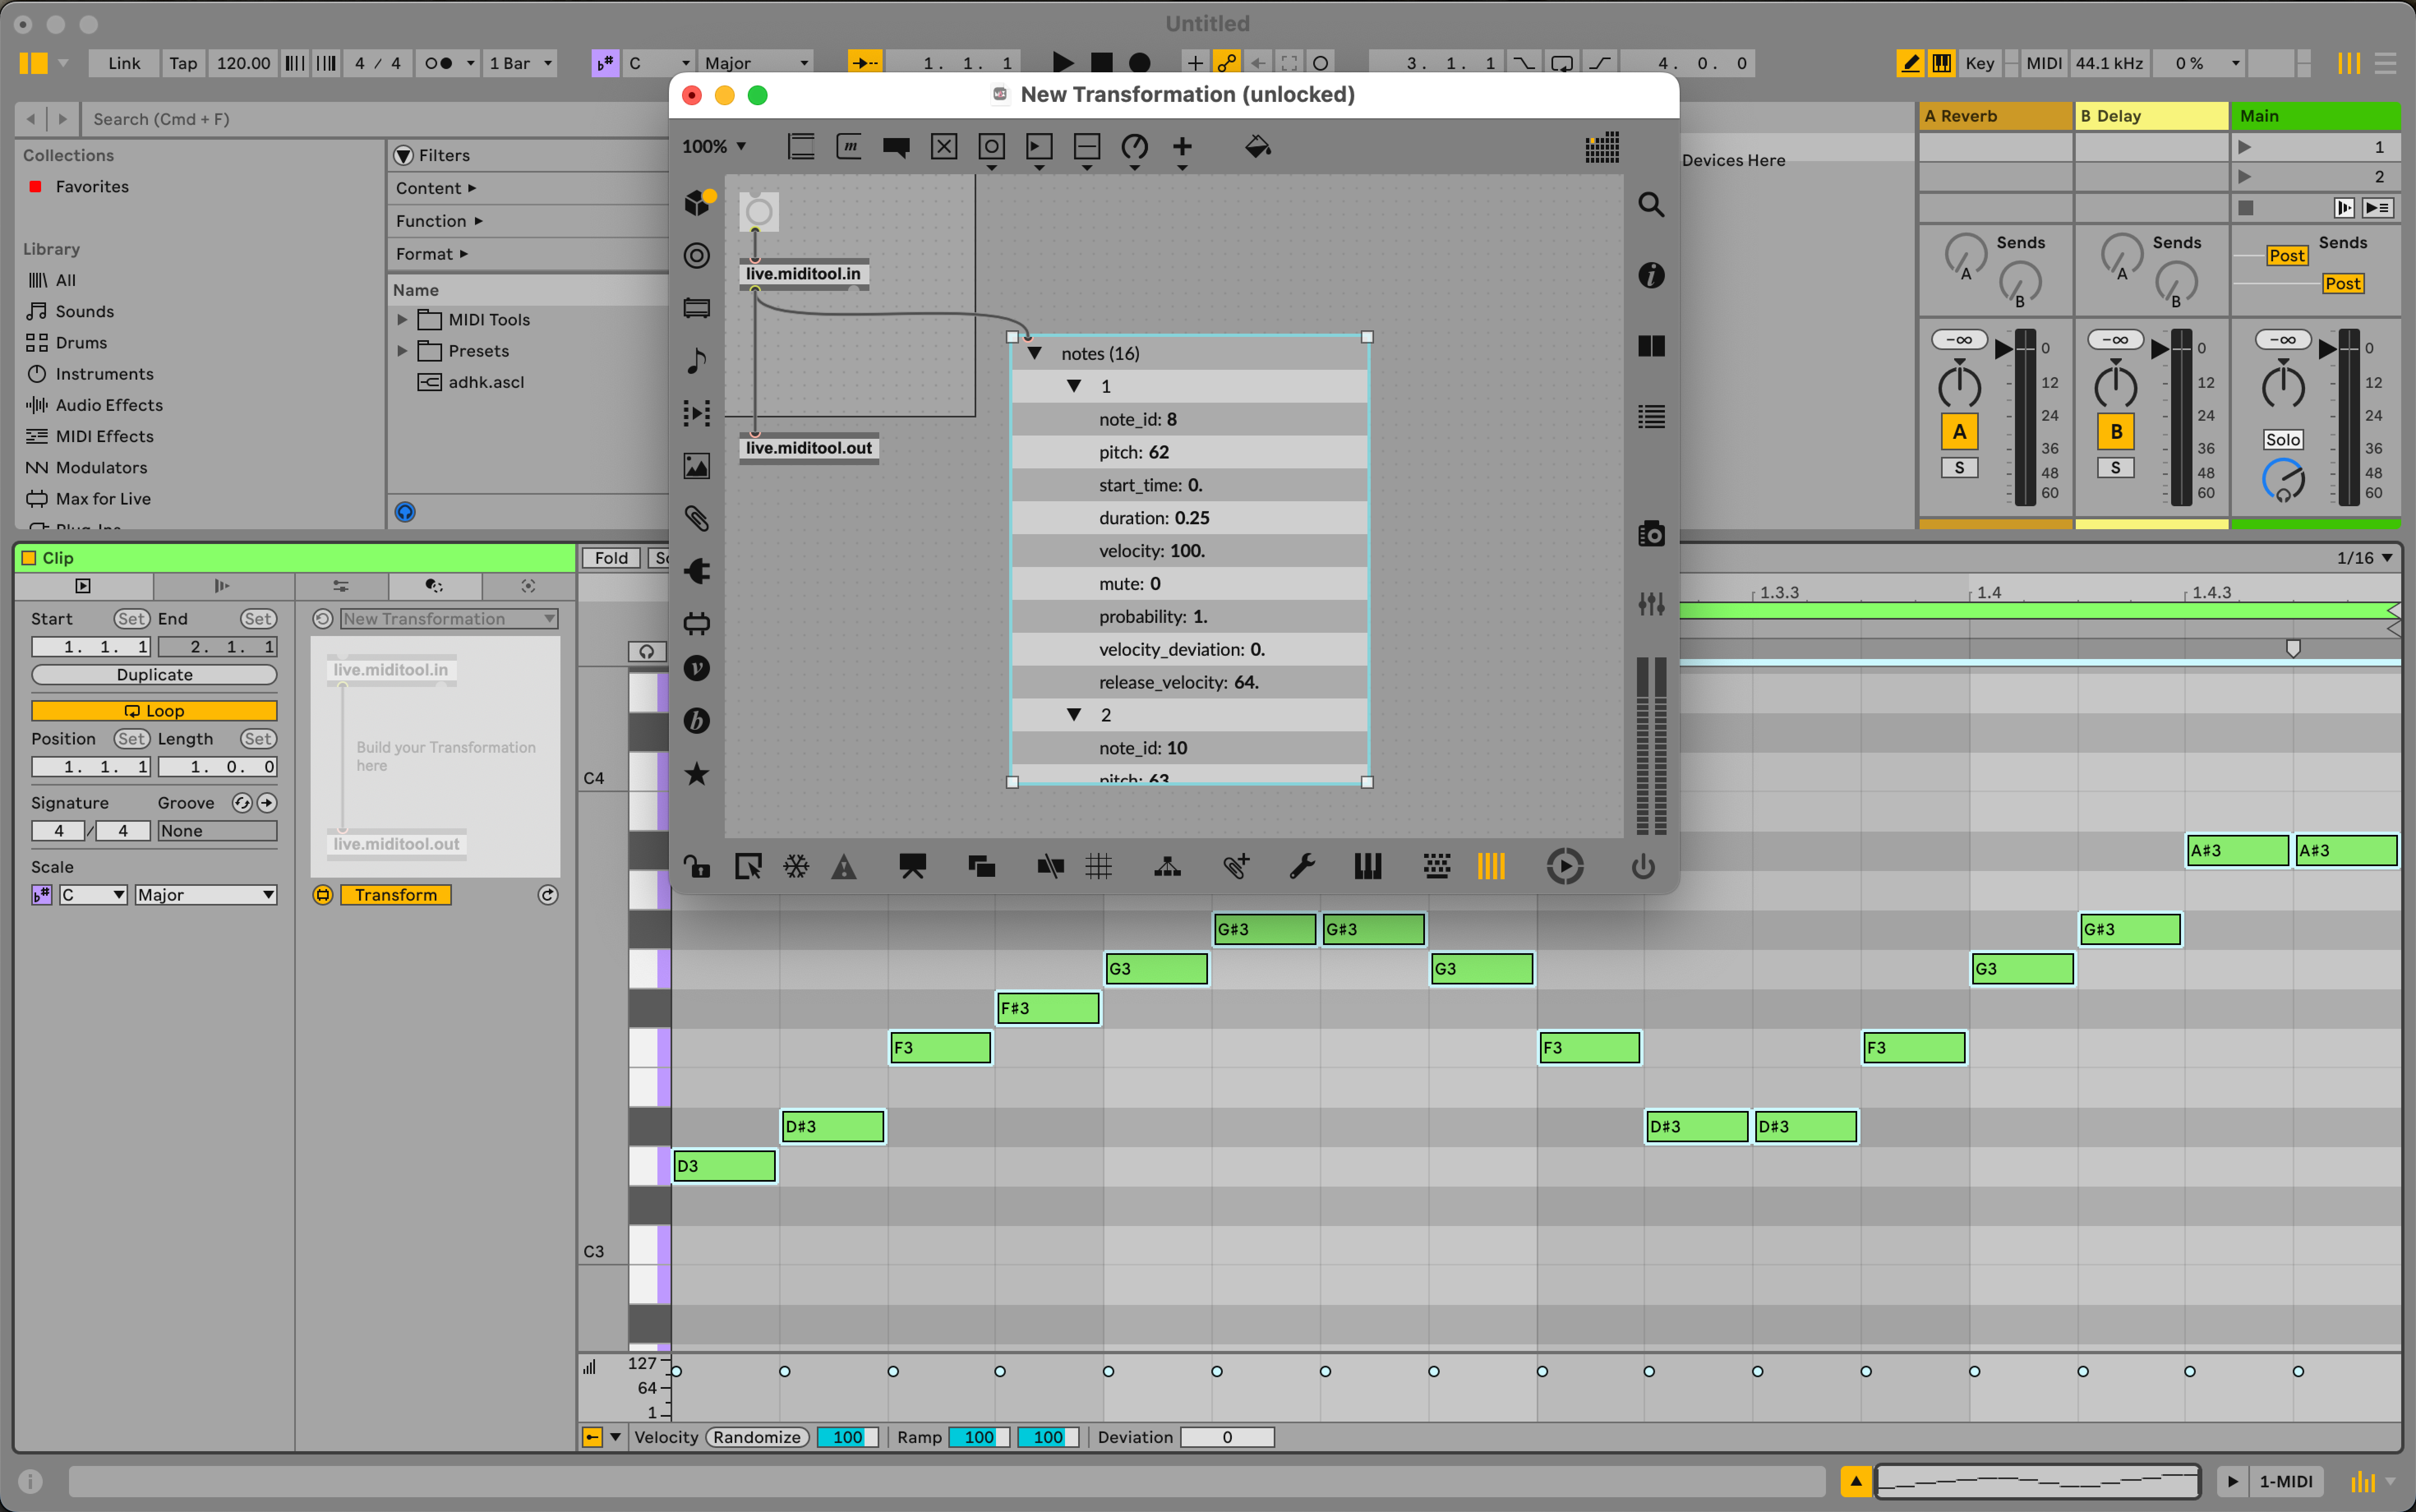
To summarise, the note dict that is output from live.miditool.in contains a key which is associated to an array of sub-dictionaries which each represent a single note. Below is a textual representation of this data structure using a Clip that has just two notes in it:
{
	"notes" : [ // the brackets denote the start of an array
		// this here is the first note
		{
			"note_id" : 9,
			"pitch" : 60,
			"start_time" : 0.0,
			"duration" : 0.25,
			"velocity" : 127,
			"mute" : 0,
			"probability" : 1,
			"velocity_deviation" : 0,
			"release_velocity" : 0
		}
		// this here is the second note
, 		{
			"note_id" : 10,
			"pitch" : 61,
			"start_time" : 0.25,
			"duration" : 0.25,
			"velocity" : 127,
			"mute" : 0,
			"probability" : 1,
			"velocity_deviation" : 0,
			"release_velocity" : 0
		}
 	],
	}
If we want to transform this Clip represented by a dictionary, we have to iterate through each sub-dictionary representing a note and modify the properties we are interested in mutating. For example, if we want to pitch shift all the notes up by 1 semitone, we must add 1 to the property of each sub-dictionary.
Step 3: Transforming the Data
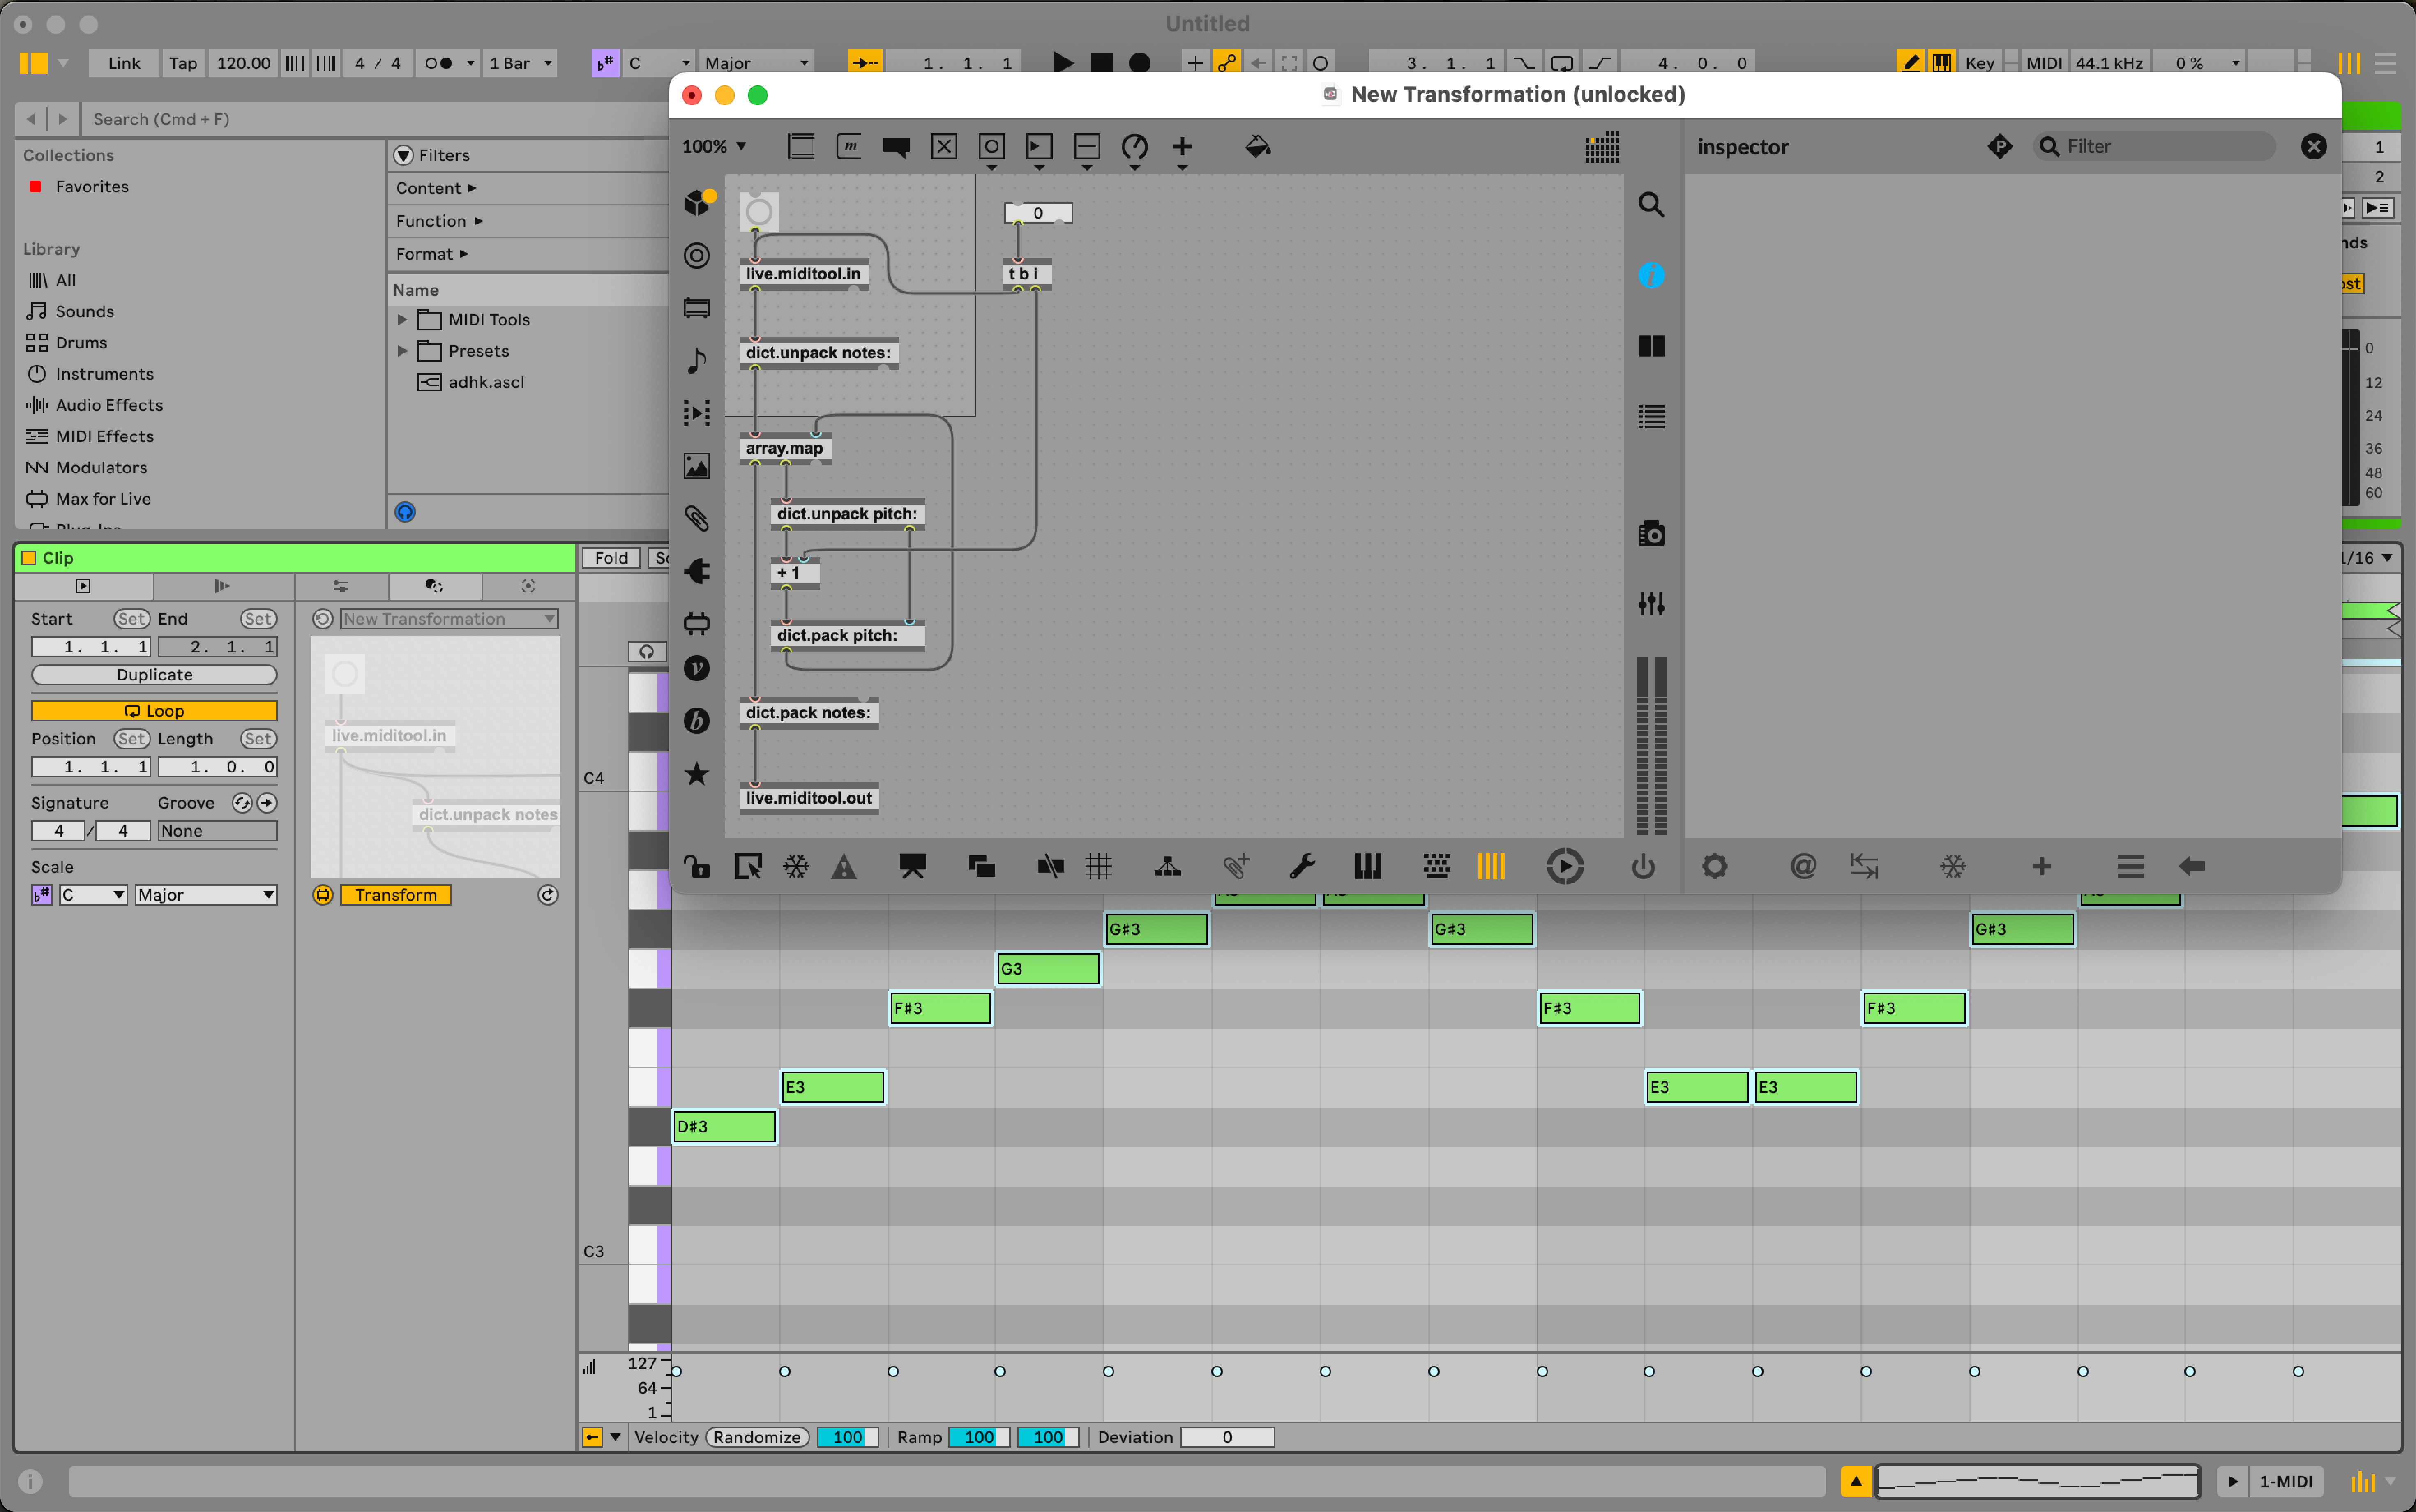
To coordinate the Transformation, we need to first extract the array of sub-dictionaries that represent each note in the Clip. By using dict.unpack and making the first argument , we can extract this array. Then, we can then iterate over the sub-dictionaries and transform the pitch property of each one to realise the total pitch shift effect. Importantly, all the other properties need to be left intact, so as to not change, for example, the duration or start time.
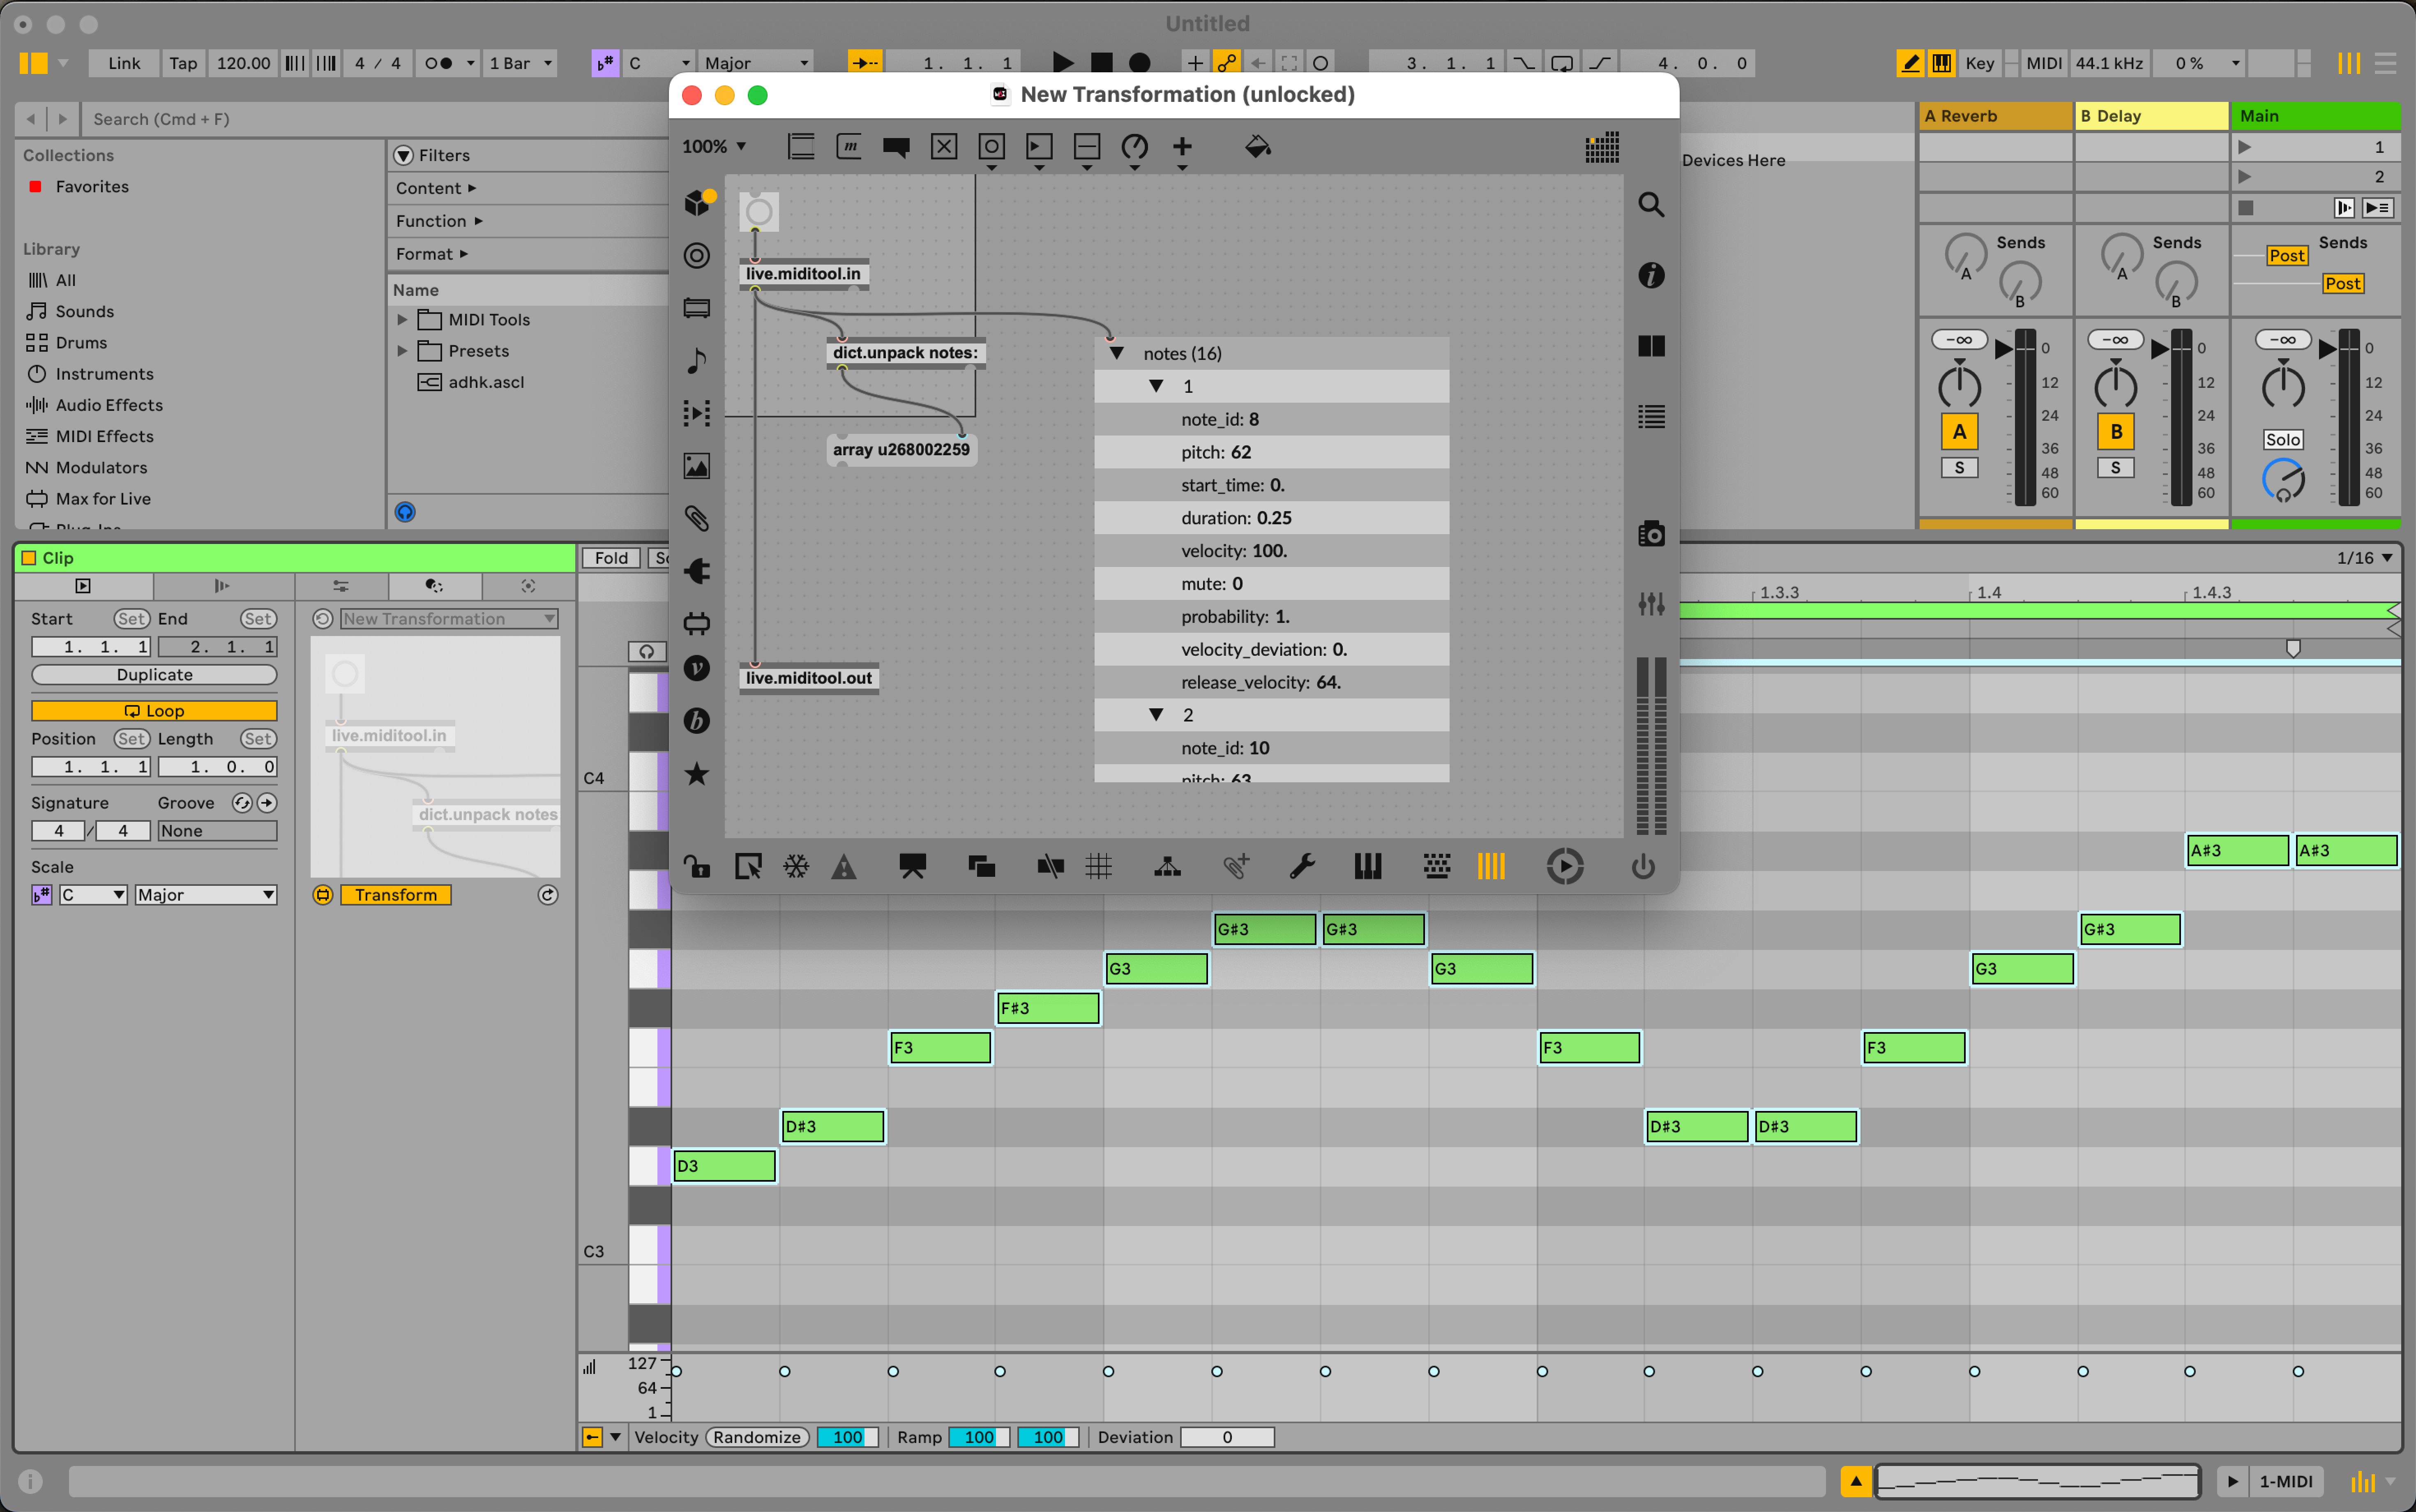
Once we have just the array of sub-dictionaries, we are going to use the array.map object. A straightforward mapping example would be to take an array of numbers and add 1 to each element. In Max, this would look like the following:
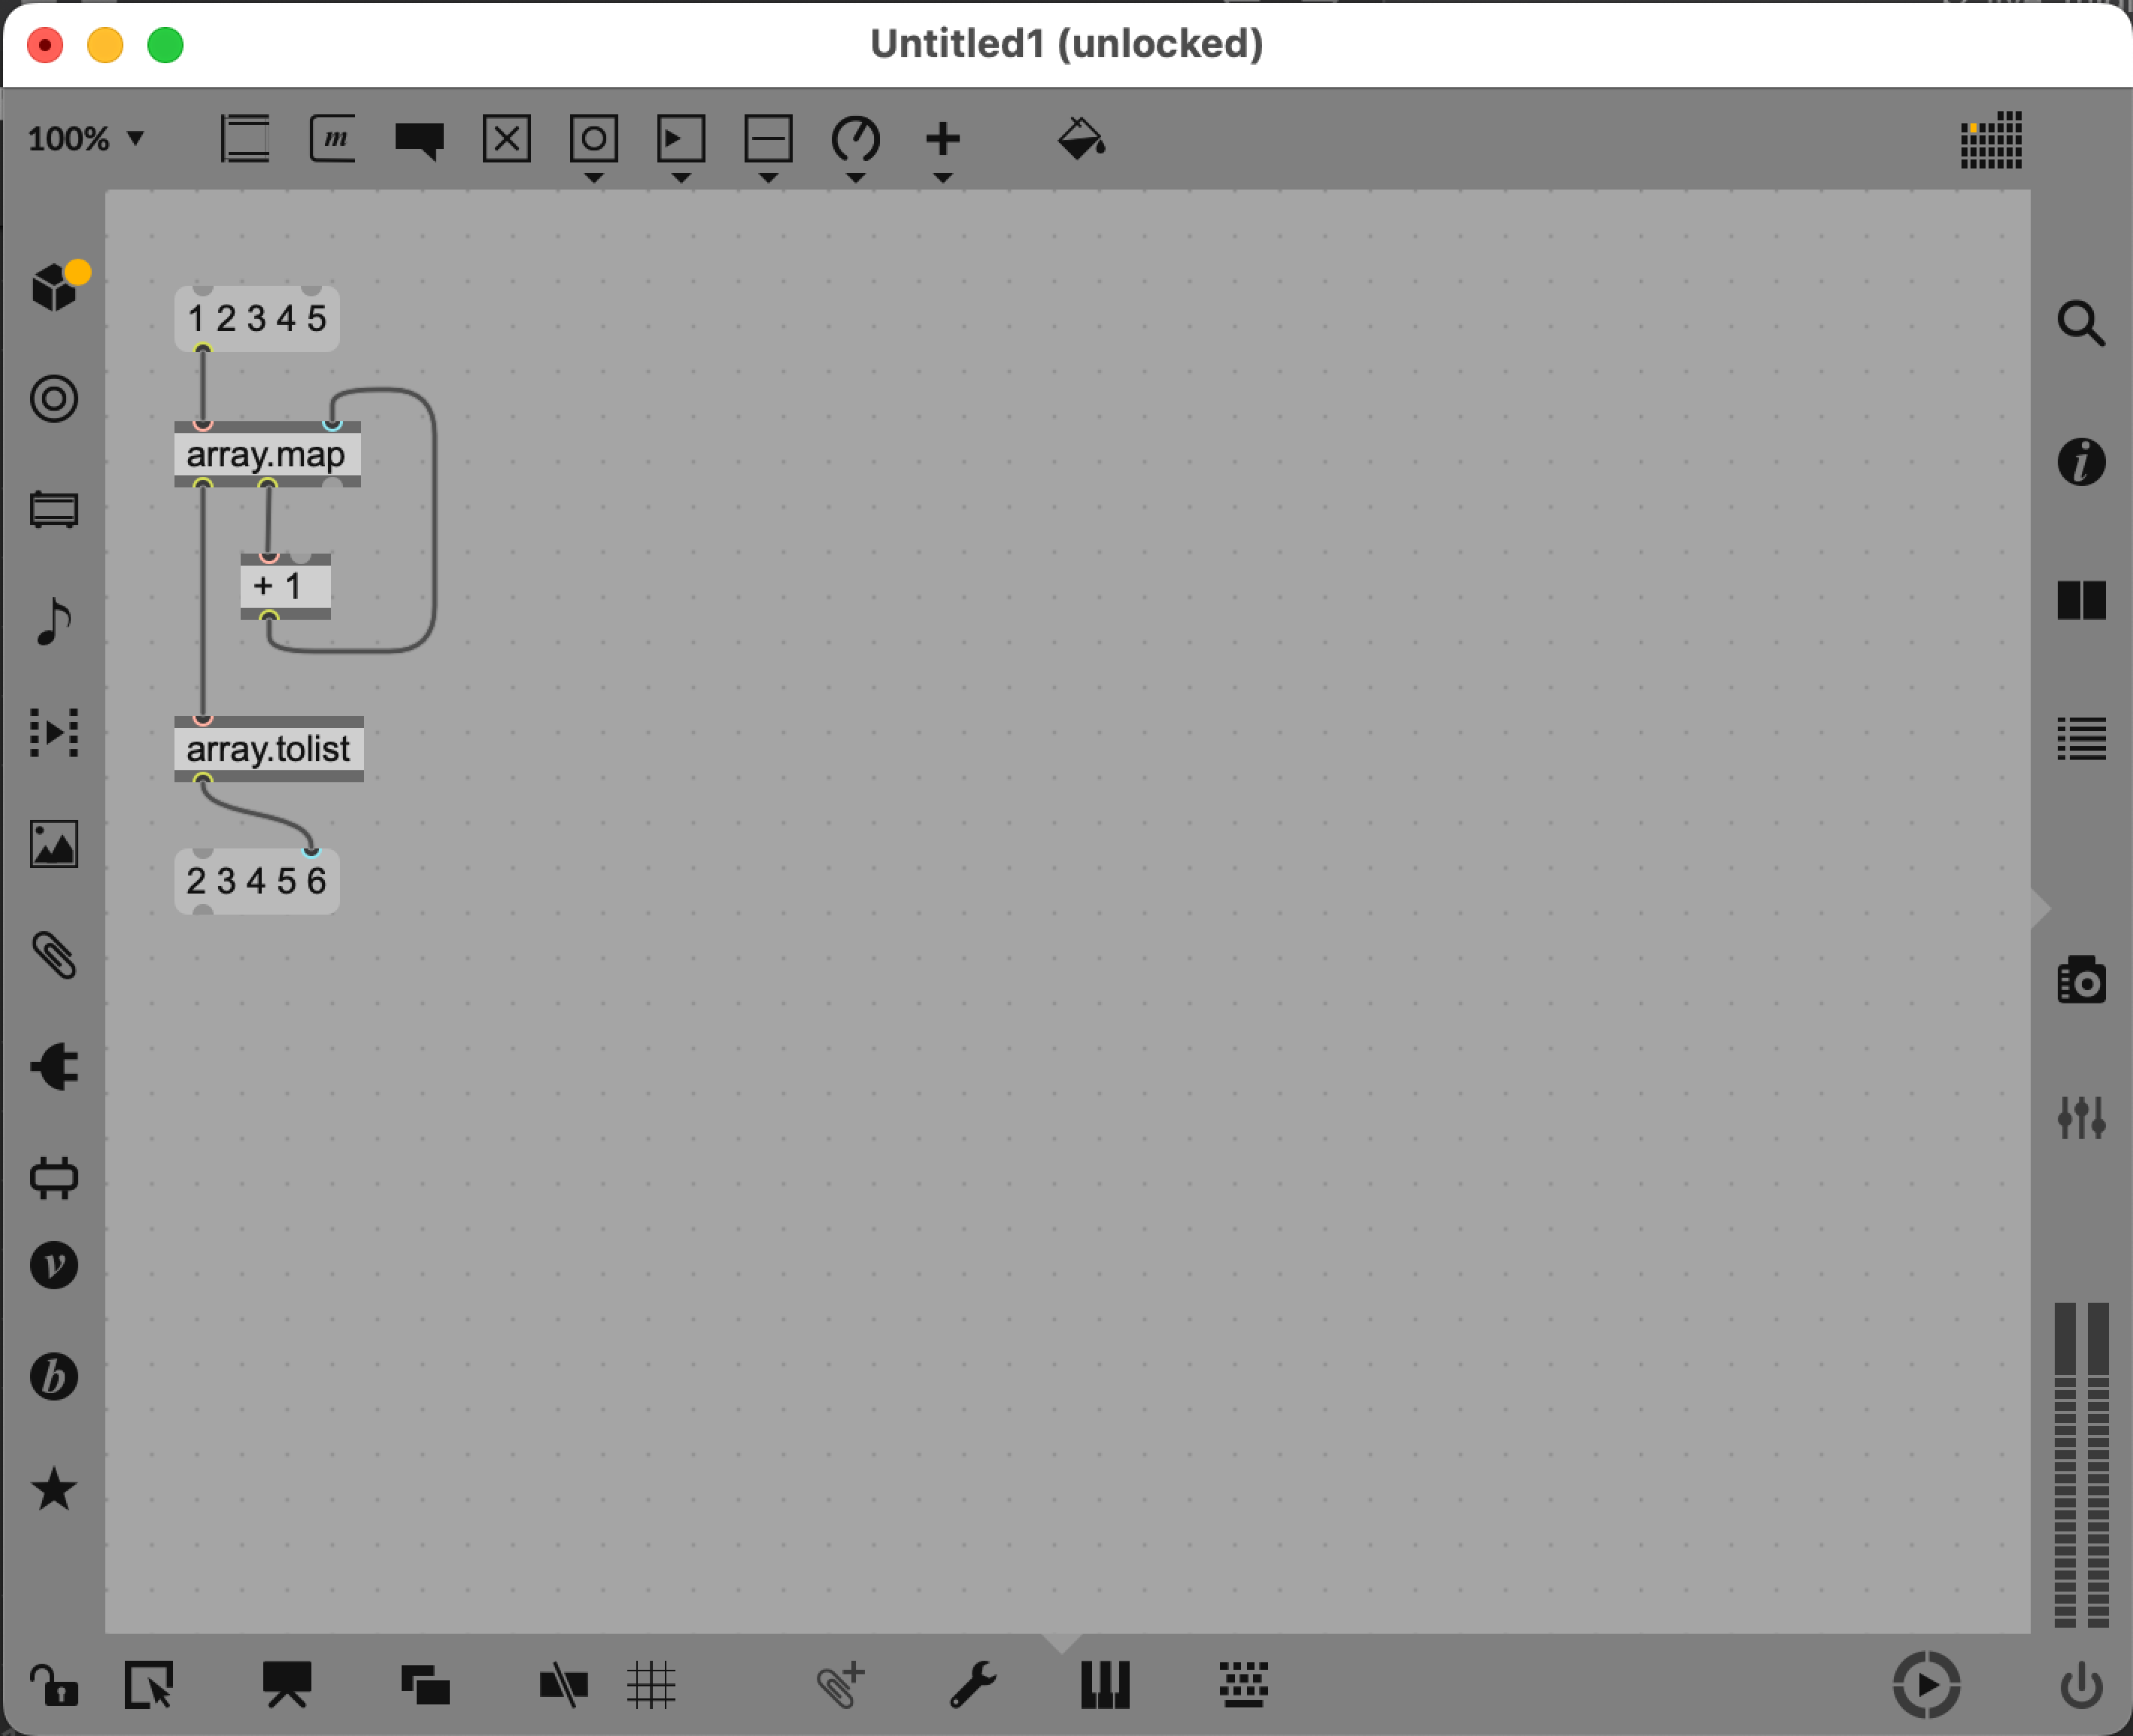
When you supply an array to array.map it iterates over each element, outputting it from the second outlet. Each time this happens, array.map will wait for some input from the second inlet. Whatever the object receives when it is waiting will overwrite the original value in the array. Once all the elements have been processed, the object will output the final result from the first outlet. In the case of this pitch shift example, we want to take each sub-dictionary from the array, and add a positive or negative offset to the "pitch" value. At each iteration we have to unpack the pitch value from the sub-dictionary, add the offset, and then pack it back together in order to preserve all the data we did not change (start_time, velocity, etc.). This can be done with the dict.unpack and dict.pack objects. To keep things simpler for now, we're just going to make the offset a fixed value of 1 in MIDI note numbers.
The only thing left to do is take the array of sub-dictionaries that we just transformed and wrap it back up in a dictionary with a key. This ensures that the array containing sub-dictionaries is formed back into the same structure that we first saw from the output of live.miditool.in. To do this we use dict.pack and make the first argument . Once you're at this stage your patch should look like this:

You can now transform notes in a Live Clip by pressing the apply button, or sending live.miditool.in a . You should see that the notes are shifted by 1 semitone upwards.
Summary
To quickly summarise, the patching workflow for a Transformation follows these steps each time:
- 1. Extract the array of note sub-dictionaries from the dict output from live.miditool.in
- 2. Process the array of note sub-dictionaries
- 3. Pack the array of note sub-dictionaries back into a dict with a "notes" key
- 4. Send the dict to live.miditool.out
Step 4: Adding a User Interface
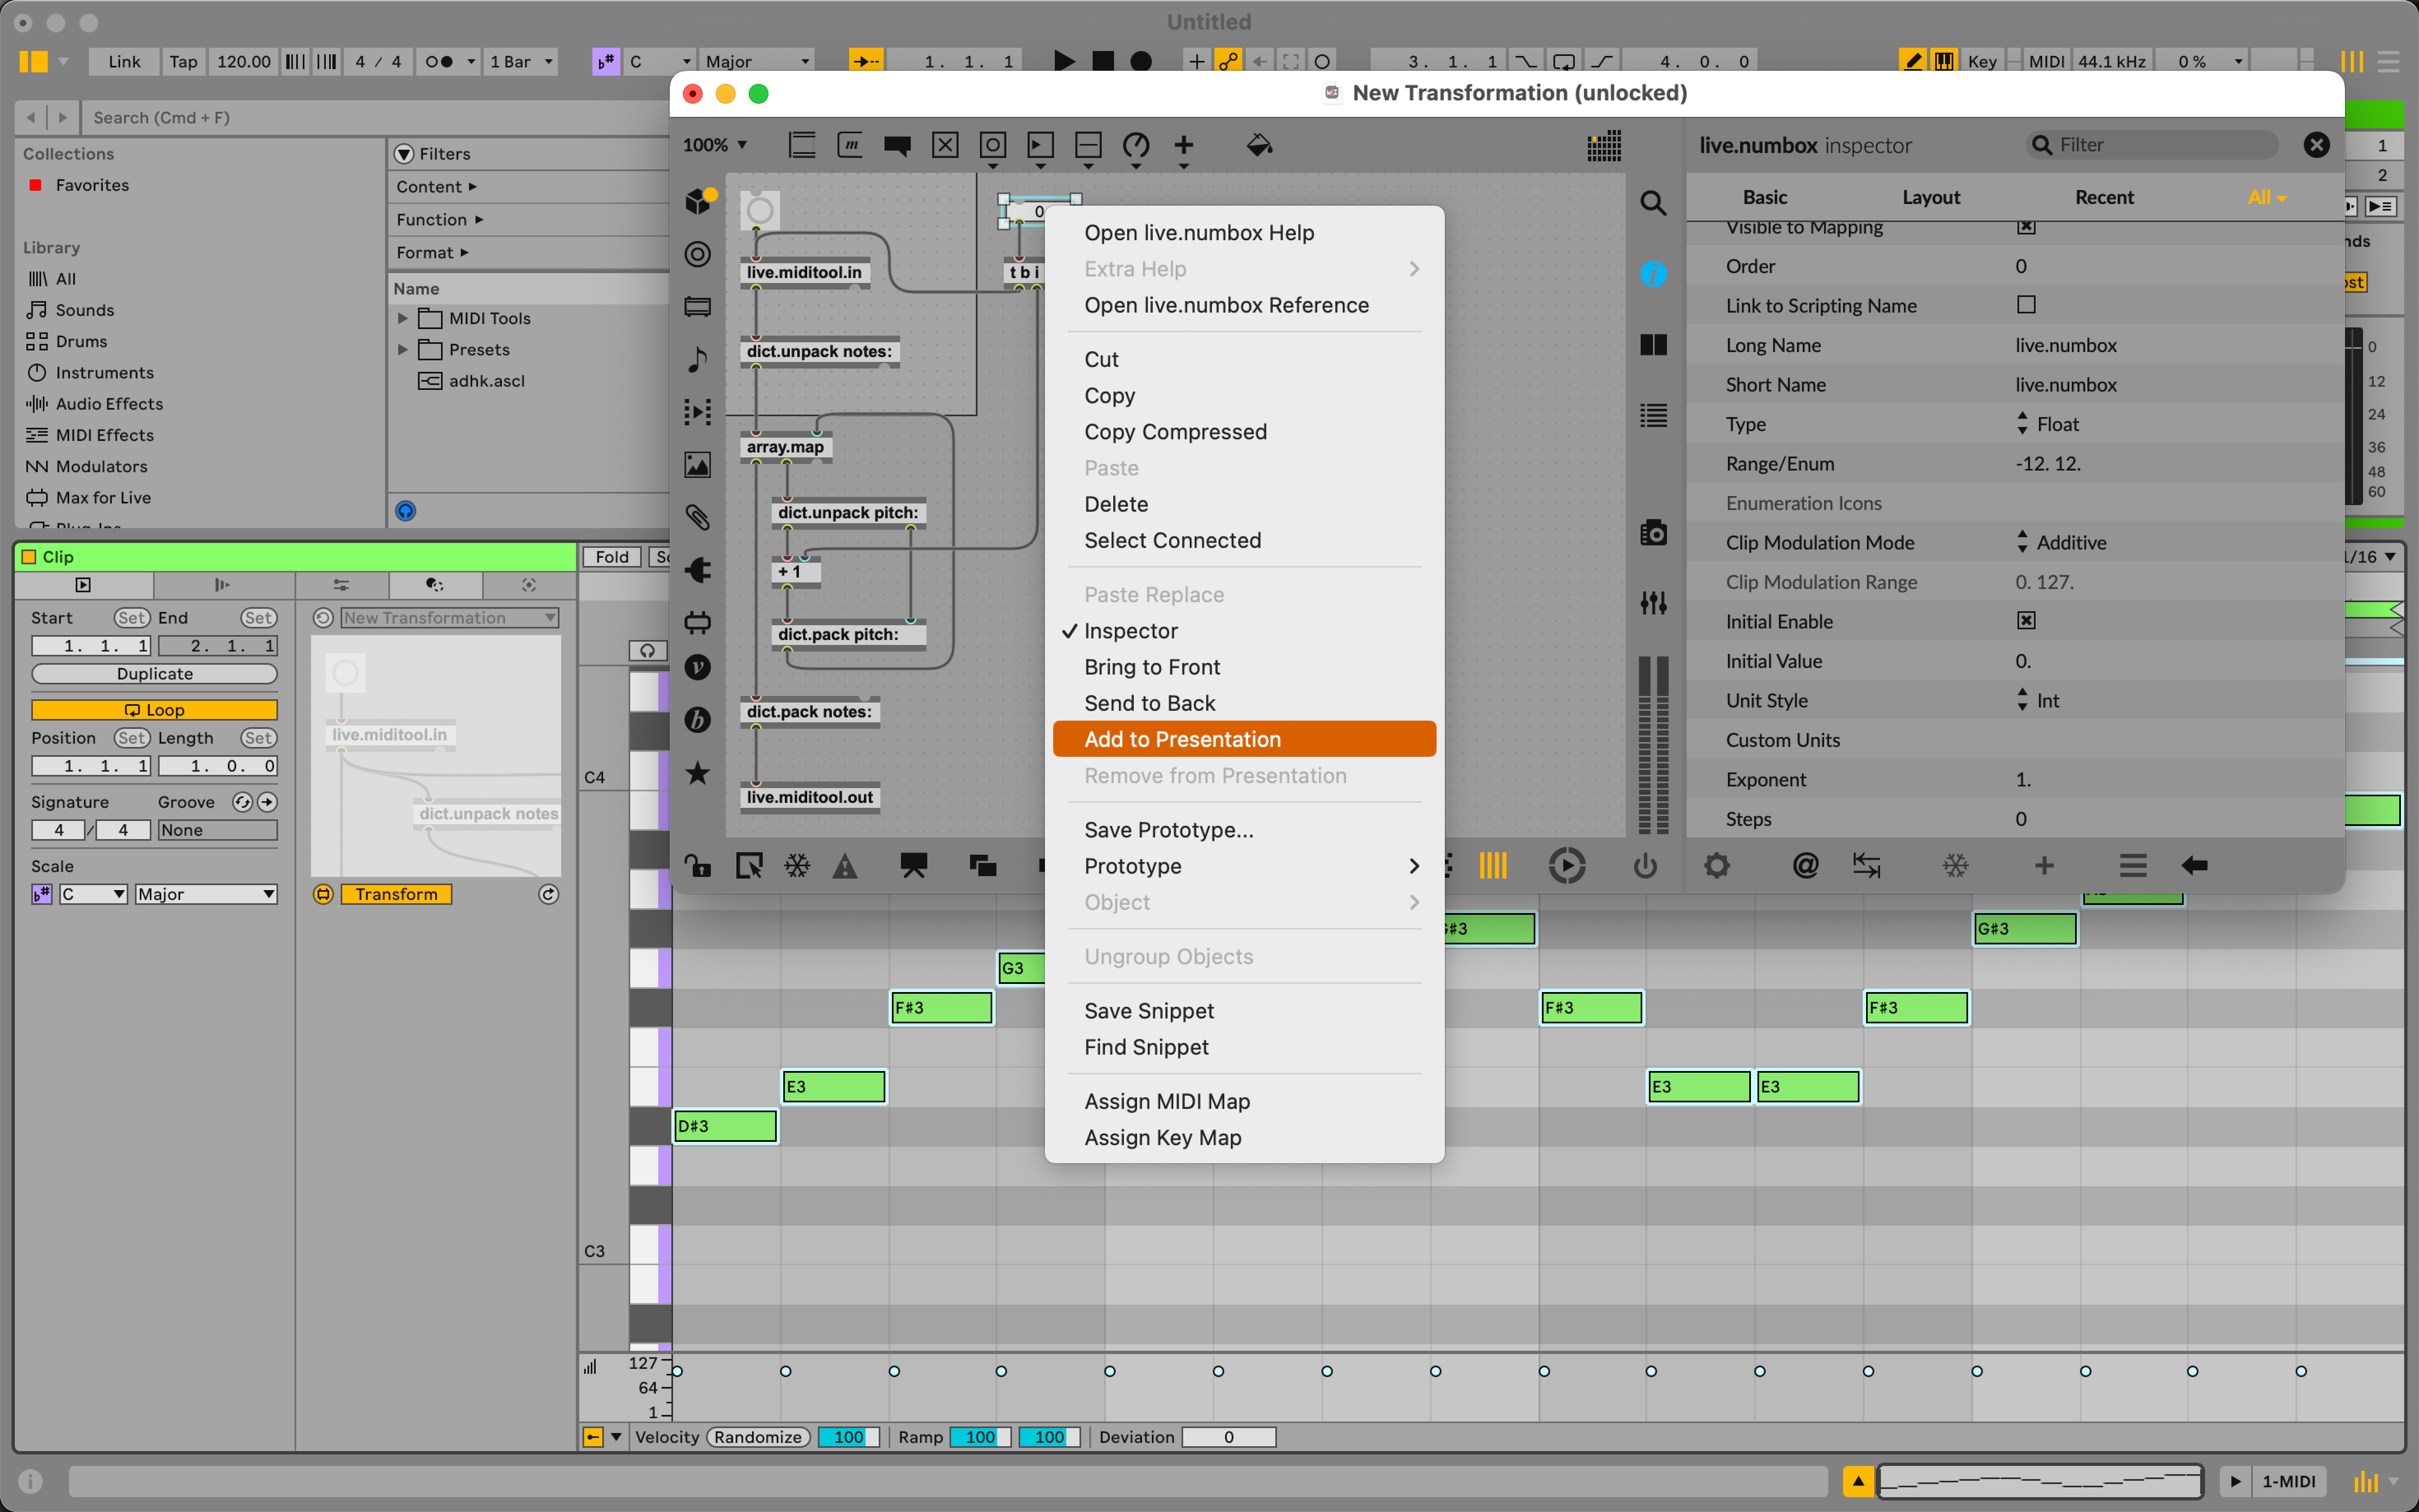
You will probably want to add some controls to the Transformation, in this case so that you can alter the amount of transposition. To do this, add a live.numbox to the patch. We can use the output of this live.numbox to set the amount of shift as well as trigger the Transformation. First though, let's set the range of the parameter to something useful, like -12 to 12, giving us an octave of shift in both a positive and negative direction.
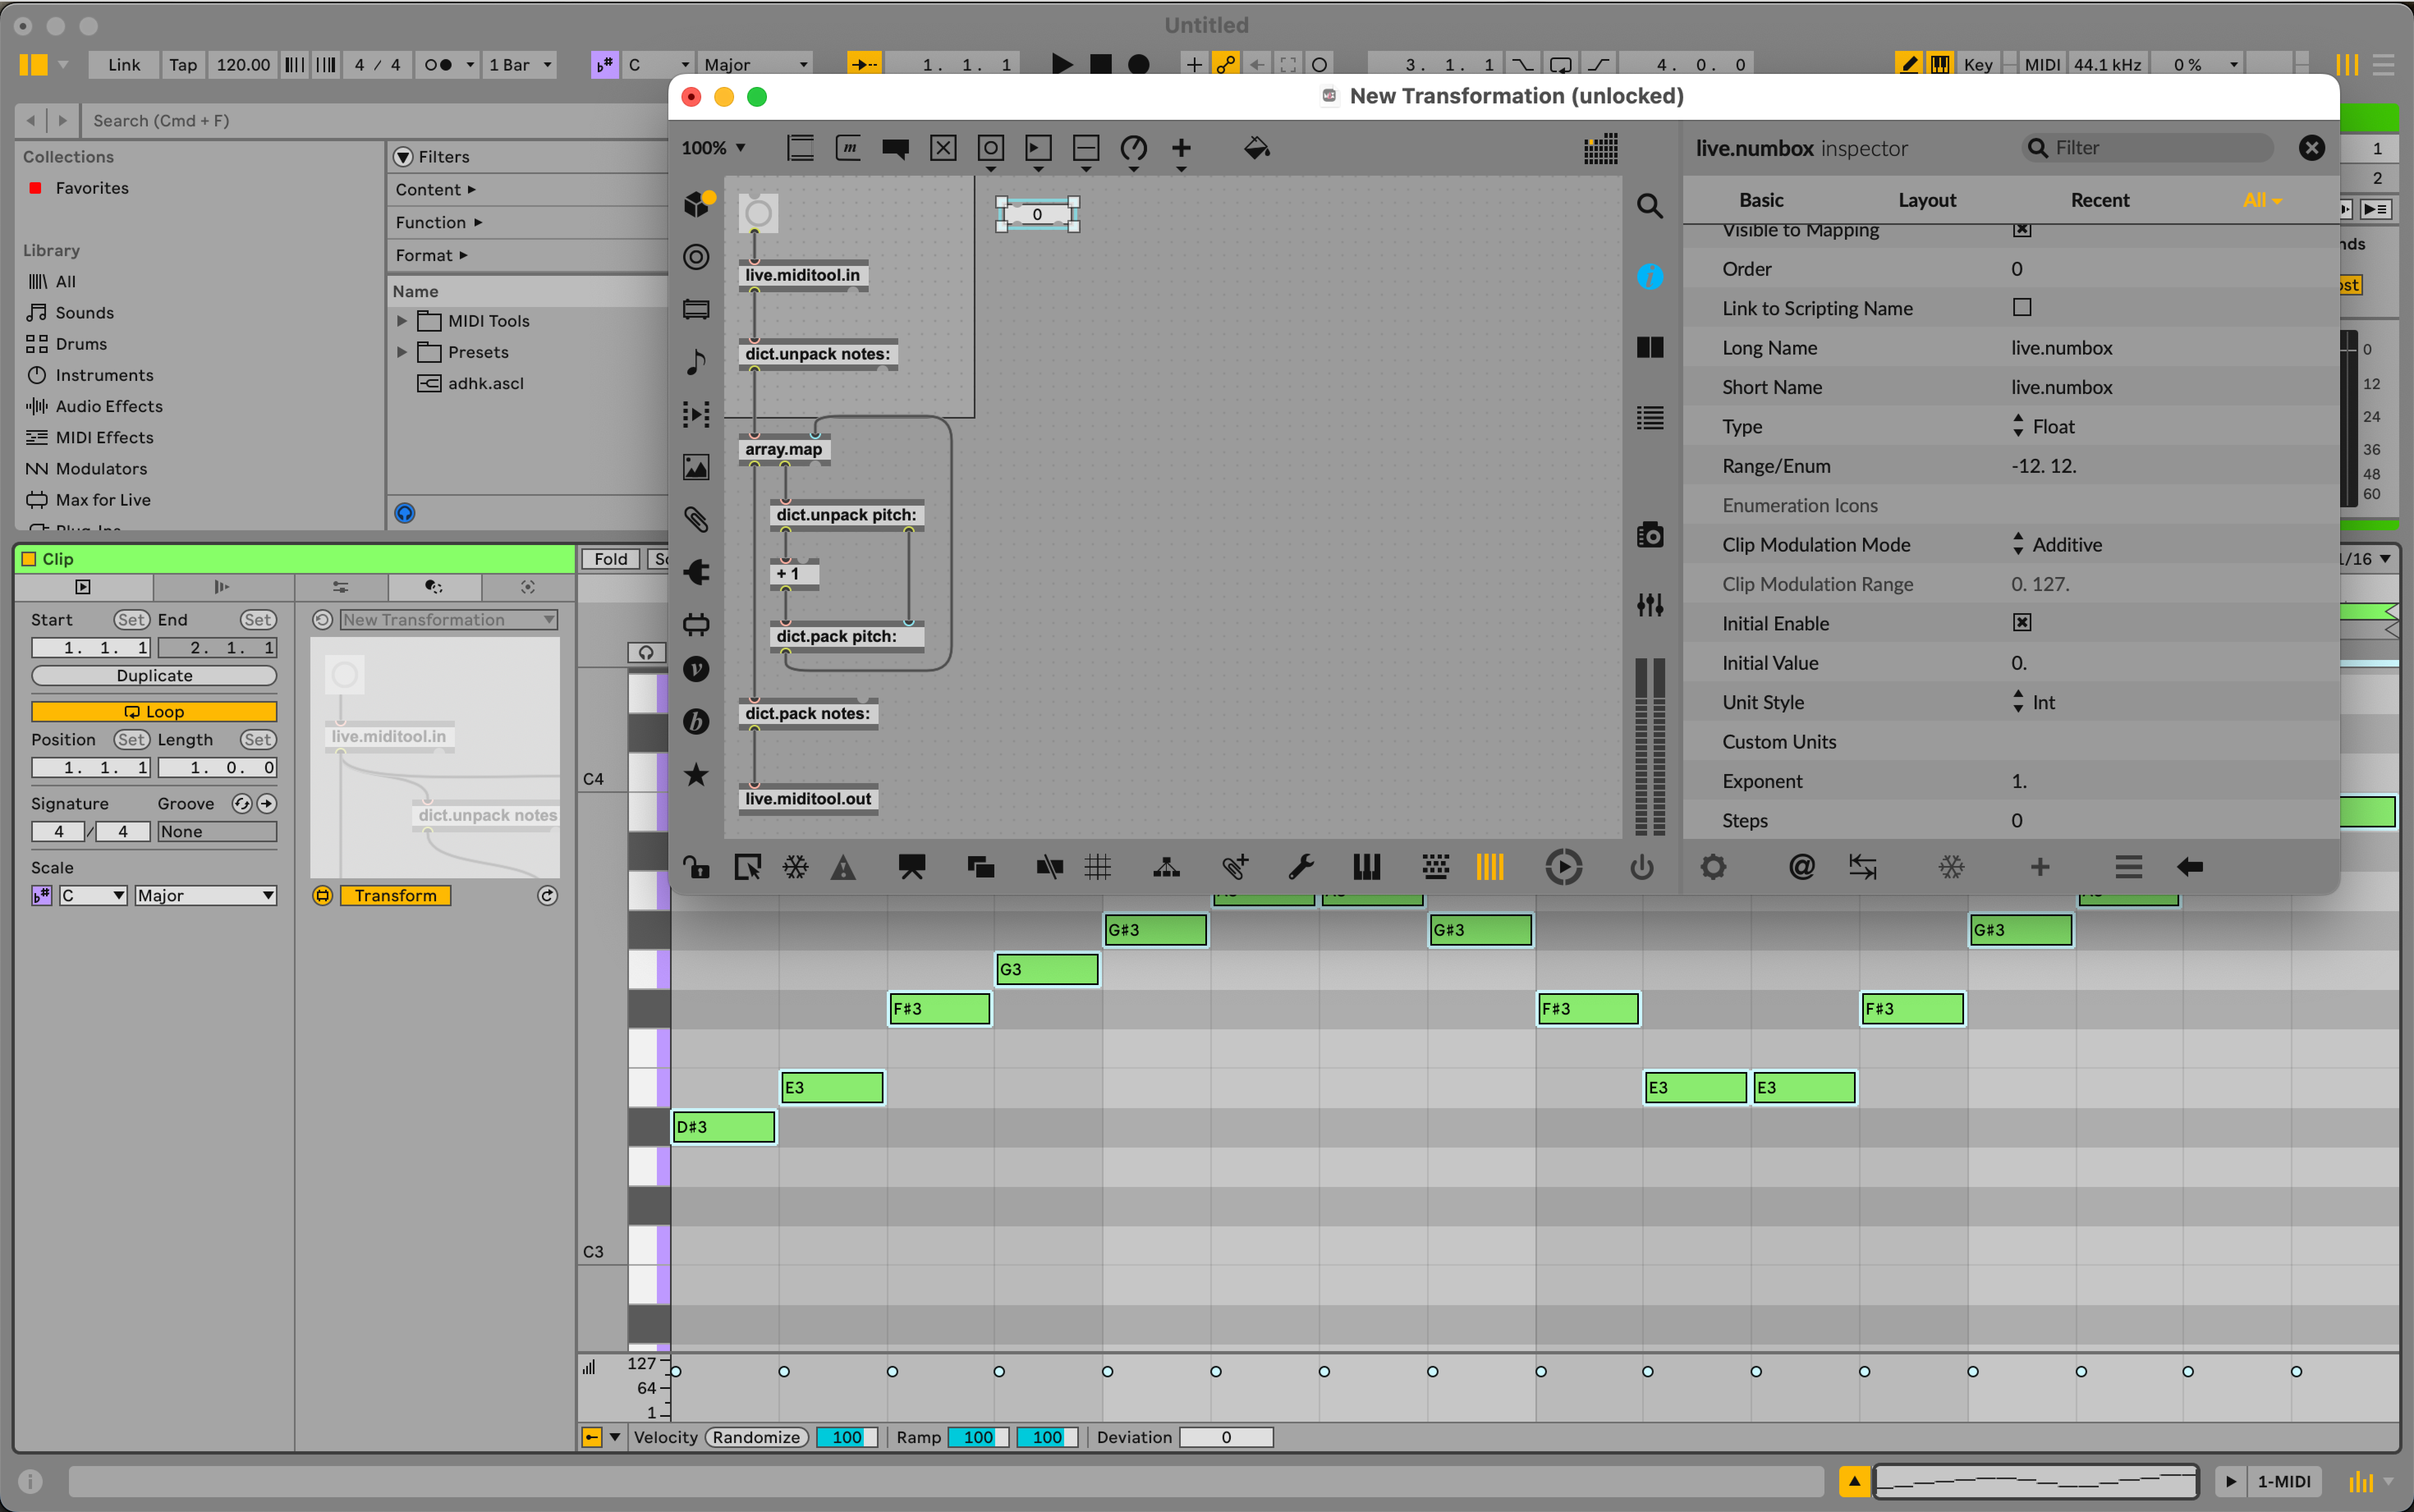
Now that we've done that, we need to connect the output of the live.numbox to the + object. However, we still need to trigger the Transformation every time we modify this parameter value. To do this we also must send a to the live.miditool.in object. We should coordinate this with a trigger object to guarantee those things happen in the correct order: first set the offset and then trigger with a .
We can also tidy this up and put the parameter into presentation mode so that it is cleaner and simpler to use the Transformation while we are not editing it. We should also set the patcher to open in presentation mode, by editing this property in the patcher inspector.
Apply Cycle
Typically, part of using a Transformation or Generator involves a process where you adjust parameters to fine-tune the result you want. When you do this, and change the parameters of a MIDI Tool in Live, you might notice that the result of a transformation can always be reverted, and you are able to get back to the state of the Clip from before you started experimenting. Take our simple pitch shift MIDI Tool we just built as an example. If you had a Clip with a single MIDI note at C3, and you then set the live.dial to 4, you would see that the MIDI Note now appears as E3. If you then turn the dial back to 0, you would see the note return to C3. The reason that this behavior can happen is because of the apply cycle. The apply cycle is responsible for managing "snapshots" of the Clip that are sent as dictionaries to Max for processing. When you send a to live.miditool.in or press the apply button in Live's interface, an apply cycle starts. An apply cycle ends when you perform any interactions outside of the MIDI Tool. While you are inside an apply cycle, the dictionary output by live.miditool.in will always contain the same note data. So, when the logic of your patch adds 1 to the pitch of each note, it is always applying this change to the dictionary it received at the start of the apply cycle. This is to prevent a scenario in which the transformation result is then immediately reflected in the next output of live.miditool.in. If that were the case, a "feedback loop" would be created where you would not be able to return to the original state of the clip, and you would also have far less parametric control over the transformation. You can use this graph to conceptualize how and why an apply cycle starts and ends.

Creating a Generator
Creating a Generator is similar to creating a Transformation in terms of patching. The main difference is that you will be generating the note dictionary data from scratch rather than transforming existing note data output by the live.miditool.in object. In the following example, we will create a Generator that creates a randomised rhythm with 16th notes.
Step 1: Create A New MIDI Tool Generator
Create a new Max for Live MIDI Tool by opening the existing "MIDI Generator Template" and saving it. Give it a unique name, and then open it in the Max editor by clicking the edit button in the bottom left.
Step 2: Generating Data
We've already had a glimpse of the shape of the data that represents a Clip and is output as a dict from live.miditool.in when making a Transformation. For a Generator, we can generate whatever note data we would like to, as long as we pass it to Live via the live.miditool.out object and in the correct format.
This code example shows all the properties that you can supply to create notes from scratch in a Generator. Notice that you don't have to supply the property that can be seen when notes are passed from the Clip to the MIDI Tool. Only , and are required. The rest are optional.
{
"notes" : [
{
"pitch" : 60,
"start_time" : 0.0,
"duration" : 0.25,
"velocity" : 127,
"mute" : 0,
"probability" : 1,
"velocity_deviation" : 0,
"release_velocity" : 0
}
, {
"pitch" : 61,
"start_time" : 0.25,
"duration" : 0.25,
"velocity" : 127,
"mute" : 0,
"probability" : 1,
"velocity_deviation" : 0,
"release_velocity" : 0
}
],
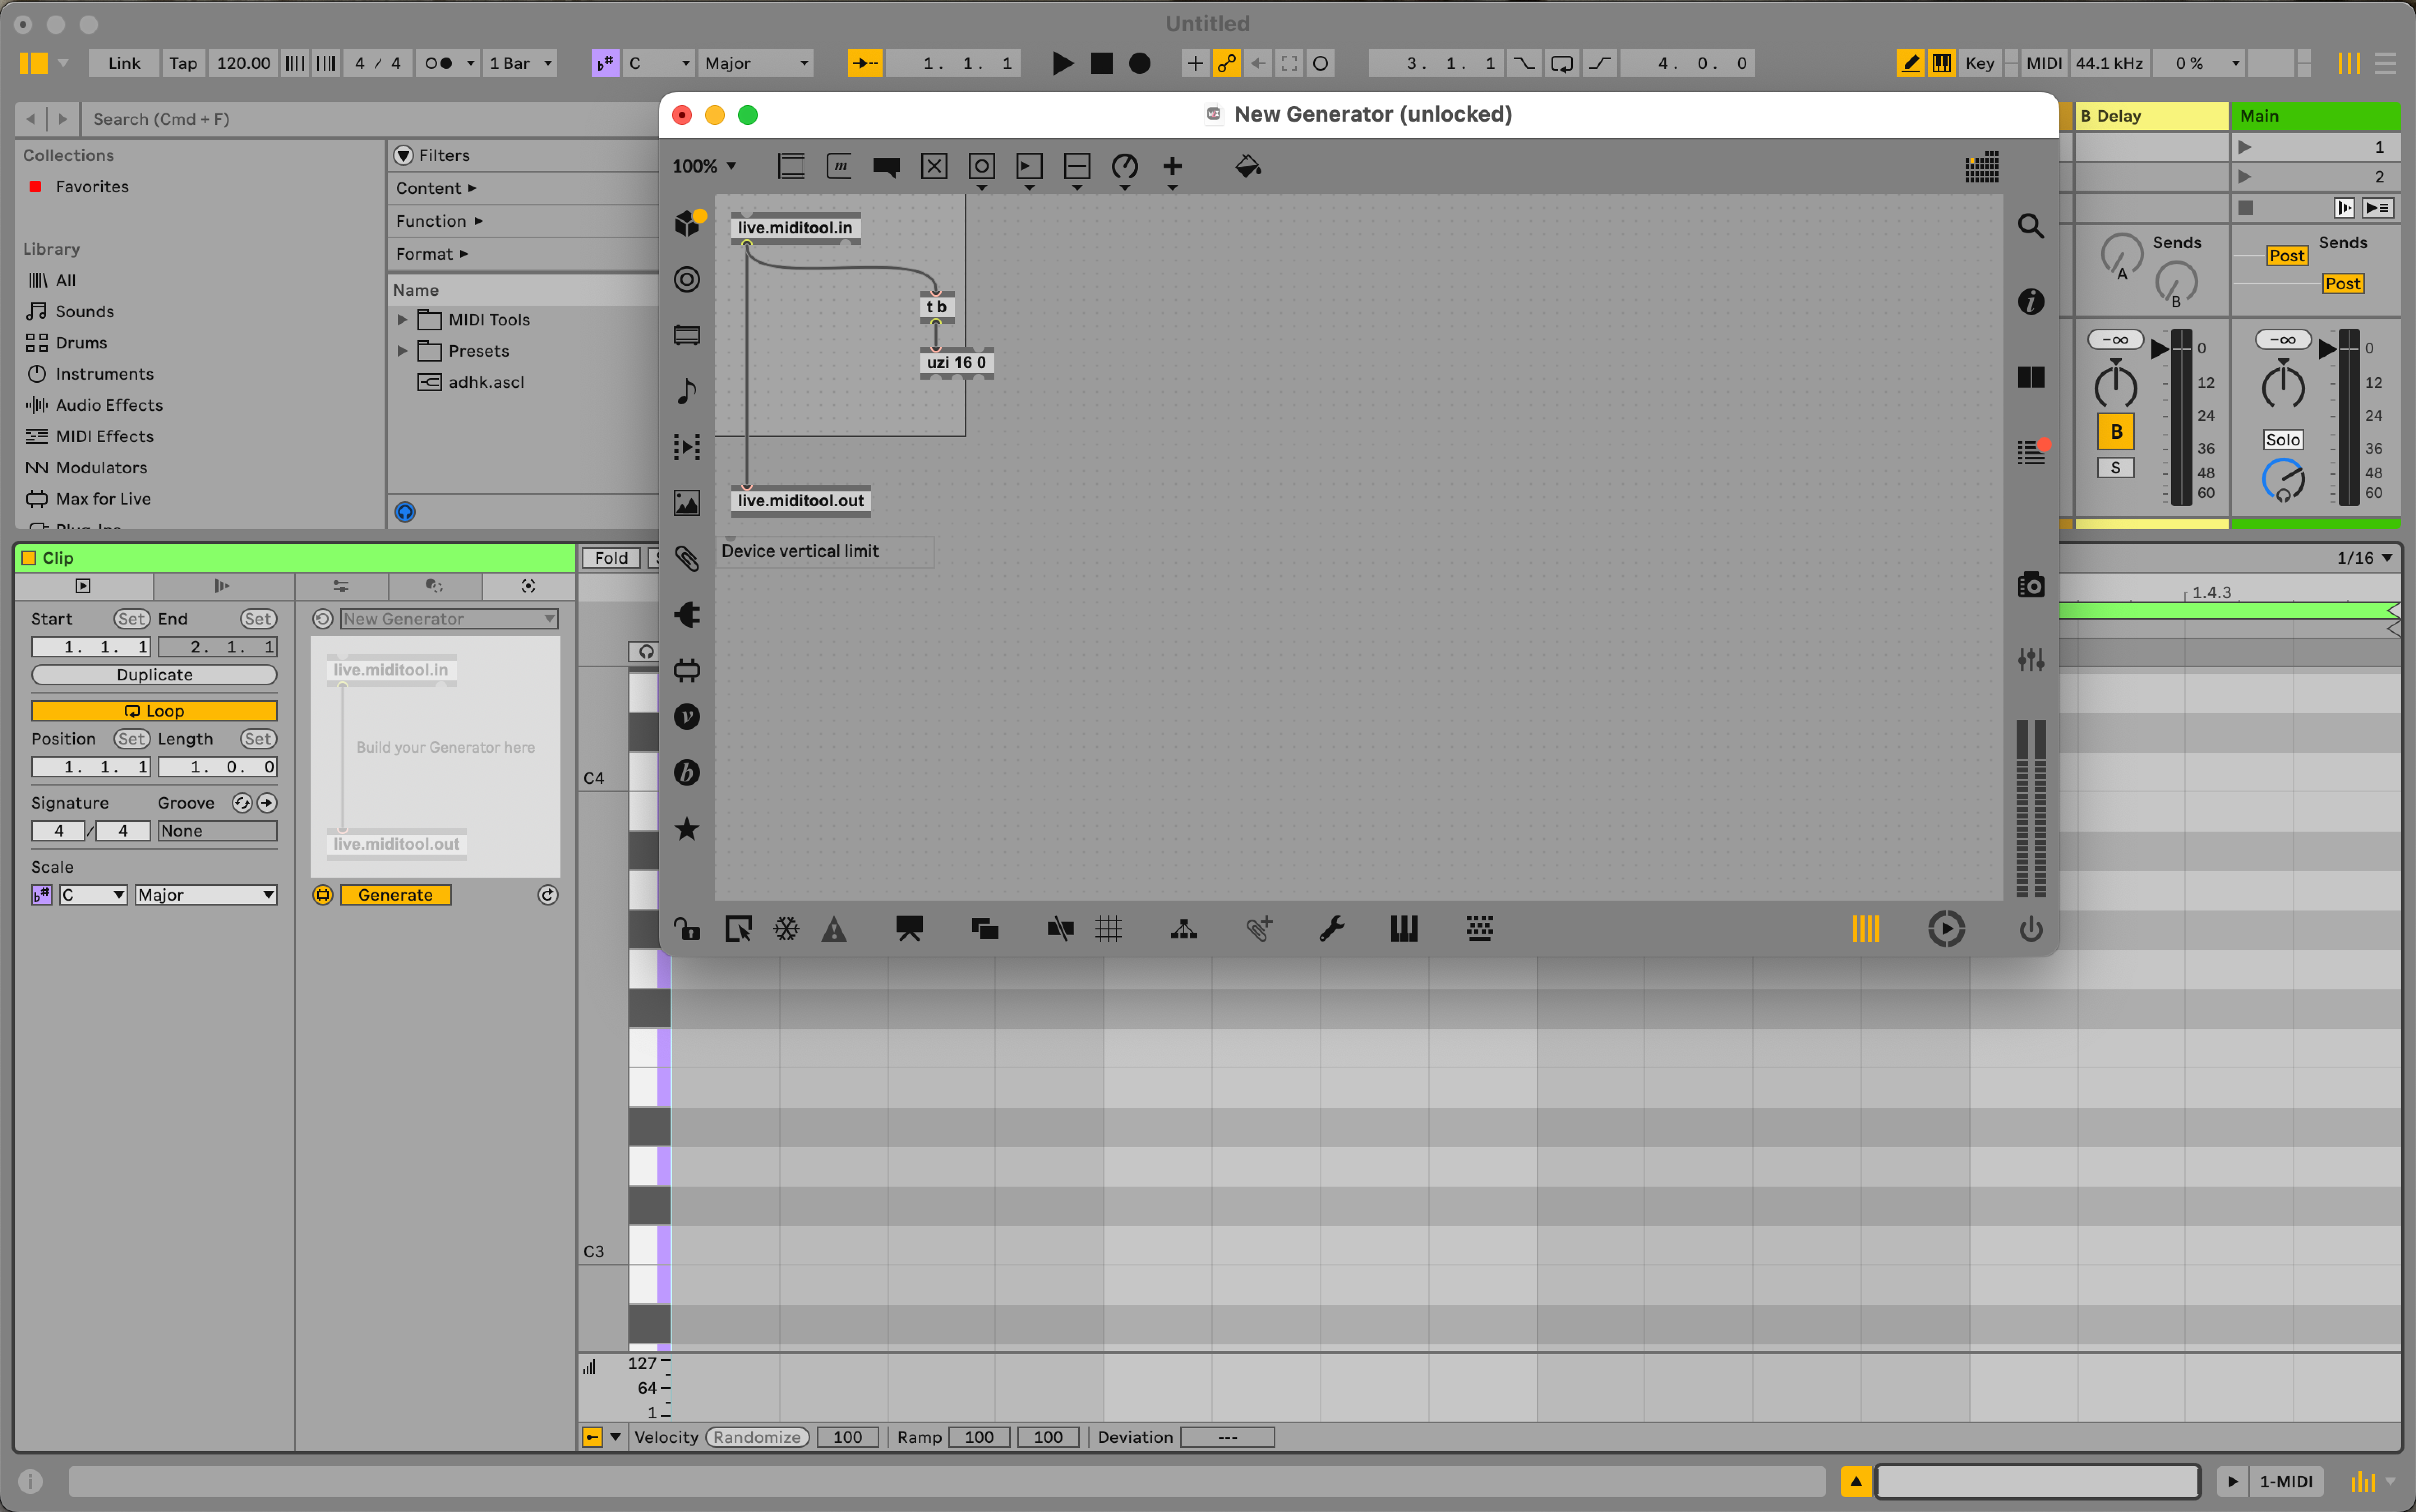
}Because we are not transforming notes, we are going to take the output of live.miditool.in and use it to create a . This will initiate the logic of the patch that is responsible for generating the dict that represents the Clip. From here we can implement the generation logic, starting with uzi. In this specific case, we will always generate 16 notes, so we'll set the first argument to 16, and the second argument to 0, so that it counts up from 0 for the right outlet.
Now let's cobble together an array of note dictionaries using the uzi output. First we'll create a dict.pack which will be crucial in forming the keys and values that represent each note. We only need to generate three bits of information for each note: , and . We can set the to a fixed value of 60, the to the output of the uzi and the to a fixed value of 0.0625. The duration is always defined in beat time, and so a 16th note is represented by this floating-point value.
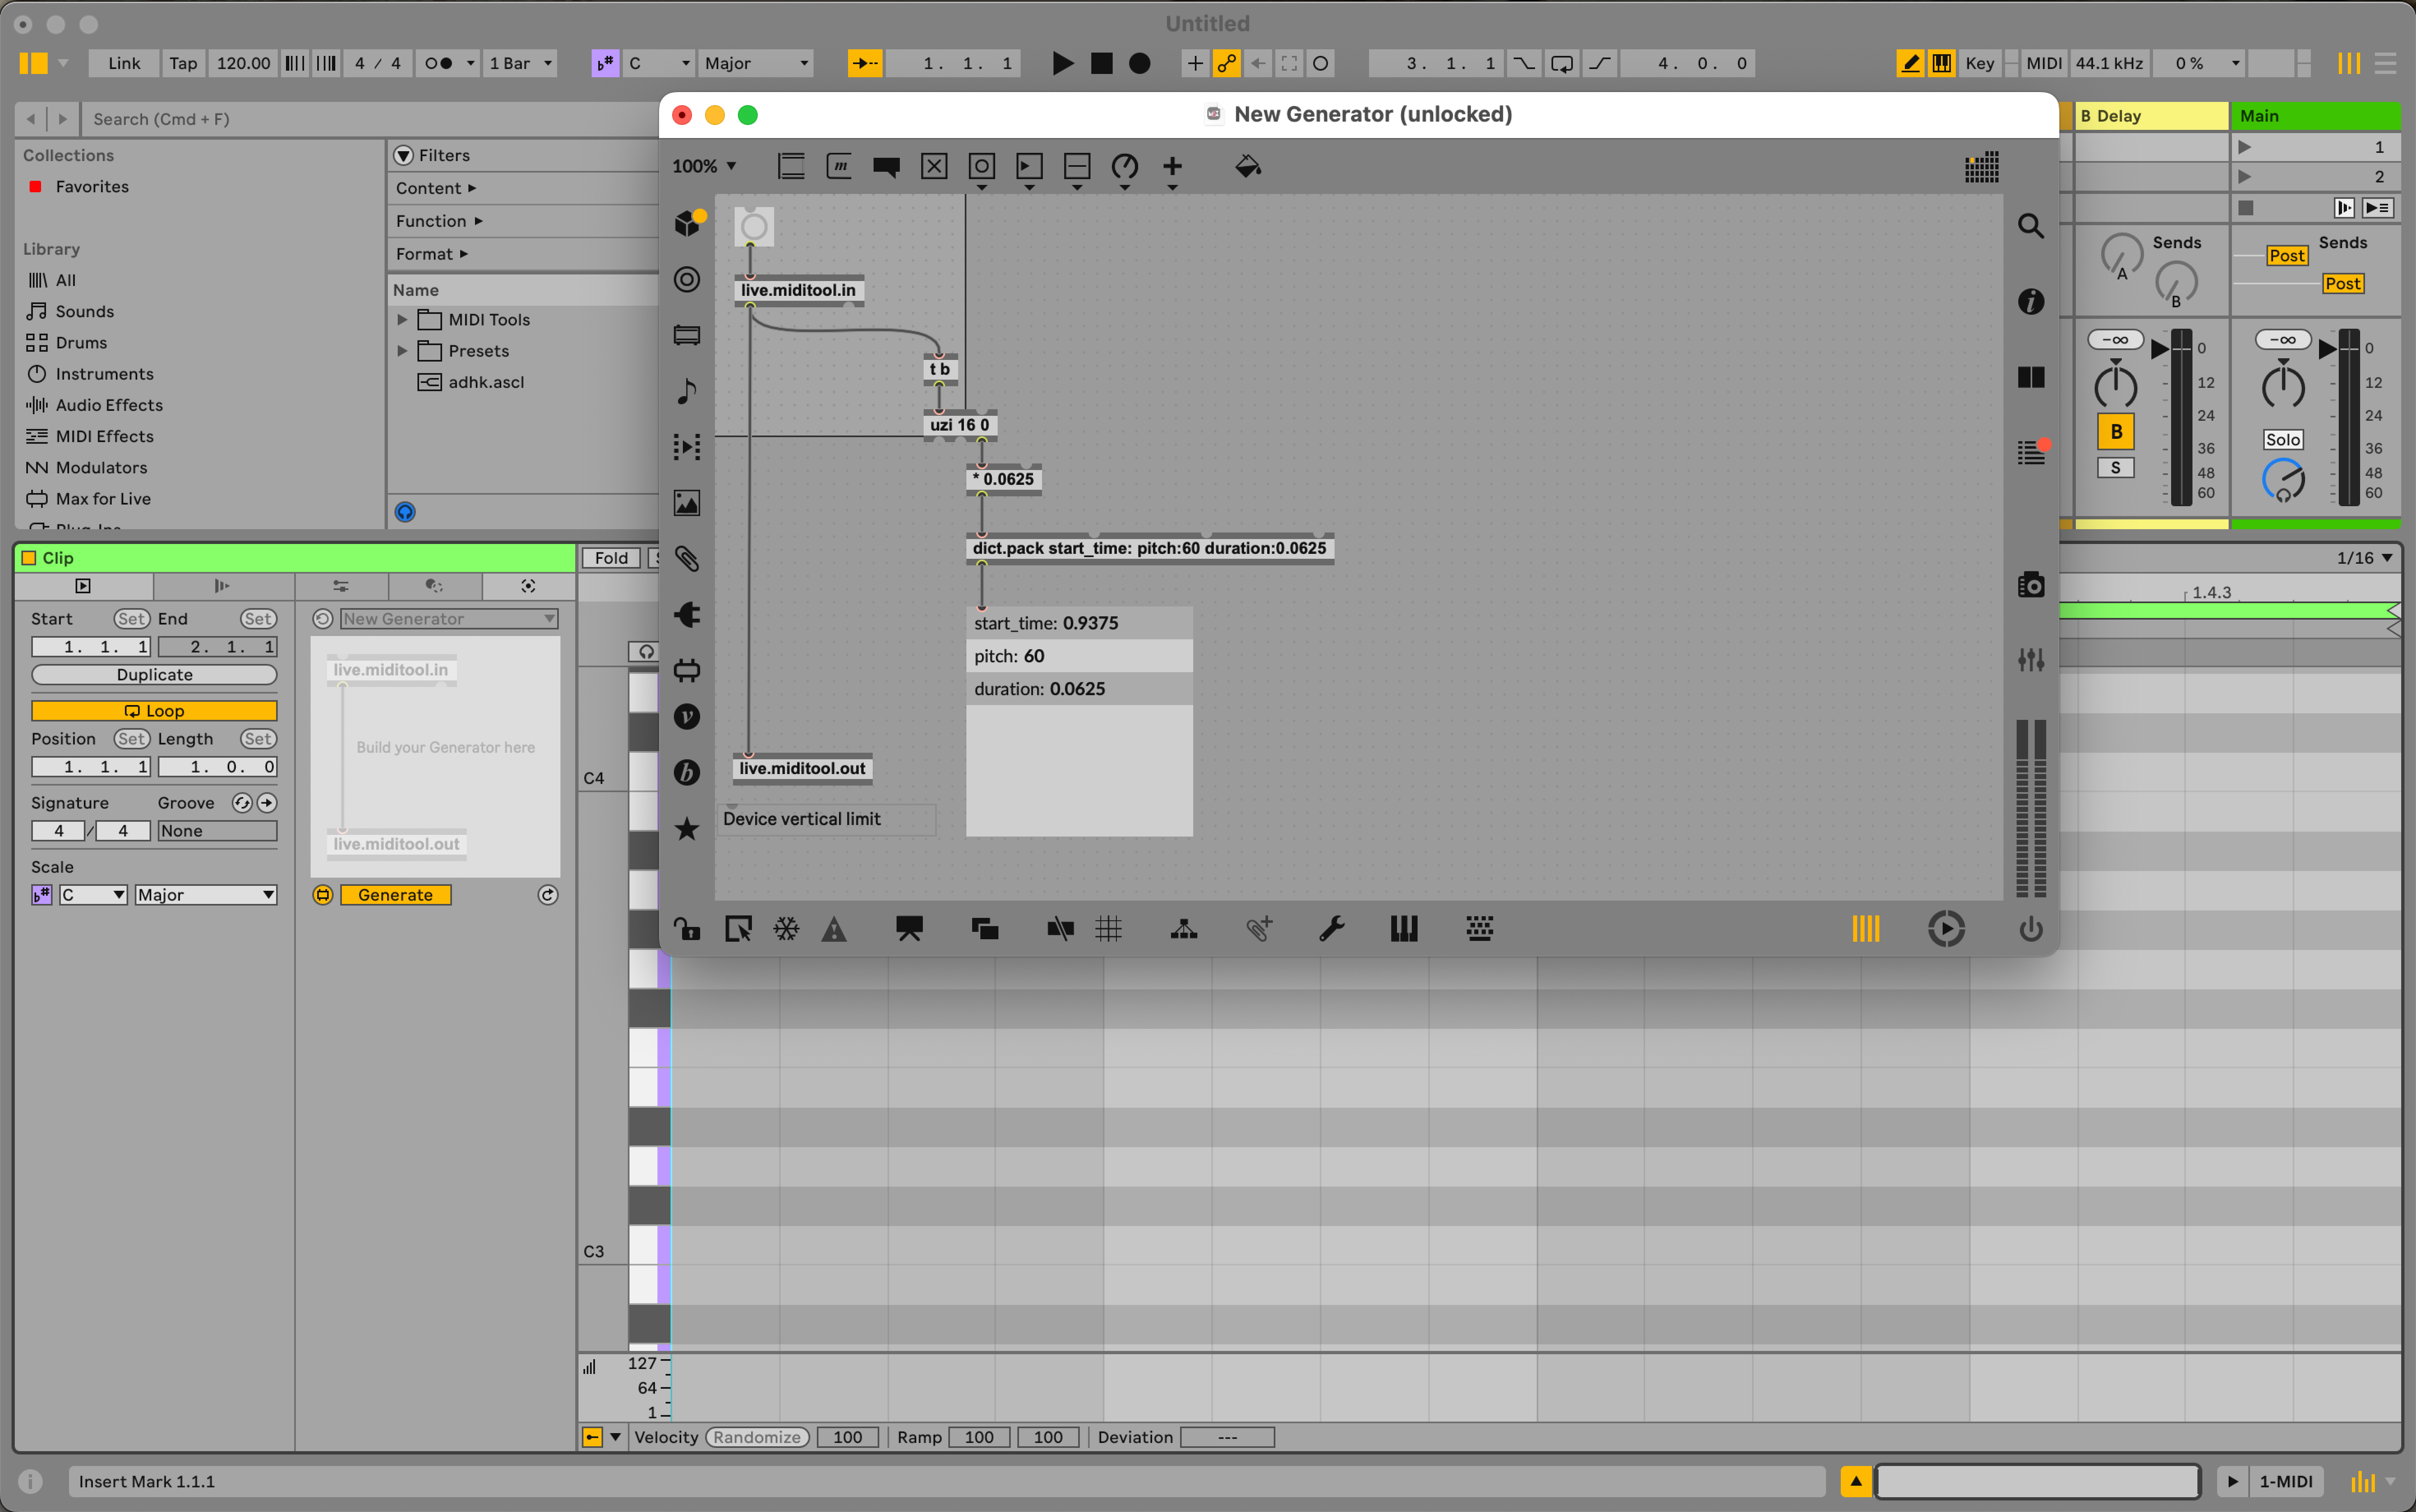
As each of these note dictionaries are generated, they need to be appended to an array containing all the notes. To do this we take the output of dict.pack and send it to an array prefixed by the symbol. Once the uzi has finished outputting we will use its middle outlet to output the array of note dictionaries. Before sending that off to live.miditool.out we need to wrap it in a dict with a key. This can be done with dict.pack and by making the first argument .
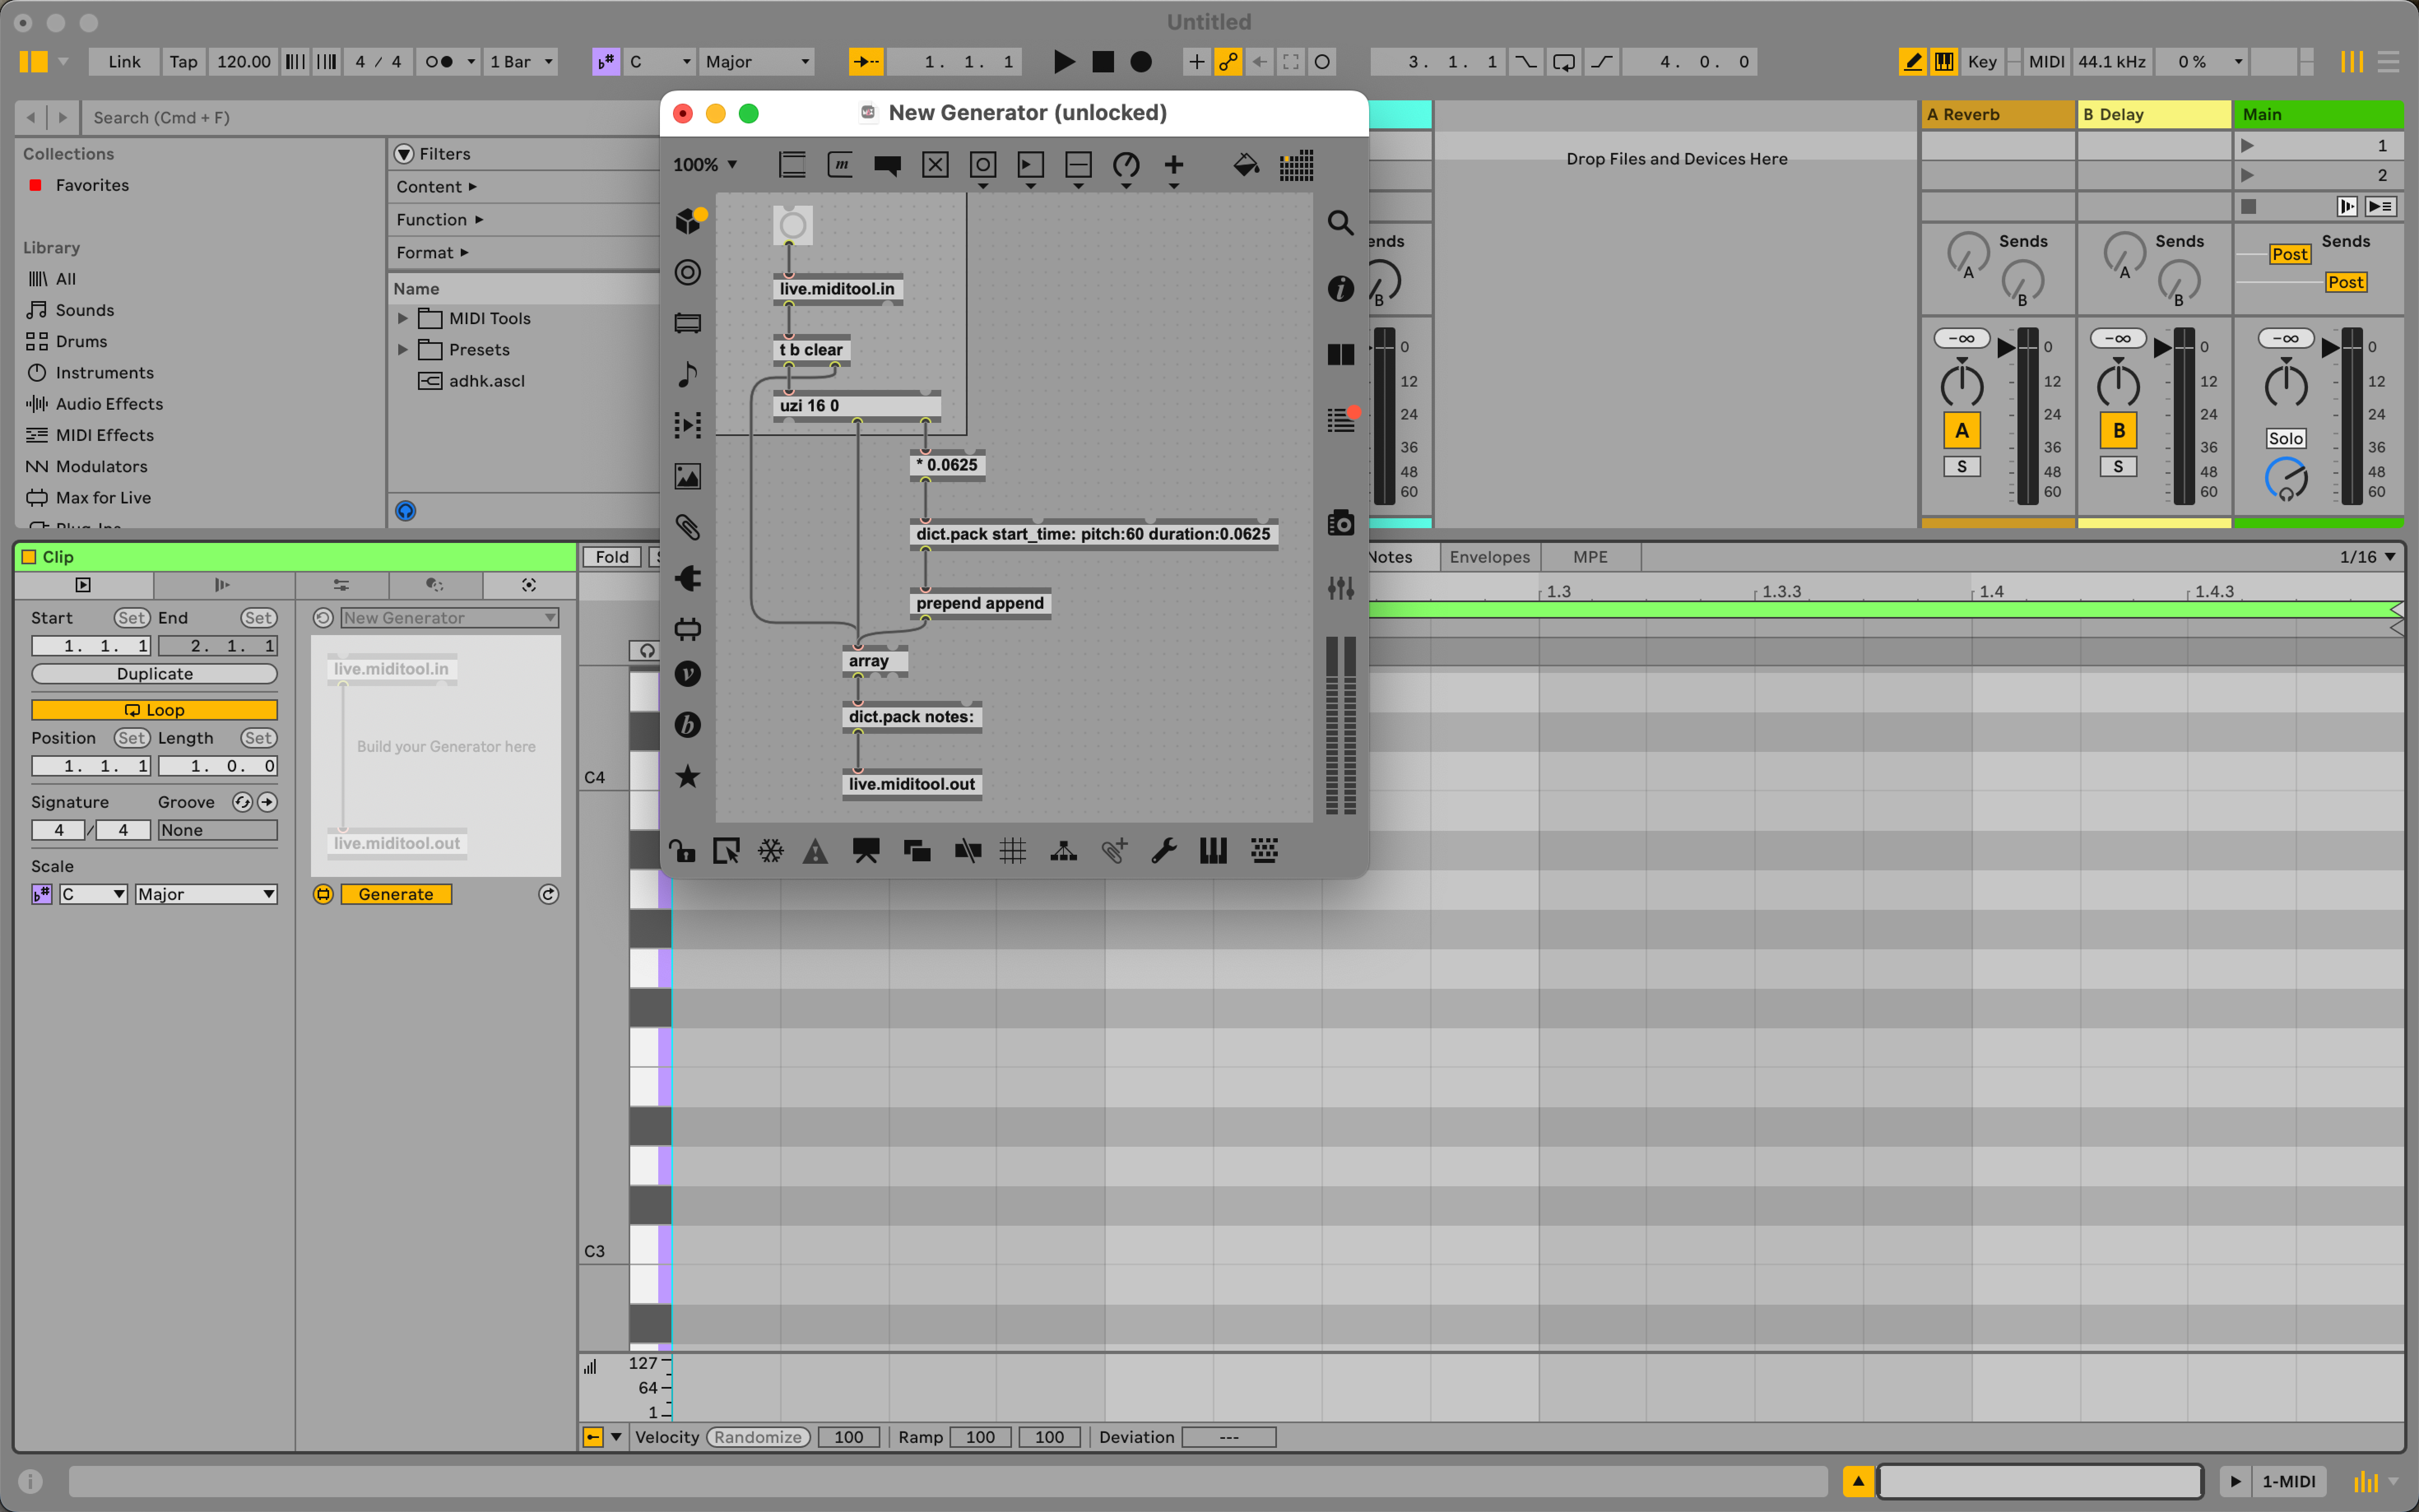
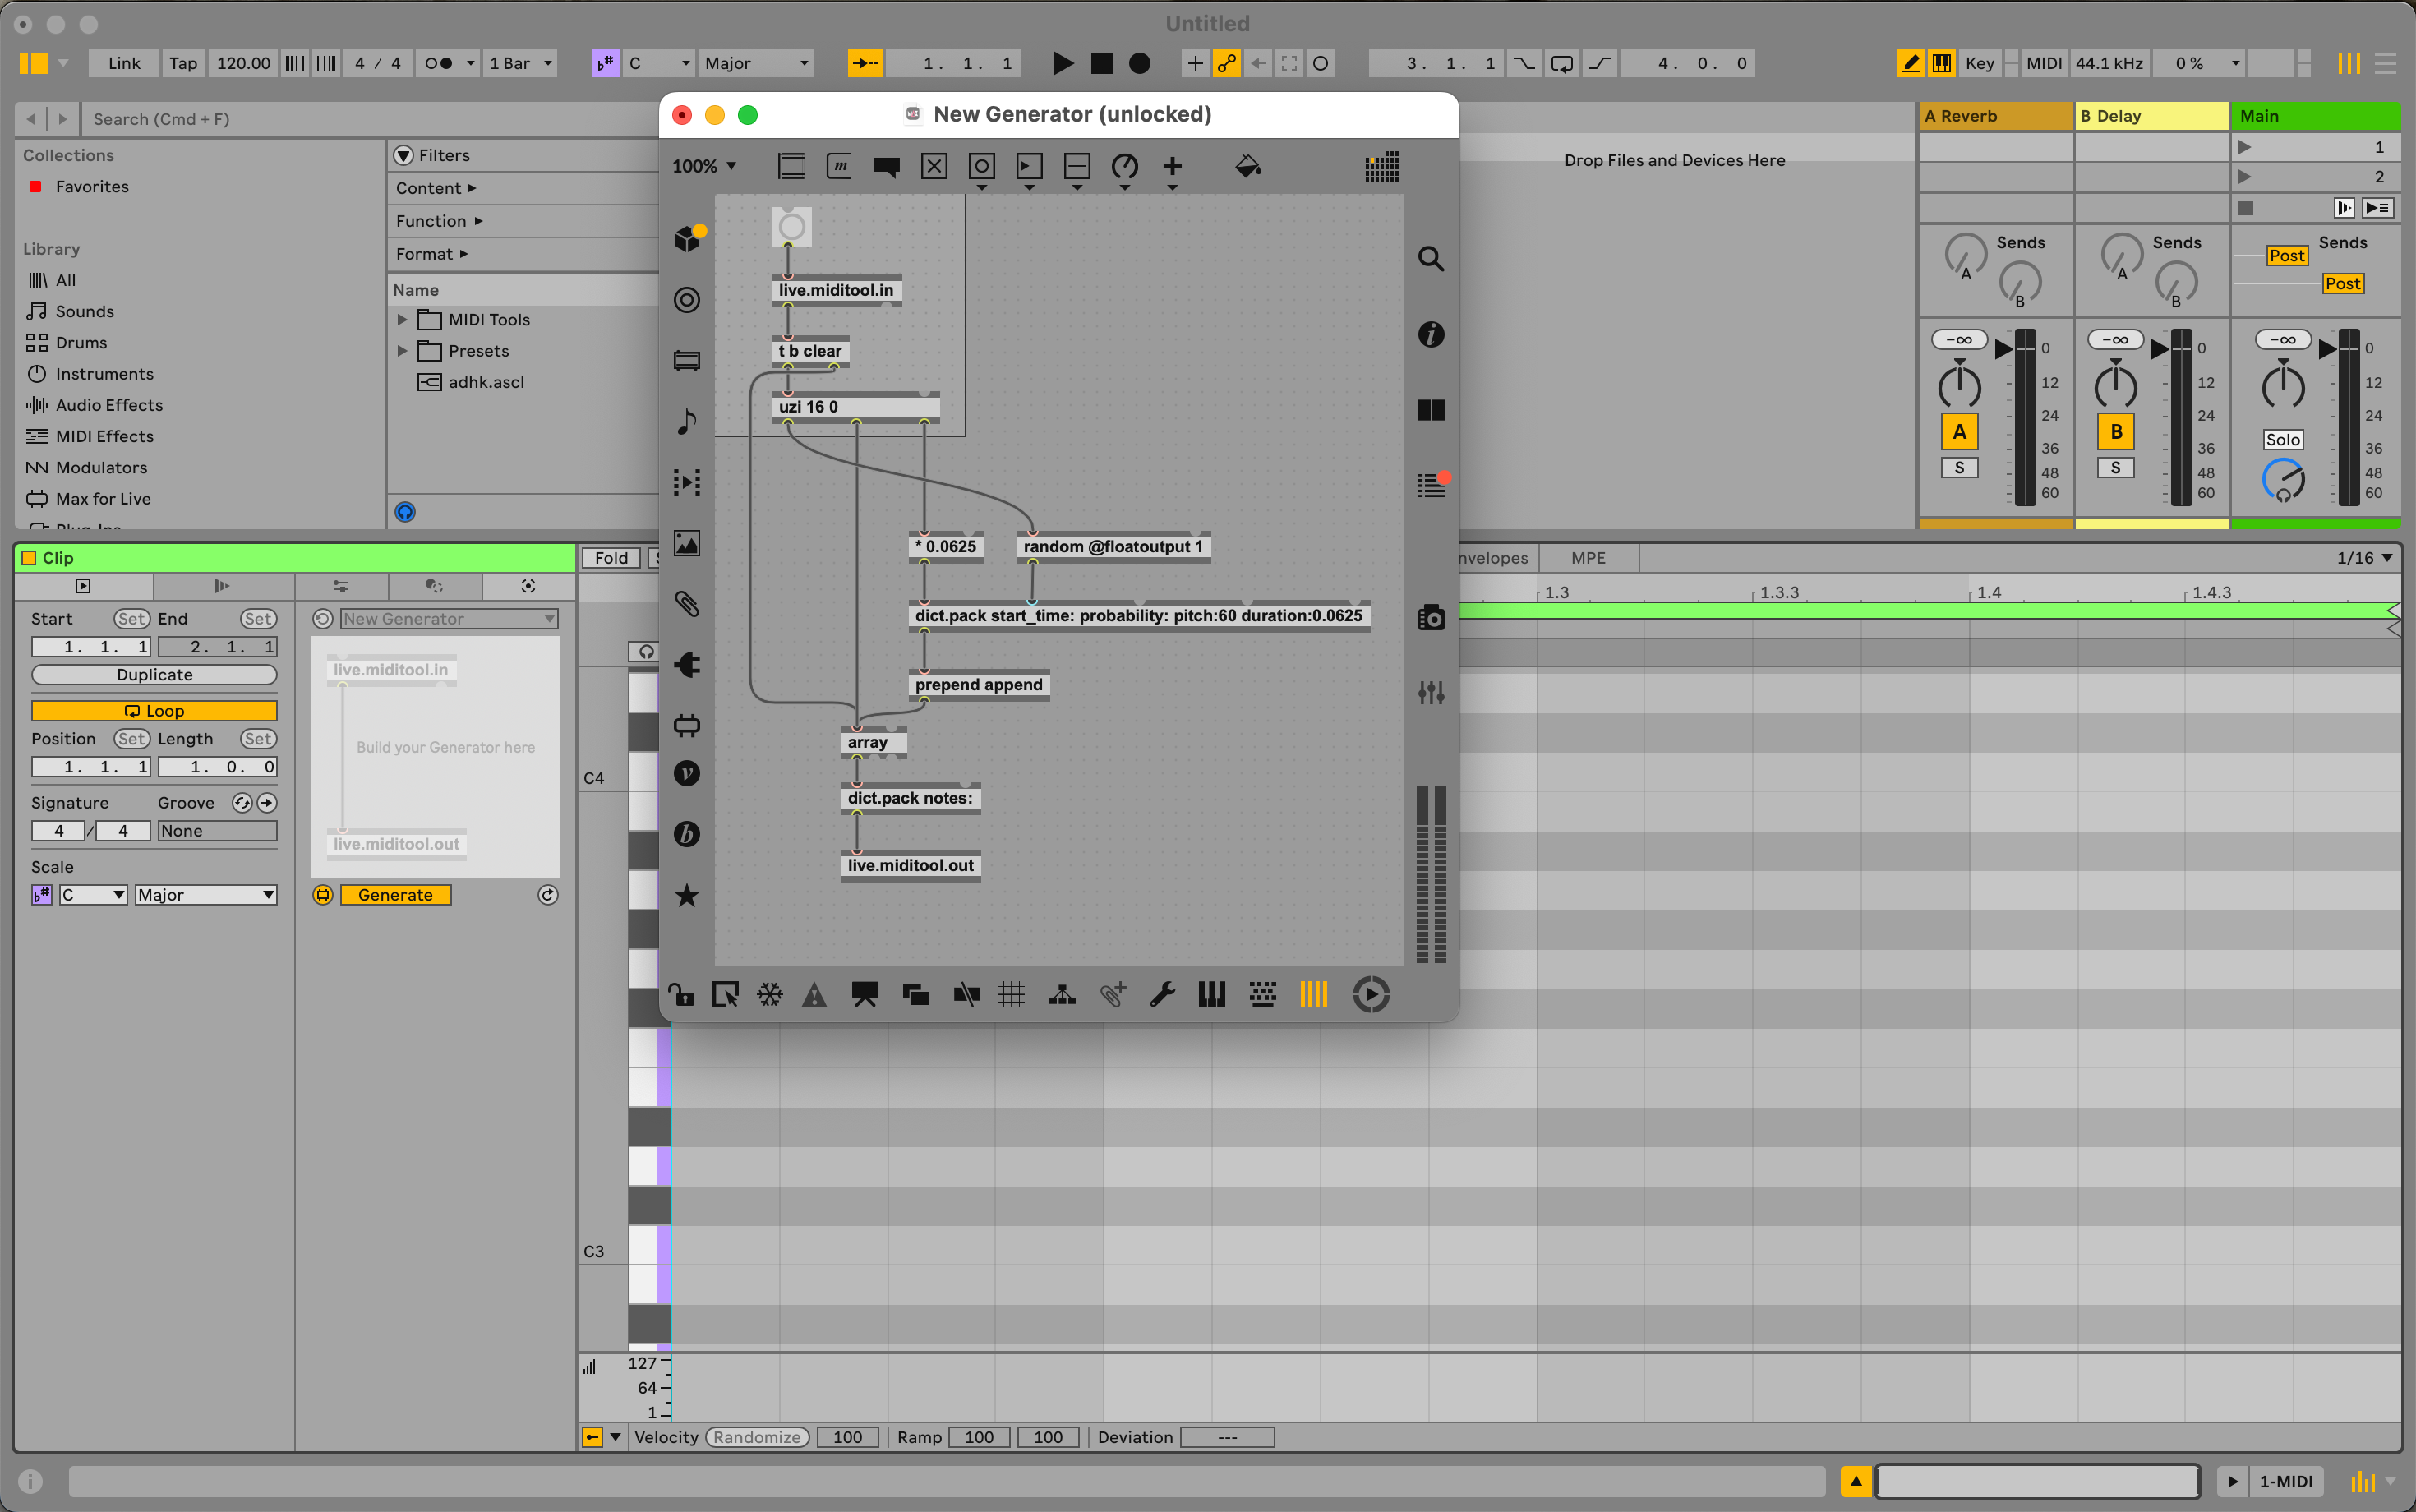
You can now generate 16th notes by pressing the bang or apply button in Live. To vary the rhythm that is generated each time, we can add a small randomisation to the chance that a note is generated at all. We can do this by adding a random object to the patch and connecting it to the key of each note dictionary. We will have to add the argument to dict.pack to do this.
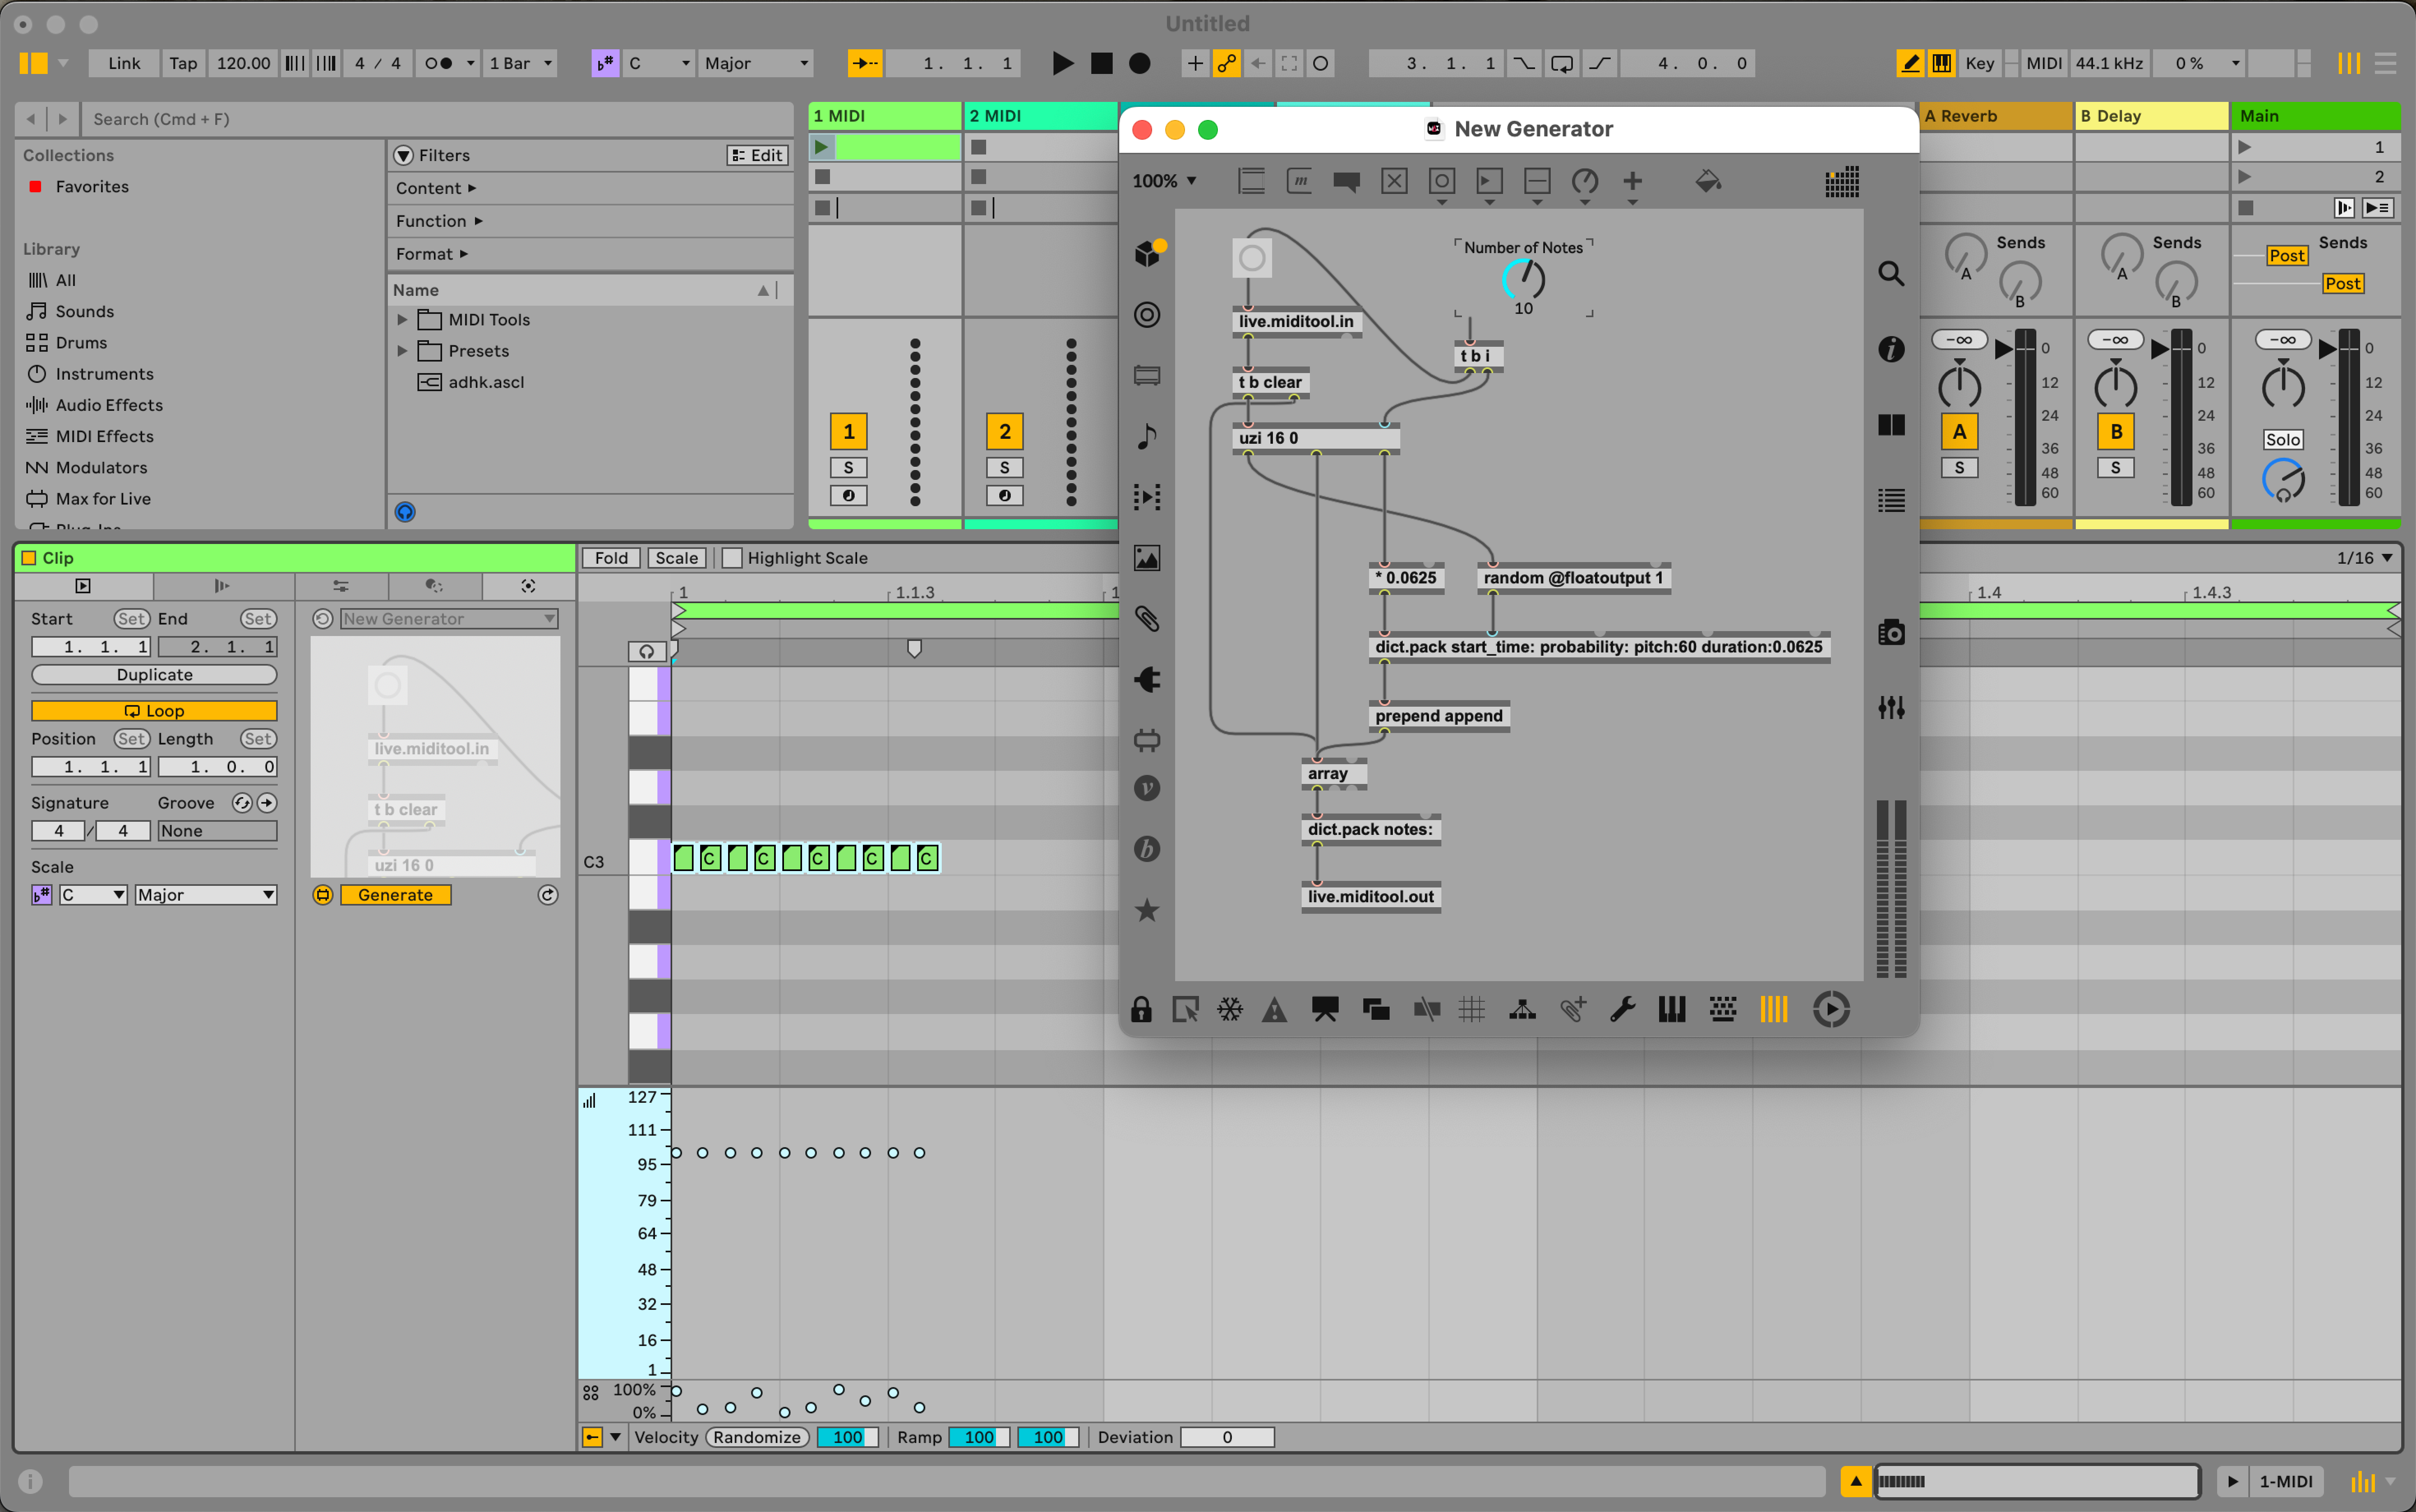
Lastly, we can also add a dial to control the number of notes generated. We can do this by adding a live.dial to the patch and connecting it to the uzi and live.miditool.in objects. As we did with the Transformation example, we can also add the control to the presentation view and set the patcher to "Open in presentation".
Next Steps
Now that you have the basic building blocks for creating both a Generator and Transformation MIDI Tool it's up to you to create more interesting, varied and explorative devices for yourself. Something that you can explore next is using the context outlet of live.miditool.in to create MIDI Tools that are more contextually aware of the Clip they are interacting with. You could also implement more sophisticated algorithms for melodic and rhythmic generation, as well as musical and complex transformations. Of course, you can also open the Euclidean and Velocity Shaper MIDI Tools in the editor and look at those patches for inspiration as well.
Common Errors and How To Handle Them
My Generator or Transformation doesn't do anything
In this scenario, it's always good to start by checking that the live.miditool.in object is outputting the data you expect. You can do this by attaching a dict.view object to the left outlet of live.miditool.in and sending a to the object. If you see the data you expect, then the problem is likely in the logic of your patch. If you see the correct data being emitted by live.miditool.in then check that the transformed or generated data is arriving at the live.miditool.out object in the correct format. Lastly, for a Transformation, ensure that there are notes in the MIDI Clip. Remember, Transformations won't do anything if there are no notes available in the Clip to transform.
Synchronisation
In some cases, you may see an error message in the status bar of Live like this:

This is because the patch has initiated a sort of transaction between Live and the MIDI Tool, but the transaction has not been completed. This can happen for a number of reasons, but most likely happens if you send a to live.miditool.in and do not also pass a dictionary back to Live via live.miditool.out.
Limitations
MSP objects and audio processing
Objects that process audio do not work in MIDI Tools currently. MIDI Tools are not attached to the audio processing engine and therefore cannot process audio.
node.script
Max for Live MIDI Tools do not support the node.script object in a straightforward way because this object runs in its own process and can return values at an indeterminate time. Because MIDI Tools depend on a synchronous interaction with Live, the node.script object is not suitable for use in a MIDI Tool, unless the order of operations in a MIDI Tool is not contingent on the output of the node.script object.
Transport
The transport object cannot be used to control the transport. It currently reports values, however, these values are not necessarily correct and can be misleading.