Tutorial 51: Jitter Java
This tutorial assumes that the reader is familiar with the process of programming mxj Java classes. The details for how this is done are contained in the Writing Max Externals in Java document.
In this Tutorial we’ll outline how mxj classes can operate directly on the cells of an input matrix. We also will see how to create classes in the Java programming language that internally load Jitter objects and define and execute a processing network. Finally, we will learn how to design hardware-accelerated user interface elements by attaching a “listener” to a drawing context and polling a window for mouse events.
The Jitter Java API centers around the JitterObject class, which provides a way for mxj classes to instantiate Jitter objects. The following line of code creates a jit.op Jitter object.
JitterObject jo = new JitterObject(“jit.op”);
We can send messages to objects in our Java code by using JitterObject’s call() or send() methods. For instance, we might set the operator in the above instance of jit.op as follows:
jo.send(“op”, “+”);
We could alternatively set this attribute using the setAttr() method:
jo.setAttr(“op”,”+”);
The JitterMatrix class extends JitterObject – after all, jit.matrix is a Jitter Object. Since jit.matrix is such a common object it is handy to have convenience methods dedicated to its creation and destruction. For instance, the below line of code creates a new -plane JitterMatrix of type and dimensions by 240.
JitterMatrix jm = new JitterMatrix(4, “char”, 320, 240);
We can also create a JitterMatrix object by specifying the matrix :
JitterMatrix jm = new JitterMatrix(“Stanley”);
If a jit.matrix object named already exists, this Java peer JitterMatrix object will refer to it. In this case a new jit.matrix object is not created.
Conveniences are nice, but the primary reason the JitterMatrix class exists is to provide native methods to access the data in the matrix cells. We’ll see an example of this in action when we open the tutorial patch.
Accessing an Input Matrix
• Open the tutorial patch 51jJava in the Jitter Tutorials folder. Double-click on the subpatcher. Click on the button object and look at the output in the Max window.
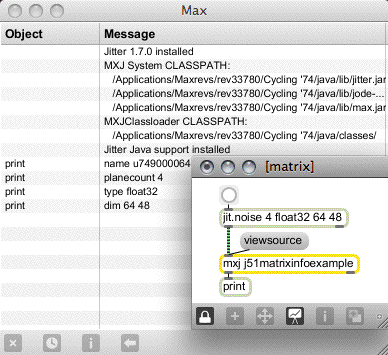
In this subpatcher, clicking on the button object causes the jit.noise object to send a plane by matrix into an mxj object with the j51matrixinfoexample class loaded. This Java class sends some basic information about the input matrix out its outlet. Let’s examine the code for the class:
import com.cycling74.max.*;
import com.cycling74.jitter.*;
public class j51matrixinfoexample extends MaxObject {
public void jit_matrix(String s)
{
JitterMatrix jm = new JitterMatrix(s);
outlet(0,"name", jm.getName());
outlet(0,"planecount", jm.getPlanecount());
outlet(0,"type", jm.getType());
outlet(0,"dim", jm.getDim());
}
}
The class consists of a single jit_matrix method. Of course since matrices are passed between Jitter objects as named references, we think of a matrix being input as just a simple two element list, and this is how mxj sees it. The argument of the jit_matrix message is of course the matrix , so the first thing our method does is create a new JitterMatrix object with the of the input matrix as the constructor’s only argument. The JitterMatrix object that is created will have that named jit.matrix object as its peer. The next four lines of code simply output the results of some basic queries that can be made using the methods of the JitterMatrix class.
Operating on a Matrix
• Close the subpatcher. Open the subpatcher.
The subpatcher gives us an example of a class that operates on the data of an input
matrix. Note that there are two classes set up to be used, with a Ggate object allowing us to switch between them; we will be comparing two different ways of performing the same operation to see which is more efficient.
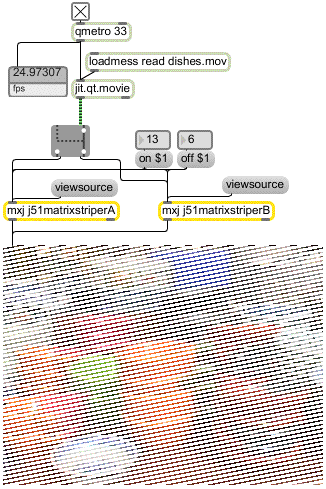
These classes “stripe” an input matrix by iterating across each row of the matrix and
overwriting the values of some of the cells. Which cells are written to depends on the
values of the and attributes: if the attribute has value v and has value w, the
algorithm will overwrite v cells, then not write to w cells, and so on as it iterates row-wise through the matrix.
Here is the code for j51matrixstriperA:
import com.cycling74.max.*;
import com.cycling74.jitter.*;
public class j51matrixstriperA extends MaxObject {
JitterMatrix jm = new JitterMatrix();
int frgb[] = new int[] {255, 255, 255, 255};
int on = 2, off = 1;
j51matrixstriperA()
{
declareAttribute("frgb");
declareAttribute("on");
declareAttribute("off");
}
//note that this method assumes a 2D char matrix!
public void jit_matrix(String s)
{
jm.frommatrix(s);
int dim[] = jm.getDim();
int count = 0;
boolean notoff = true;
for (int i="0;i<dim[1];i++)"
for(int j="0;j<dim[0];j++)"
{
if (notoff)
jm.setcell2d(j, i, frgb);
if ((notoff &&(++count > on))
||(!notoff&&(++count > off)))
{
count = 0;
notoff = !notoff;
}
}
outlet(0, "jit_matrix", jm.getName());
}
}
In the jit_matrix method we use the getDim() method to find out the dimensions of
our matrix and store them in the int array dim, which we then use as the terminal
conditions in the for() loops of our iterative procedure. The setcell2d method allows
us to directly set the value of any cell in the matrix. When we are finished processing, we
send a message out with the name of our JitterMatrix as the argument.
• Toggle the Ggate object back and forth. Which class is faster?
The only difference between j51matrixstriperA and j51matrixstriperB is the jit_matrix
method. Here is j51matrixstriperB’s jit_matrix method:
//note that this method assumes a 2D char matrix!
public void jit_matrix(String s)
{
jm.frommatrix(s);
int dim[] = jm.getDim();
int count = 0;
int planecount = jm.getPlanecount();
int offset[] = new int[]{0,0};
boolean notoff = true;
int row[] = new int[dim[0]*planecount];
for (int i="0;i<dim[1];i++)"
{
offset[1] = i;
jm.copyVectorToArray(0, offset, row,
dim[0]*planecount, 0);
for(int j="0;j<dim[0];j++)"
{
if (notoff)
{
for (int k="0;k<planecount;k++)"
row[j*planecount+k] = frgb[k];
}
if ((notoff &&(++count > on))
||(!notoff&&(++count > off)))
{
count = 0;
notoff = !notoff;
}
}
jm.copyArrayToVector(0, offset, row,
dim[0]*planecount, 0);
}
outlet(0, "jit_matrix", jm.getName());
}
Rather than set values in the matrix one cell at a time, the jit_matrix method of
j51matrixstriperB grabs an entire row from the matrix using JitterMatrix’s
copyVectorToArray method, overwrites the appropriate values in the row, then writes
the row back to the matrix using JitterMatrix’s copyArrayToVector method. As you
may have noticed, this version of the class is significantly faster than the version that sets
cells in the matrix one-by-one. This is an excellent demonstration of the following very
important thing to keep in mind: it is very expensive to cross the C/Java boundary. The
version of this object that uses setcell must go back and forth across the C/Java boundary once for every cell in the matrix. The latter version goes back and forth just twice per row. If you have tried both versions of the object out, the savings are evident.
The copyVectorToArray and copyArrayToVector methods are overloaded with
signatures that cover all the relevant data types. As you can see from a careful
examination of the above code, these methods provide and expect the Java arrays with the
planar data multiplexed so that all of a cell’s data is presented contiguously. There are also
copyVectorToArrayPlanar and copyArrayToVectorPlanar methods for moving a single plane’s data into Java.
When using mxj classes to process matrices in Jitter there is no built-in usurp functionality, so it is important to always drive the object network using a qmetro object, or some other construction that defers events to prevent backlog.
Copying Input Data
In the above examples may also have noted the different way that we internally use our
JitterMatrix. Whereas in the matrix info example we created a new JitterMatrix every
time an input matrix was received, this time we cache one instance of JitterMatrix and
copy the input data into it every time using the frommatrix method. Why do we do this?
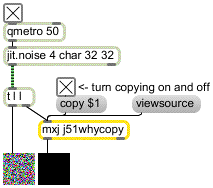
The trigger object in this subpatch sends the output of the jit.noise object first into an
instance of the mxj class j51whycopy:
import com.cycling74.max.*;
import com.cycling74.jitter.*;
public class j51whycopy extends MaxObject {
JitterMatrix jm = new JitterMatrix();
boolean copy = false;
j51whycopy()
{
declareAttribute("copy");
}
public void jit_matrix(String inname)
{
//under normal circumstances
//we would only create this matrix once
jm = new JitterMatrix();
if (copy)
{
jm.frommatrix(inname);
}
else //!copy
{
jm = new JitterMatrix(inname);
}
zero(jm);
outlet(0, "jit_matrix", jm.getName());
}
//note that this method assumes the matrix is of type char
private void zero(JitterMatrix m)
{
int z[] = new int[m.getPlanecount()];
for (int i="0;i<m.getPlanecount();i++)"
z[i] = 0;
m.setall(z);
}
}
The attribute flips the jit_matrix method between two different modes: if is true, the data from the input matrix is copied into our internal JitterMatrix using the frommatrix method. If is not true, the JitterMatrix is created with the input matrix as its peer. In both cases our JitterMatrix is zeroed using the setall method, and then output.
• Turn the attribute on and off with the toggle box. What happens in the left jit.pwindow?
When the attribute is off and we create a new JitterMatrix associated with the input
name we operate directly on the data of that matrix. Therefore we may be altering the
contents of the matrix before other objects have had a chance to see it. In this example
patch, when the attribute is true the left jit.pwindow correctly shows the matrix
produced by jit.noise. When the attribute is false both jit.pwindow objects are black
because our mxj class alters the matrix’s data directly. Therefore if we are operating on a
matrix, we should make sure to copy the input data into an internal cache as we do here
with frommatrix.
Object Composition
In this section we’ll examine the use of multiple JitterObjects within a single Java class.
• Toggle the qmetro off and close the subpatcher window. Open the composition
subpatcher. Toggle the qmetro on.
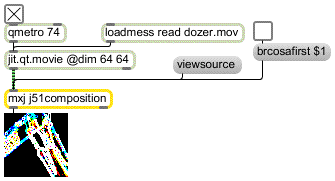
Let’s examine the code for the j51composition class:
import com.cycling74.max.*;
import com.cycling74.jitter.*;
public class j51composition extends MaxObject {
JitterMatrix jm = new JitterMatrix();
JitterMatrix temp = new JitterMatrix();
JitterObject brcosa;
JitterObject sobel;
boolean brcosafirst = false;
j51composition() {
declareAttribute("brcosafirst");
brcosa = new JitterObject("jit.brcosa");
brcosa.setAttr("brightness", 2.0f);
sobel = new JitterObject("jit.sobel");
sobel.setAttr("thresh", 0.5f);
}
public void jit_matrix(String mname)
{
jm.frommatrix(mname);
temp.setinfo(jm);
if (brcosafirst)
{
brcosa.matrixcalc(jm, temp);
sobel.matrixcalc(temp, jm);
}
else
{
sobel.matrixcalc(jm, temp);
brcosa.matrixcalc(temp, jm);
}
outlet(0, "jit_matrix", jm.getName());
}
public void notifyDeleted()
{
brcosa.freePeer();
sobel.freePeer();
}
}
Two JitterObjects are created in the class’s constructor: brcosa controls a peer jit.brcosa
object, and sobel controls a peer jit.sobel object. The jit_matrix method copies the
data from the input matrix to jm, and then sets the dimensions, and of the
temp matrix to that of jm with the setinfo method. After this the two JitterObjects can be used to process the data in either order: if the attribute is true, the brcosa
operates first and then sobel, and of course vice versa is is false. We operate on
the data in a matrix by calling a JitterObject’s matrixcalc method. The two arguments are input and output matrices – it is also possible to use arrays of input and output matrices if the peer Jitter object supports multiple matrix inputs or outputs. This simple example shows how it is possible to define a varying network of Jitter objects within a Java class.
• Toggle the attribute on and off to see the difference in the resulting image.
Finally, note that when the mxj object is deleted and the notifyDeleted method is called, the peer Jitter objects are freed by calling the freePeer() method for every JitterObject we’ve instantiated. If freePeer() is not called the C object peers will persist until the Java memory manager garbage collects, and this could take a while.
Listening
• Toggle the qmetro off and close the subpatch. Open the subpatch. Turn on the toggle box labeled verbose, move the mouse in the jit.pwindow object and observe the results in the Max window.
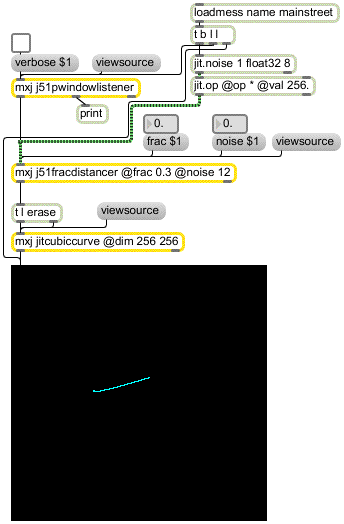
This section assumes you’ve looked at Tutorial 47: Using Jitter Object Callbacks in JavaScript, which covers object callbacks in Javascript. The Jitter Java API provides the same mechanism for “listening” to events generated by named Jitter objects. In this subpatcher we use this mechanism to track mouse movement within a named jit.pwindow. Let’s examine the source code for the j51pwindowlistener class:
import com.cycling74.max.*;
import com.cycling74.jitter.*;
public class j51pwindowlistener extends MaxObject
implements JitterNotifiable
{
JitterListener listener;
boolean verbose = false;
j51pwindowlistener()
{
declareIO(1,2);
declareAttribute("verbose");
}
public void name(String s)
{
listener = new JitterListener(s,this);
}
public void notify(JitterEvent e)
{
//this gets the name of the listening context
String subjectname = e.getSubjectName();
//this gets the type of event...mouse, mouseidle, etc.
String eventname = e.getEventName();
//this gets the arguments of the event
Atom args[] = e.getArgs();
if (verbose)
{
outlet(1,subjectname);
outlet(1,eventname,args);
}
if ((eventname.equals("mouse"))
||(eventname.equals("mouseidle")))
{
int xy[] = new int[] {args[0].toInt(),
args[1].toInt()};
//output the x and y coordinates of the mouse
outlet(0, xy);
}
}
}
The first thing to notice is that the class implements an interface called JitterNotifiable. This simple interface ensures that the class has a notify method which will be called when an event is “heard”. Notice that the notify method takes a JitterEvent as an argument. The notify method in this class illustrates the methods of these JitterEvents that we’ll use to extract the pertinent data: getSubjectName returns the name of the listening context, which is useful if we’re listening in more than one place; getEventName returns the name of the event that has been heard; and getArgs returns the arguments that detail the parameters of the event. With the attribute enabled, this class’s notify method outputs these data out the second outlet and a print object sends it to the Max window.
The notify method continues by testing the value of eventname for equality with either (for normal mouse movement) or (for movement with the button down). If either of these Strings is a match, the first two arguments, which represent the x and y position of the mouse in the window, are output as a list.
The last thing to note about this class is that before any listening can happen the listener must be created with an existing context. In this case that happens when an instance of the class receives a message. Unlocking the patch will show you how the jit.pwindow object is given a first; the message is then sent to the instance of j51pwindowlistener.
The rest of the patch uses the jitcubiccurve example class to render a cubic curve the follows the mouse around. The control points for the cubic curve are calculated using the j51fracdistancer class, whose code you may want to read through to see if you’ve understood the material in this lesson:
import com.cycling74.max.*;
import com.cycling74.jitter.*;
import java.util.*;
public class j51fracdistancer extends MaxObject{
JitterMatrix ctlmatrix =
new JitterMatrix(1, "float32", 8);
float ctldata[] = new float[8];
int offset[] = new int[] {0};
float frac = 0.5f;
float noise = 0.5f;
Random r = new Random();
j51fracdistancer() {
declareAttribute("frac");
declareAttribute("noise");
}
//new x,y input
public void list(int args[])
{
if (args.length != 2) return;
float x = (float)args[0];
float y = (float)args[1];
for (int i="0;i<4;i++)"
{
ctldata[i*2] += (x-ctldata[i*2]) * frac +
((float)r.nextGaussian()*noise);
ctldata[i*2+1] += (y-ctldata[i*2+1]) * frac +
((float)r.nextGaussian()*noise);
}
ctlmatrix.copyArrayToVector(0,offset, ctldata, 8, 0);
outlet(0, "jit_matrix", ctlmatrix.getName());
}
public void jit_matrix(String mname)
{
JitterMatrix jm = new JitterMatrix(mname);
if (jm.getDim()[0] != 8) return;
if (jm.getPlanecount() != 1) return;
if (!jm.getType().equals("float32")) return;
ctlmatrix.frommatrix(mname);
ctlmatrix.copyVectorToArray(0, offset, ctldata, 8, 0);
}
}
Summary
In this tutorial we’ve introduced the JitterObject, JitterMatrix, and JitterListener classes, and we’ve seen how to use them to put together mxj classes that operate directly on data, use composition of existing Jitter objects to define graphs of processing, and how to listen to Jitter objects for events in a way that can facilitate the building of user interface components, among other things.
See Also
| Name | Description |
|---|---|
| jit.matrix | The Jitter Matrix! |
| jit.noise | Generate white noise |
| jit.op | Apply binary or unary operators |
| jit.qt.movie | Play or edit a QuickTime movie |
| mxj | Java in Max |