Tutorial 53: Jitter Networking (part 2)
Broadcasting
In addition to sending matrix data over networks, we can also create RTSP streams in Jitter, using the objects jit.broadcast and jit.qt.broadcast. The jit.qt.broadcast object is only available on computers running the Mac OS, and is described at the end of this chapter. The jit.broadcast object is cross-platform. Both objects function more or less the same way, though, and users of jit.qt.broadcast should follow the entire chapter.
RTSP stands for Real-Time Streaming Protocol, and is a popular network streaming standard, supported by many media players such as the QuickTime Player and VLC (you can learn more about VLC, a free, open-source, cross-platform player, at http://www.videolan.org/vlc/). These media players are RTSP clients. Our Max objects are RTSP servers, and they properly format, in some cases compress, packetize and broadcast data for RTSP streaming. Using these objects, you don't need any external server — everything is done for you, all inside of Jitter!
Mainstream
Before we get started, you'll want to make sure that your network is properly configured. Ensure that you have a network interface active and a valid IP address. On Windows, this is particularly important, or our streaming experiments won't work.
Even if you are not connected to a network on Windows, you'll need to have at least one active network interface, as far as the OS is concerned. This might mean logging/dialing into the Internet, or attaching a powered-on router to your Ethernet port, even if you have no other computers to share with—basically, anything which causes Windows to detect that you're using the network—so that it assigns your computer an IP address.
• Click on the message box labeled and turn on the toggle box labeled Start Movie to begin movie playback. You should see the movie playing in the jit.pwindow object.
Before we begin the actual broadcast, we should consider a few things.
First, what will the dimensions of our broadcast stream be? The two arguments in the jit.broadcast object's box determine the size of the compressed, streamed image. To change this size, the attribute is used. In our case, we will stream at 160x120 pixels.
Second, what streaming video codec are we going to use? The jit.broadcast object supports 3 different ones—MPEG-4, H.263 and JPEG. Incoming Jitter frames will be automatically compressed into the chosen format before streaming.
• Using the umenu object, choose your desired streaming codec from the 3 available.
By default, the object uses the MPEG-4 codec, but the choice is yours. Certain codecs may be easier for some clients to receive. For instance, at the time of this writing, QuickTime Player is much better at receiving MPEG-4 video than VLC.
Third, are we streaming to a single computer (known as a unicast) or should our stream be made available to any client who accesses the URL of our stream (known as a multicast)? By default, the jit.broadcast object uses multicast streaming, although this can be changed using the attribute.
• Click on the message box labeled and note the output in the Max Window. When multicasting, the jit.broadcast object automatically generates a valid multicast IP address. Click on the toggle labeled Enable Unicast and click the message box labeled again, noting the output in the Max Window. The IP address changed to (this address is also known as localhost, and means "myself"—using this IP address, the computer would broadcast to itself). Using the attribute, we could now manually set the IP address of the (single) client computer (you can't change the attribute when multicasting, since it's generated automatically). For the purposes of this tutorial, we're going to stick to multicasting, but it's important to note that both methods are available.
There are a number of additional parameters which we can set to control the broadcast, such as port numbers, time-to-live (TTL), codec quality and keyframe-generation, and so on. By default, those values are all set to perfectly functional defaults, and there's no need to change them for this Tutorial.
Finally, what should we name our stream? The jit.broadcast object produces a URL for client computers to access, in the form rtsp://192.168.2.2:8554/jitStream. The IP address and port numbers are generated for us, but we could change the last part to our liking. For instance, we could name our RTSP stream someDishes.
• Click on the message box labeled . This will customize our stream's name.
• Click on the message box labeled to begin streaming. When streaming has successfully begun, the message , followed by a , then the RTSP URL (e.g. ) should appear in the Max Window. This last part is the address that client computers should connect to, in order to receive your stream.
Router Users: Note that if your computer is behind a router providing a local IP address (using NAT, for instance), the RTSP URL will refer to your local IP address, not your "real" IP address (WAN address), as would be accessed from computers outside of your local network. To learn your WAN address, you can point your web browser to http://checkip.dyndns.org/ (merely one example from many similar websites). You'll substitute this address for the numerical portion of the RTSP URL before the colon. In the example above, the WAN address would take the place of .
Most routers have built-in firewalls. In order to properly stream from Jitter, be aware that the RTSP port (the portion of the RTSP URL after the colon, but before the forward-slash; here, ) will have to be unblocked, and any network traffic to that port must be directed to your computer. Consult the manual of your router if you are unsure how to do this.
• If you have a 2nd computer on your network, use a web browser or media player on that computer (such as QuickTime Player or VLC) to connect to the URL printed in the Max Window. Or call a friend and ask them to try it over the Internet. Or, if you have neither a 2nd computer nor available friends, you can fire up a copy of a web browser or media player on the same machine Jitter is running on to see your stream.
• When you've confirmed that it's all working, click the message box labeled . You might want to try some more broadcasting using different codecs and compare image quality and performance.
File Streaming
Using the jit.broadcast object, we can also stream pre-compressed Hinted Movie files as created by QuickTime. The jit.qt.movie object can export Hinted Movie files, so let's use it to export and hint our dishes.mov file, preparing it for broadcast.
Hinted Movie files contain extra information about the contents of the movie tracks, providing "hints" to a streaming server about codecs and quality, so that the server only has to worry about packetizing and broadcasting the data. In the case of jit.broadcast, since the object needn't compress incoming frames, streaming a Hinted Movie might offer a modest performance improvement, depending on your media.
We first need to tell the jit.broadcast object that we want to stream a movie file, rather than incoming matrix data. This is accomplished by setting the object's attribute.
• Turn on the toggle labeled Matrix / File to set the jit.broadcast object's attribute to 1—file broadcast mode.
We use the message to jit.qt.movie to create a Hinted Movie. You may want to refer to Tutorial 20: Importing and Exporting Single Matrices if you want to refresh your memory about movie exporting.
• Click on the message box labeled . This brings up the ‘Export’ dialog box for the movie loaded into jit.qt.movie (in our case, dishes.mov).
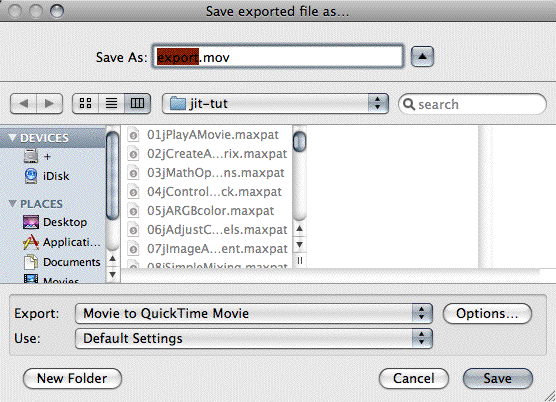
• Chose Movie to QuickTime Movie from the pop-up menu labeled Export, beneath the file browser section of the dialog box. Although there is a selection called Movie to Hinted Movie, it doesn't recompress a movie's media, which we want to do.
• Click the button labeled Options... to open the Movie Settings dialog box.
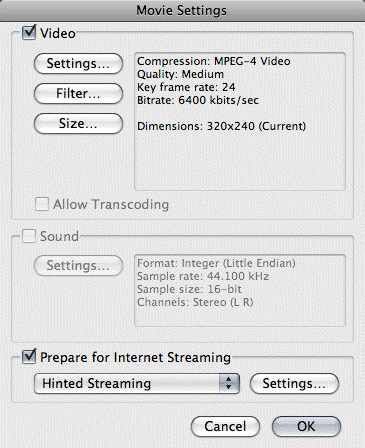
• Make sure that the Video check box has been checked and click on the button labeled Settings... just beneath it to open the Standard Video Compression Settings dialog box. Choose MPEG-4 Video from the pop-up menu labeled Compression Type and then click OK to return to the Movie Settings dialog box. Make sure that the check box labeled Prepare for Internet Streaming is checked, and that Hinted Streaming is selected in the pop-up menu directly beneath. Click OK when you're done, to return to the Export dialog box.
• Choose a location to save your Hinted Movie and a name, and click the Save button to write the movie to a file on your hard disk.
Good work! We're almost ready to stream the movie. In the case of a Hinted Movie, the attribute (or related information such as the , or attributes) to jit.broadcast has no effect—all of that information is already provided by the movie itself. All we need to do is tell the jit.broadcast object which movie to stream.
• Click the message box labeled to bring up a standard file dialog box, navigate to the location of your newly saved Hinted Movie and open it. A message should be posted to the Max Window with the of your movie followed by the number , indicating that the movie was read successfully.
• Press the message box labeled to begin broadcasting. Just like before, a message with the RTSP URL will be output from the object's dump outlet and posted to the Max Window. Verify with a media player or web browser that the movie is streaming.
• When you're done, click the message box labeled to stop the broadcast.
Using the jit.qt.broadcast object (Mac OS X only)
In most respects, the jit.qt.broadcast object functions identically to its companion jit.broadcast object. There are a few significant differences between the 2 objects, though:
• The jit.qt.broadcast object uses Session Description Protocol (SDP) files, instead of an "automatic" session announcement, when making a stream available.
• The jit.qt.broadcast object can stream several more codecs than the jit.broadcast object.
• The jit.qt.broadcast object can stream audio and/or video from Hinted Movie files, not just video.
• The jit.qt.broadcast object can stream audio and/or video from an attached camera.
The interested learner can consult the on-line Reference and help patch for the jit.qt.broadcast object to learn about streaming from a camera. For this tutorial, we're simply going to go through the process of generating an SDP file and starting a video-only broadcast based on incoming Jitter matrices.
Session Description Protocol files simply provide some basic data to RTSP clients about how many tracks are being streamed, some information about how they are encoded, and where in the network or internet the client should look for the actual streaming data (the SDP file needn't be located at the source of the data). The jit.qt.broadcast object automatically generates these files, based on how the broadcast's codec, size, etc. have been set in the object. By making this file available to RTSP clients—emailing the file to friends, posting a link to the file on a web site, etc.—you can publicize your stream.
• If the tutorial patch 53jBroadcasting.pat is still open, close it now. Then open the tutorial patch 53jQTBroadcasting from the Jitter Tutorials folder. As you can see, the patches look very similar. Just as in the previous patch, the 2 arguments to our broadcast object determine the dimensions of the broadcast stream.
• Click on the message box labeled and turn on the toggle labeled Start Movie to begin movie playback. You should see the movie playing in the jit.pwindow object.
• If you like, make a selection from the umenu labeled Codec. The default video codec, H.263, should be already selected. Note that we have access to all of the standard video codecs available in QuickTime.
Some codecs are much better suited for streaming than others. H.261, H.263, MPEG-4 and Photo-JPEG are reasonably common. Other codecs can be used, but may not offer acceptable image quality or performance, streamed over a network.
• Click on the message box labeled . A standard file dialog box will open, where you can choose the name and location for the SDP file that describes your broadcast stream. Click OK to save the file.
The SDP file is now configured for your broadcast, as it is currently set up. If you make any changes—a change from multicast to unicast, or to a new codec—you will need to write a new SDP file.
• Click on the message box labeled to begin streaming.
• If you have a 2nd computer on your network, use a web browser or media player on that computer (such as QuickTime Player or VLC) to open the SDP file (you will need to transfer the file to the other machine somehow). Or email the SDP file to a friend and ask them to try it over the Internet. Or, if you have neither a 2nd computer nor available friends, you can open the file in a local web browser or media player and try it out yourself.
• Click on the message box labeled to end the broadcast.
Summary
In this chapter, we learned how to use the jit.broadcast and jit.qt.broadcast objects to serve RTSP (Real-Time Streaming Protocol) streams directly out of Jitter, using different codecs and different methods of session announcement. We also learned how to export Hinted Movies from the jit.qt.movie object.
See Also
| Name | Description |
|---|---|
| jit.broadcast | Broadcast video using RTSP |
| jit.qt.broadcast | Broadcast video using RTSP (Macintosh only) |
| jit.qt.movie | Play or edit a QuickTime movie |