Tutorial 19: MIDI Synthesizer Control
In this chapter we'll demonstrate how to implement MIDI control of a synthesis instrument built in MSP. The example instrument is a MIDI FM synthesizer with velocity sensitivity, pitch bend, and mod wheel control of timbre. To keep the example relatively simple, we use only a single type of FM sound (a single ‘patch’, in synthesizer parlance), and only 2-voice polyphony.
The main issues involved in MIDI control of an MSP synthesizer are
• converting a MIDI key number into the proper equivalent frequency
• converting a MIDI pitch bend value into an appropriate frequency-scaling factor
• converting a MIDI controller value into a modulator parameter (such as vibrator rate, vibrato depth, etc.).
Additionally, since a given MSP object can only play one note at a time, we will need to handle simultaneous MIDI note messages gracefully.
Each sound-generating object in MSP -- an oscillator such as cycle~ or phasor~, or a sample player such as groove~ or play~ -- can only play one note at a time. Therefore, to play more than one note at a time in MSP you need to have more than one sound-generating object. In this tutorial patch, we make two identical copies of the basic synthesis signal network, and route MIDI note messages to one or the other of them. This 2-voice polyphony allows some overlap of consecutive notes, which normally occurs in legato keyboard performance of a melody.
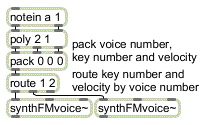
Assign a voice number with poly to play polyphonic music
The poly object assigns a voice number -- 1 or 2 in this case -- to each incoming note message, and if more than two keys are held down at a time poly provides note-off messages for the earlier notes so that the later notes can be played. The voice number, key number, and velocity are packed together in a three-item list, and the route object uses the voice number to send the key number and velocity to one synthesizer ‘voice’ or the other. If your computer is fast enough, of course, you can design synthesizers with many more voices. You can test the capability of your computer by adding more and more voices and observing the CPU Utilization in the DSP Status window.
There is another way to manage polyphonic voice allocation in MSP -- the poly~ object. We'll look at the elegant and efficient poly~ object (and its helper objects in, in~, out, out~, and thispoly~) in Tutorial 21; in the meantime, we'll use the poly object to make polyphonic voice assignments for the simple case required for this tutorial.
In this instrument we use MIDI pitch bend values from 0 to 127 to bend the pitch of the instrument up or down by two semitones. Bending the pitch of a note requires multiplying its (carrier) frequency by some amount. For a bend of ±2 semitones, we will need to calculate a bend factor ranging from 2-2/12 (approximately 0.891) to 22/12 (approximately 1.1225).
MIDI pitch bend presents a unique mapping problem because, according to the MIDI protocol, a value of 64 is used to mean ‘no bend’ but 64 is not precisely in the center between 0 and 127. (The precise central value would be 63.5.) There are 64 values below 64 (0 to 63), but only 63 values above it (65 to 127). We will therefore need to treat upward bends slightly differently from downward bends.
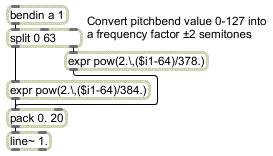
Downward bend is calculated slightly differently from upward bend
The downward bend values (0 to 63) are offset by -64 and divided by 384 so that the maximum downward bend (pitch bend value 0) produces an exponent of -64/384, which is equal to -2/12. The upward bend values (64 to 127) are offset by -64 and divided by 378 so that an upward bend produces an exponent ranging from 0 to 63/378, which is equal to 2/12. The pack and line~ objects are used to make the frequency factor change gradually over 20 milliseconds, to avoid creating the effect of discrete stepwise changes in frequency.
The mod wheel is used here to change the modulation index of our FM synthesis patch. The mapping is linear; we simply divide the MIDI controller values by 16 to map them into a range from 0 to (nearly) 8. The precise way this range is used will be seen when we look at the synthesis instrument itself.
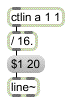
Controller values mapped into the range 0 to 7.9375
• Double-click on one of the subpatch objects to open its Patcher window.
The basis for this FM synthesis subpatch is the subpatch introduced (and explained) in Tutorial 11. A typed-in argument is used to set the harmonicity ratio at , yielding a harmonic spectrum. The MIDI messages will affect the frequency and the modulation index of this FM sound. Let's look first at the way MIDI note and pitch bend information is used to determine the frequency.
The object mtof is not a signal object, but it is very handy for use in MSP. It converts a MIDI key number into its equivalent frequency.
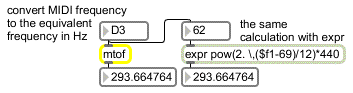
Calculate the frequency of a given pitch
This frequency value is multiplied by the bend factor which was calculated in the main patch, and the result is used as the carrier frequency in the subpatch.
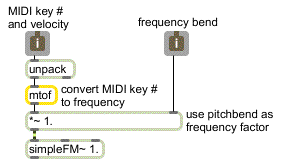
The frequency of the note calculated from key number and pitch bend data
MIDI note-on velocity is used in this patch, as in most synthesizers, to control the amplitude envelope. The tasks needed to accomplish this are
• Separate note-on velocities from note-off velocities.
• Map the range of note-on velocities -- 1 to 127 -- into an amplitude range from 0 to 1 (a non- linear mapping is usually best).
• Map note-on velocity to rate of attack and decay of the envelope (in this case).
The first task is achieved easily with a select object, so that note-on velocity triggers a function object to send the attack and decay shape, and note-off velocity returns the amplitude to 0, as shown in the following example.
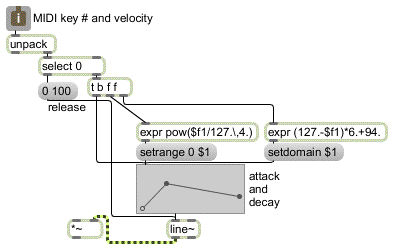
MIDI note-on velocity sets domain and range of the amplitude envelope
Before the function is triggered, however, we use the note-on velocity to set the domain and range, which determine the duration and amplitude of the envelope. The expr object on the right calculates the amount of time in which the attack and decay portions of the envelope will occur. Maximum velocity of 127 will cause them to occur in 100 ms, while a much lesser velocity of 60 will cause them to occur in 496 ms. Thus notes that are played more softly will have a slower attack, as is the case with many wind and brass instruments.
The expr object on the left maps velocity to an exponential curve to determine the amplitude.
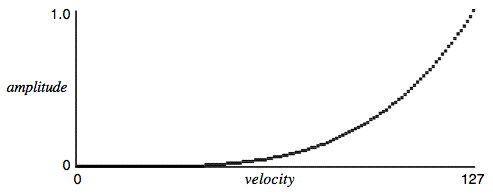
Velocity mapped to amplitude with an exponent of 4
If we used a straight linear mapping, MIDI velocities from 127 to 64 (the range in which most notes are played) would cover only about a 6 dB amplitude range. The exponential mapping increases this to about 24 dB, so that change in the upper range of velocities produces a greater change in amplitude.
It's often the case that acoustic instruments sound brighter (contain more high frequencies) when they're played more loudly. It therefore makes sense to have note-on velocity affect the timbre of the sound as well as its loudness. In the case of brass instruments, the timbre changes very much in correlation with amplitude, so in this patch we use the same envelope to control both the amplitude and the modulation index of the FM instrument. The envelope is sent to a *~ object to scale it into the proper range. The +~ object ensures that the modulation index affected by velocity ranges from 0 to 8 (when the note is played with maximum velocity). As we saw earlier, in the main patch the modulation wheel can be used to increase the modulation index still further (adding up to 8 more to the modulation index range).
Thus, the combination of velocity and mod wheel position can affect the modulation index substantially.

Envelope and mod wheel control modulation index
• Listening only to MSP (with the volume turned down on your keyboard synth), play a single- line melody on the MIDI keyboard. As you play, notice the effect that velocity has on the amplitude, timbre, and rate of attack. Move the mod wheel upward to increase the over-all brightness of the timbre. You can also use the mod wheel to modulate the timbre during the sustain portion of the note. Try out the pitch bend wheel to confirm that it has the intended effect on the frequency.
Summary
MIDI data can be used to control an MSP synthesis patch much like any other synthesizer. In normal instrument design, MIDI key number and pitch bend wheel position are both used to determine the pitch of a played note. The key number must be converted into frequency information with the mtof object. The pitch bend value must be converted into the proper frequency bend factor, based on the twelfth-root-of-two per semitone used in equal temperament. Since the designated ‘no-bend’ value of 64 is not in the precise center of the 0 to 127 range, upward bend must be calculated slightly differently from downward bend.
Note-on velocity is generally used to determine the amplitude of the note, and triggers the attack portion of the amplitude envelope. The note-off message triggers the release portion of the envelope. The velocity value can be used to alter the range of the envelope (or to provide a factor for scaling the amplitude). It is usually best to map velocity to amplitude exponentially rather than linearly. Velocity can also be used to alter the rate of the envelope, and/or other parameters such as modulation index.
An MSP object can only make one sound at a time, so if you want to play more than one simultaneous note via MIDI you will need to assign each note a voice number with poly, and route each voice to a different MSP object. In the next tutorial, we'll use the poly object to make polyphonic voice assignments for the simple case required for this tutorial. Tutorial 21 will introduce another way to manage polyphonic voice allocation in MSP -- the poly~ object.