As we've seen in the last two sampling tutorials, there are a variety of objects for accessing data from an MSP buffer~ object. This tutorial looks at another one which is specialized for working with looping sounds: groove~.
Playing samples with groove~
The groove~ object is one of the most versatile objects for playing sound from a buffer~. You can specify the buffer~ to read, the starting point, the playback speed (either forward or backward), and start and end points for a repeating loop within the sample. As with other objects that read from a buffer~, groove~ accesses the buffer~ remotely, without patch cords, by sharing its name.
Take a look at groove~ object in the tutorial patcher. The groove~ object has three inlets which take both signals and standard Max messages. The left-hand inlet interprets a signal as its playback speed, and a Max floating-point numeric message as its playback position. This allows for event-level control of the playback point (to jump to an area of the sample) as well as a time-varying signal controlling the playback rate of the sound. The second and third inlets allow you to specify start and end points in the buffer~ to be used as loops.
The sig~ object is an MSP object that outputs a constant signal based on a floating-point numeric input. This signal drives the playback speed of the groove~. A signal of causes normal-speed forward playback; a signal of halves the speed (and drops the pitch of the sample by an octave); a signal of plays the sample at double-speed in reverse, and so on. While our tutorial uses constant-value signals for playback speed (supplied by the sig~ object), there is no reason why we couldn't use a line~, cycle~ or other MSP object as a control signal for the speed of the playback.
The groove~ object also understands a number of messages in its left inlet to control its behavior. The message turns looping on, which is to say that when the groove~ object reaches the end of the sample (or the time specified in the third inlet) it will return instantly to the beginning of the sample (or the point specified in the second inlet). In addition, you can change which buffer~ the groove~ object accesses as its sample memory at any time by sending the message followed by the name of a valid buffer~ object --- in fact, you can do this with any buffer~-accessing MSP object, including index~ and play~. In the tutorial patcher, a umenu object is loaded with the names of the three buffer~ objects we've got in our patcher.
Play some loops
The first preset just functions as an ‘Off’ button. The next three presets play the three buffer~ objects at normal speed without looping. The rest of the presets demonstrate a variety of sound possibilities using different playback speeds on different excerpts of the buffered files, with or without looping.
If you want to create smooth undetectable loops with groove~, you can use the message to enable crossfades between the end of a loop and the beginning of the next pass through the loop to smooth out the transition back to the start point (see the groove~ Object reference page for more information on this message). If the buffer~ contains an AIFF file that has its own loop points - points established in a separate audio editing program - there is a way to use those loop points to set the loop points of groove~.
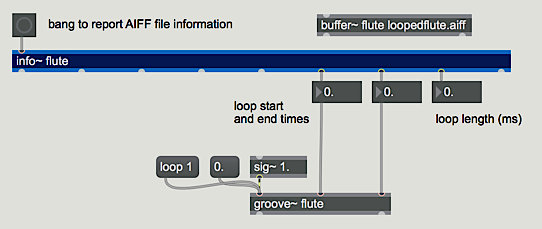
The info~ object can report the loop points of an AIFF file contained in a buffer~, and you can send those loop start and end times directly into groove~. You can also use the the info~ object to find out the length (in milliseconds) of any file you load into a buffer.
Summary
The groove~ object is the most versatile way to play sound from a buffer~. You can specify the buffer~ to read, the starting point, the playback speed (either forward or backward), and starting and ending points for a repeating loop within the sample. If the buffer~ contains an AIFF file that has its own pre-established loop points, you can use the info~ object to get those loop times and send them to groove~. The playback speed of groove~ is determined by the value of the signal coming in its left inlet. You can set the current buffer position of groove~ by sending a time value in the left inlet.
See Also
| Name | Description |
|---|---|
| buffer~ | Store audio samples |
| groove~ | Variable-rate looping sample playback |
| info~ | Report information about a sample |
| sig~ | Convert numbers into audio signals |