Color in Jitter
In this chapter we'l l discuss how color is handled in Jitter. We'll focus on the numerical representation of a color, and conversely the visualization of numbers as color. A thorough discussion of color theory—knowledge of how light and matter produce our sensation of color—is well beyond the scope of this tutorial, as is a discussion of the many ways to represent color information digitally. If you wish to learn more about color theory and/or digital representations of color, you can find some other sources of information listed in the Bibliography.
Here we present one method of representing color and how that representation is handled in Jitter matrices.
Color Components: RGB
It's possible to produce any desired color by blending three colors of light—red, green, and blue—each with its own intensity. This is known as additive synthesis—generating a color by adding unique amounts of three "primary" colors of light. (The opposite of this is subtractive synthesis: mixing colored pigments, such as paint, which absorb certain colors of light and reflect the rest.) Thus, we can describe any colored light in terms of its intensity at the three frequencies that correspond to the specific colors red, green, and blue.
In Jitter, this is the most common way to describe a color: as a combination of exact intensities of red, green, and blue. For each pixel of an image—be it a video, a picture, or any other 2D matrix—we need at least three values, one for each of the three basic colors. Therefore, for onscreen color images, we most commonly use a 2D matrix with at least three planes.
The Alpha Channel
A fourth plane is often useful for what is known as the alpha channel—a channel that stores information about how transparent a pixel should be when overlaid on another image. We won't deal with the alpha channel specifically in this tutorial chapter, but we mention it here because its inclusion is standard in most Jitter objects that deal specifically with representations of color. In most cases, the alpha channel is stored in the first plane (which is plane 0, because planes of a matrix are numbered starting from 0), and the RGB values are in planes 1, 2, and 3.
Color Data: char, long, or float
It's fairly standard in computer applications to use 8 bits of information per basic color value. 8 bits gives us the ability to express 256 (2 to the 8th power) different values. This means that if we use 8 bits for red, 8 for green, and 8 for blue, we can express 16,777,216 (224) different colors. That's a sufficient variety of colors to cover pretty thoroughly all the gradations we're able to distinguish.
So, if we only need 8 bits of resolution to represent each basic color value, that means that the 8-bit char data type is sufficient to represent the value in each plane of a four-plane matrix of color information. We could use the long, float32, or float64 data type, and Jitter will certainly let us do that, but we'd be using much larger data types than we really need. Since a full-frame video image can contain a very large number of pixels (a 640x480 image has 307,200 pixels), it often makes most sense—in order to conserve memory and speed up processing—to use the char data type.
When a matrix contains 8-bit char data, we can think of those 8 bits as representing numbers from 0 to 255, or we can think of them as representing gradations between 0 and 1 (i.e. as a fixed-point fractional number). When a Jitter object containing char data receives numerical values from other Max objects, it usually expects to receive them in the form of fs in the range 0 to 1. It will make the internal calculations necessary to convert a f from Max into the proper char value. (There are a few exceptions to this rule. For example the jit.op object can accept either in the range 0-1 or in the range 0-255 in its right inlet, as demonstrated in Tutorial 3.) For more on the use of the char data type in Jitter matrices, see the tutorial What is a Matrix?
Isolating Planes of a Matrix
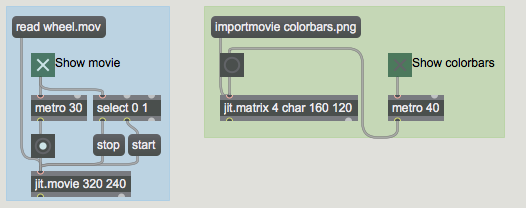
At the top of the patch you are given two different colorful source materials. One is a video of an arcade game, and the other is the standard set of color bars for used for video calibration. You can choose to see one or the other by turning on the one of the metro objects (to repeatedly the object containing the matrix you want to see).
This example patch breaks up a 4-plane matrix of color information into four 1-plane matrices, in order to allow you to see—and modify—each plane individually. We achieve this with an object called jit.unpack. Just as the Max object unpack breaks a list into individual numbers, jit.unpack breaks a multi-plane matrix into individual 1-plane matrices. You can type in an argument to tell jit.unpack how many planes to expect in the incoming matrix, but by default it expects four planes since that's the norm for color data. We're interested in seeing the contents of the red, green, and blue planes, so we send planes 1, 2 and 3 to individual jit.pwindow objects. In this case we're not interested in the alpha channel, so we don't bother to display plane 0.
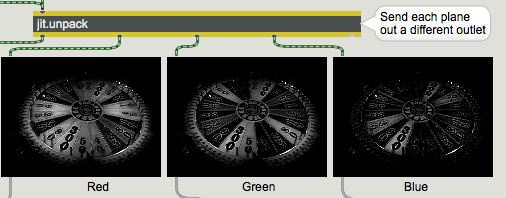
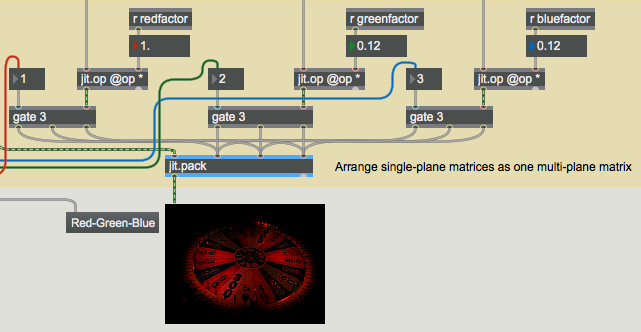
Here you can see the content of each color plane, in the form of three monochrome images. The lighter pixels indicate higher values for that color. By sending each matrix to a jit.op object, we obtain individual control over the strength of each color, and can alter the color balance. We then send the individual (altered) matrices to a jit.pack object to recombine them as a 4-plane matrix, for display in the jit.pwindow.
Color Rotation
To demonstrate another color trick, we've sent each color plane through a gate object, so that each matrix can be routed to a different inlet (color plane) of jit.pack. In this way, the meaning of each plane can be reassigned, and we can try all the permutations of possible color assignments by choosing a setting from the coll object on the left side of the patch.
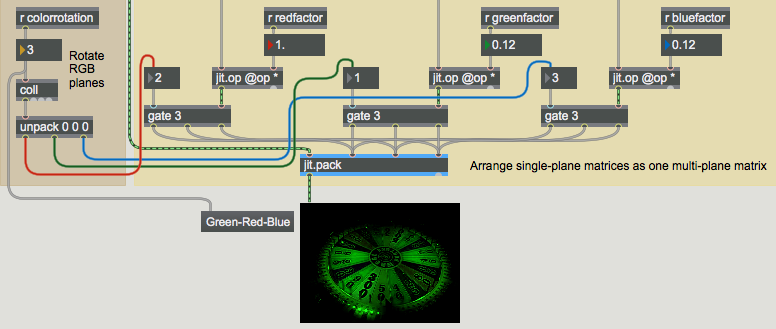
The example above shows the original green and blue planes reduced by a factor of 0.12, and the gates are set so that the red and green planes are swapped when they're sent to jit.pack, resulting in an image with more green in it. The coll object contains all the possible permutations of assignments of the RGB planes.
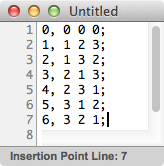
The elements in the coming out of the coll are unpacked and sent to assign the outlets of the three gate objects. The number sent into coll is also sent to a umenu (in Label mode) to show the color rotation in words—in this case "Green-Red-Blue".
Automated Color Changes
For one more exercise in color modification, we've made an automated process for continually changing the scaling and rotation of colors.
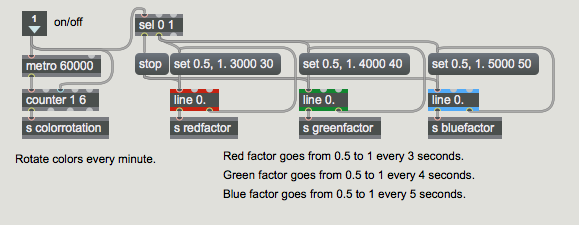
The subpatch uses line objects to send values that progress from 0.5 to 1 for each of the color scaling factors. The red factor changes over the course of 3 seconds, green in 4 seconds, and blue every 5 seconds. (The three line objects thus come into sync once every 60 seconds.) Every 60 seconds, a new color rotation is selected by the metro-counter combination.
Summary
When a jit.window or jit.pwindow receives a single-plane 2D matrix, it displays the values as a monochrome (greyscale) image. When it receives a 4-plane 2D matrix, it interprets the planes as alpha, red, green, and blue values, and displays the resulting colors accordingly. This ARGB representation in a 4-plane matrix is the most common way of representing colors in Jitter.
Because each of the basic colors only requires 8 bits of precision to represent its full range, it's common in Jitter to use the char data type for color data. Thus, most of the QuickTime-related objects (such as jit.movie) and many of the objects specifically designed for manipulating colors (such as jit.brcosa and jit.colorspace, which are demonstrated in later tutorial chapters) expect to receive 4-plane 2D matrices of char data. (Many other objects adapt readily to other types of data, though. Check the reference documentation for the object in question when you're in doubt.) You can think of the char data as representing values 0 to 255, or you can think of them as representing fractional values from 0 to 1. Most of the time, objects that contain char data expect to receive numerical values from other Max objects specified as s in the range 0 to 1.
The jit.unpack object splits a multi-plane matrix into individual single-plane matrices. The jit.pack object combines single-plane matrices into a single multi-plane matrix. By treating each plane spearately, you can control the color balance of an image, or even reassign the meaning of the individual planes.
See Also
| Name | Description |
|---|---|
| Working with Video in Jitter | Working with Video in Jitter |
| coll | Store and edit a collection of data |
| counter | Keep count based on bang messages |
| jit.matrix | The Jitter Matrix! |
| jit.op | Apply binary or unary operators |
| jit.pack | Make a multiplane matrix out of single plane matrices |
| jit.pwindow | Display Jitter data and images |
| jit.movie | Play a QuickTime movie |
| jit.unpack | Make multiple single plane matrices out of a multiplane matrix |
| line | Generate timed ramp |
| metro | Output a bang message at regular intervals |