In this chapter, we will walk through the various steps involved in setting up your Jitter patch for live performance. Along the way, we'll look at using a second video monitor for fullscreen output.
Most of the patches we've looked at so far use the jit.pwindow object for displaying video data. While that object is extremely practical for looking at video inside of your patch, it's not so ideal for live performance (unless you want the audience to see your patch, too). In these situations, we use the jit.window object (which you may remember from way back in Tutorial 1 Play A Movie).
Let's take a look at some of the capabilities of the jit.window object. In addition to moving and sizing the window with the mouse (clicking in the lower right hand corner lets us resize the window manually), we can send messages to the object and cause the window to move or resize, we can remove the window's border, make the window float above all other windows, and we can make the window fill the entire screen.
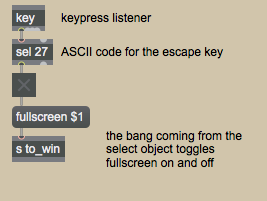
If you look in the patch, we can see clearly how this last trick functions. We've simply used the Max key object in combination with a select object to listen for the escape key (ASCII key code 27). When that key is pressed, a is sent from the select object to the toggle, causing it's state to change from 1 to 0 or from 0 to 1 (depending on what it was before it received the ). This value is sent to the message box labeled , causing the messages and to be sent to the jit.window object.
Hooking this message up to a key is particularly clever, because once the window is fullscreen, it's sometimes a little tricky to get back to your patch! By the way, the jit.window object has a useful attribute——which tells it whether or not to hide the system menu bar when the object is in fullscreen mode. By default, the attribute is set to 1, meaning that the menubar should stay where it is.
Got It Covered
Most of the time, though, we want to be able to use our patch on one screen, while looking at the output on another. The jit.window object is capable of putting a window on any display attached to your computer (or display device, like a video projector).
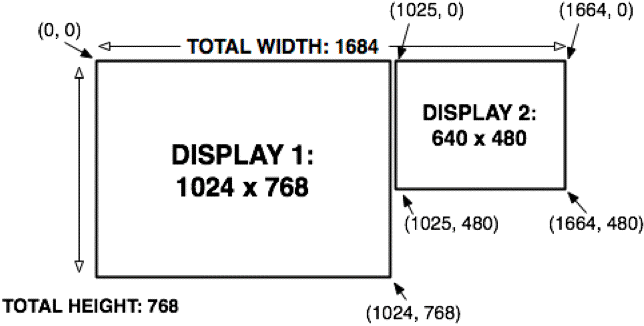
As far as your computer is concerned, once you've attached additional displays in a spanning configuration (that means, the displays aren't mirroring one another), you simply have one large display area. Moving windows to a second screen is simply a matter of knowing the correct coordinates.
Of course, figuring out where your second monitor is located and doing the math is a little bit boring. Luckily, Jitter includes an object, jit.displays, which can figure it all out for you.
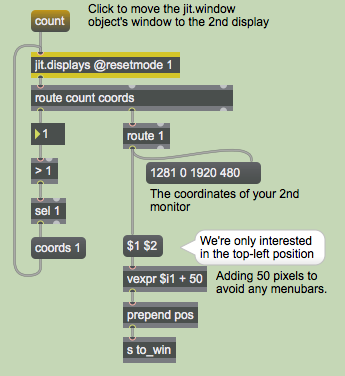
Using the jit.displays object to enumerate the number and coordinates of attached monitors is simple. The message causes the word , followed by the number of attached displays to be sent from the object's left outlet. In our patch, we're testing to make sure that there are more than one attached display using the > (greater-than) object. If there are, the message is sent to the jit.displays object, requesting the coordinates of monitor 1 (monitors are numbered starting at 0—your primary display is typically monitor 0).
Of course, the jit.displays object will work with systems comprising more than two displays.
Typically, you'll want to keep a variation of this portion of the patch as part of your performance setup. We've noticed that the position settings for a second (or third) display don't always remain the same from use to use, when connecting different kinds of devices to our computers. Using the jit.displays object to automatically determine the exact position of your attached hardware and move your output window eliminates some of the hassle and worry of working in new venues or with unfamiliar equipment.
A Little Performance Tip
Now that we've mastered the jit.window object, let's turn our attention back to the jit.pwindow object. Although the purpose of this tutorial isn't to offer tips and tricks for improving Jitter's performance, the jit.pwindow object is so often used as a small monitor in live performance settings, that a quick look at its effect on playback speed is worth our time.
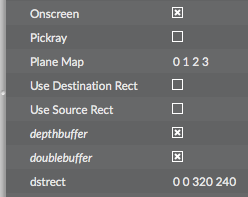
Do you see the checkbox labeled Onscreen in the jit.pwindow object's Inspector? Uncheck it, and compare framerates with both windows active. On our system, we get around 160 frames per second now—nearly 50% faster! Anytime you are using a jit.pwindow object which is smaller than the video being displayed (here, our video is 320x240, and our jit.pwindow is 80x60), you should turn off onscreen mode. It's a simple rule that will get the best possible speed from your performance patch.
Another strategy for reducing the impact of jit.pwindow objects in your performance patch is to reduce the amount of data being drawn. The Max speedlim and qlim objects are ideal for this purpose, although we're not going to demonstrate their use in this tutorial (the speedlim object is discussed in MIDI tutorial 3).
Summary
In this tutorial, we learned a few strategies for overcoming typical challenges in a performance environment: the appearance settings for the jit.window object; the fullscreen mode; the use of the jit.displays object to sense additional display hardware attached to your computer and autoconfigure the position of a jit.window object's window; and the management of the jit.pwindow object's onscreen drawing mode to improve the performance of your in-patch screens.
See Also
| Name | Description |
|---|---|
| Working with Video in Jitter | Working with Video in Jitter |
| Working with OpenGL | Working with OpenGL |
| jit.displays | Set and query monitor attributes |
| jit.pwindow | Display Jitter data and images |
| jit.window | Display data in a window |