Video and Graphics Tutorial 3: Control Jitter with Messages
Intro
Messages are essential for controlling Jitter objects. We saw a little of that with jit.movie and jit.grab. In this tutorial, we’ll look at how to take control of Jitter effects with simple messages.
Setup
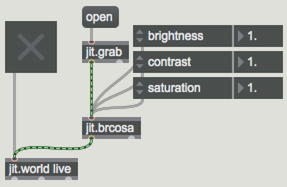
We'll start where we left off in the last tutorial - a patch containing jit.grab, jit.brcosa and jit.world objects.
Adding Objects
Now let’s add a few additional effects. Create a jit.fluoride and a jit.slide object below the jit.brcosa, and connect the new objects to the outlet of jit.brcosa and the inlet of jit.world.

Next, create some attrui objects for each effect. The jit.slide only needs two (slide_up and slide_down), while jit.fluoride will require 4 object-specific attributes (glow, lum, mode and tol).
Messages
While attrui objects are great for quick exploration, they have some limitations when it comes to sharing data with other objects and - more importantly - state saving using snapshots and the pattr system (which we'll want to do later on). For more robust control, we’ll look at how to construct messages to control objects.
We'll start by creating standard messages that duplicate the way that attrui objects let us control the jit.brcosa object. Most messages to Jitter objects consist of a list starting with the attribute name followed by the value(s) you want to set the attribute to. Create a new message box that contains the message . Next add a floating point number box (flonum) and connect its outlet to the left inlet of the message box. In turn, connect the outlet of the message box to the inlet of jit.brcosa.

The part of the message acts as a variable and tells the message box to accept an incoming value in its place.
Repeat the process for the contrast and saturation attributes.
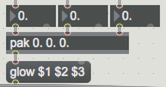
Next we’ll add some control messages for jit.fluoride. However, note that the glow attribute has three values (red, green, and blue). For this attribute, we need to put together a list of those red, green and blue values using a pak object. Make a new pak object with three floating point arguments. These can be any value, but the values we give will also act as defaults - so a pak 0. 0. 0. would default to black. Add and connect three flonum objects - one for each input of the pak object - and connect your pak object to a message box containing the message . Connect the message box outlet to the inlet of jit.fluoride.
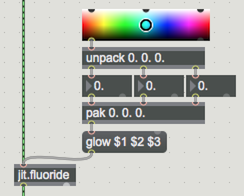
If you don’t like making color decisions based on number values, you can use the swatch object instead. Make a swatch object and connect it to an unpack object with the arguments 0. 0. 0. Connect the three outlets of the unpack object to the three flonum objects. Now, you can easily select the color you want by moving the swatch cursor and also see the numerical values associated with the color you choose.
Continue to convert the remaining attrui objects into messages, then adjust the values to see your messages in action.
Explore Further
You may want to go back and review some of the basic Max message and list tutorials as you go to get more ideas of how to control Jitter objects. Try driving object parameters with random number generators, counters, and other data sources (you’ll probably need to do some number scaling to get things into the right range).