Working with Patterns
So far, we've seen how you can change the color and opacity of paths using set_source_rgba and related MGraphics functions. However, you can also style paths using Patterns, which can be linear gradients, radial gradients, or arbitrary images.
Linear Gradients
A linear gradient creates a continuous transition from one color to another. The gradient is defined by a start and end point, along with multiple color stops along that path.
mgraphics.init();
mgraphics.autofill = 0;
mgraphics.relative_coords = 0;

function paint()
{
	let [width, height] = mgraphics.size;

  // Pattern starts at (0, 0), the top-left corner,
  // and goes to (0, height), the bottom-right corner.
	let pattern = mgraphics.pattern_create_linear(0, 0, 0, height);

  // The first argument to add_color_stop_rgba is the normalized
  // distance along the line segment connecting the start and end
  // points of the gradient. 0.0 would put a color stop on the start
  // point, and 1.0 would put a color stop on the end point. 0.5
  // puts a color stop right in the middle.
	pattern.add_color_stop_rgba(0.1, 0, 0, 1, 1);
	pattern.add_color_stop_rgba(1.0, 1, 0, 0, 1);

  // Finally, call set_source to use the pattern as a source for
  // fill and stroke calls
	mgraphics.set_source(pattern);
	mgraphics.rectangle(10, 10, width - 20, height - 20);
	mgraphics.fill();
}
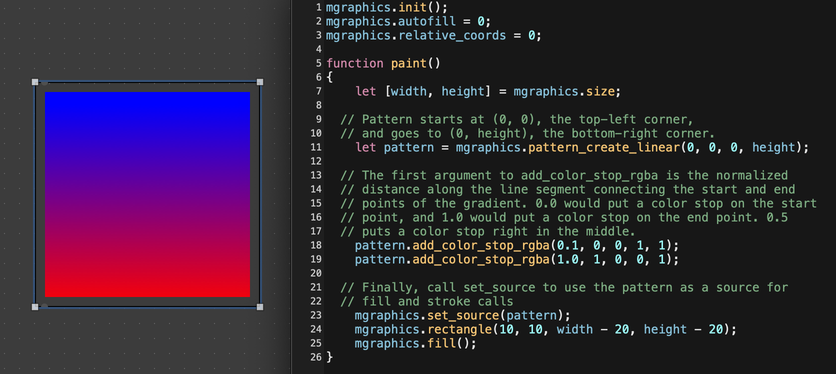
A gradient should have at least two color stops (it can have one, but then it won't be much of a gradient), but it can have as many color stops as you want.
mgraphics.init();
mgraphics.autofill = 0;
mgraphics.relative_coords = 0;

function paint()
{
	let [width, height] = mgraphics.size;

	let pattern = mgraphics.pattern_create_linear(0, 0, width, 0);

	// Here's a way to draw a lazy, fake rainbow
	for (let i = 0; i < 8; i++) {
		let r = i & 1;
		let g = i & 2;
		let b = i & 4;
		pattern.add_color_stop_rgba(i / 7, r, g, b, 1);
	}

	mgraphics.set_source(pattern);
	mgraphics.rectangle(10, 10, width - 20, height - 20);
	mgraphics.fill();
}
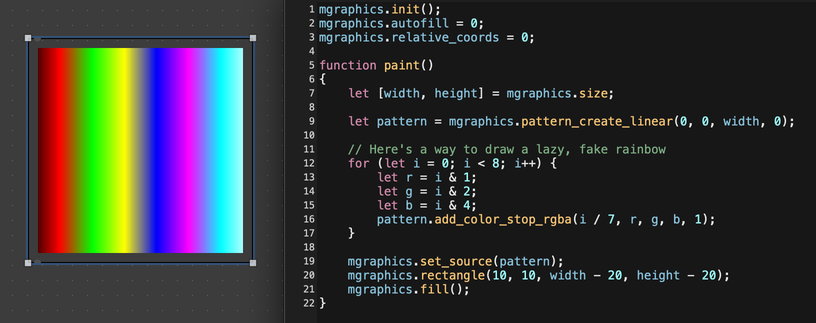
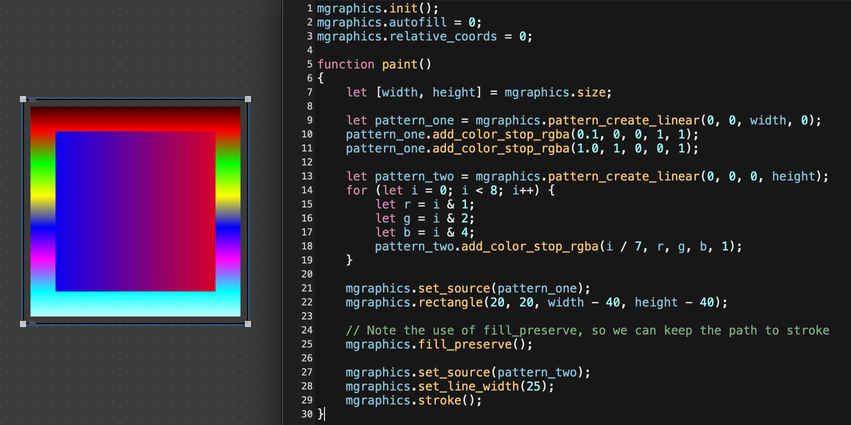
Finally, it's worth mentioning that a gradient can be used to style a path's stroke as well as its fill. In fact, a path can use a different pattern for fill and stroke. The key is to use the functions fill_preserve and stroke_preserve to prevent MGraphics from discarding the path after drawing.
mgraphics.init();
mgraphics.autofill = 0;
mgraphics.relative_coords = 0;

function paint()
{
	let [width, height] = mgraphics.size;

	let pattern_one = mgraphics.pattern_create_linear(0, 0, width, 0);
	pattern_one.add_color_stop_rgba(0.1, 0, 0, 1, 1);
	pattern_one.add_color_stop_rgba(1.0, 1, 0, 0, 1);

	let pattern_two = mgraphics.pattern_create_linear(0, 0, 0, height);
	for (let i = 0; i < 8; i++) {
		let r = i & 1;
		let g = i & 2;
		let b = i & 4;
		pattern_two.add_color_stop_rgba(i / 7, r, g, b, 1);
	}

	mgraphics.set_source(pattern_one);
	mgraphics.rectangle(20, 20, width - 40, height - 40);

	// Note the use of fill_preserve, so we can keep the path to stroke
	mgraphics.fill_preserve();

	mgraphics.set_source(pattern_two);
	mgraphics.set_line_width(25);
	mgraphics.stroke();
}
Radial Gradients
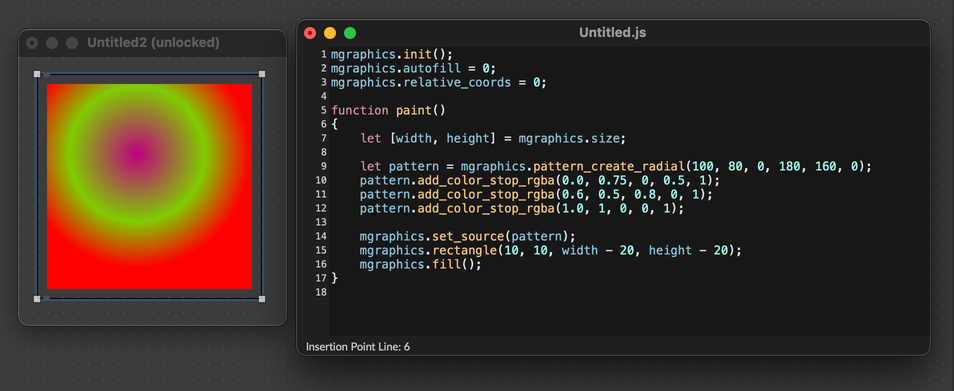
Radial gradients also define a start and end point. However, the start point for a radial gradient defines the center of a circle, and the end point defines a point on the circumference of that circle. Color stops will create circles of color between those two points.
As of this writing, the third and sixth argument to pattern_create_radial are ignored. This is due to differences between the way cairo and JUCE represent radial gradients.
mgraphics.init();
mgraphics.autofill = 0;
mgraphics.relative_coords = 0;

function paint()
{
	let [width, height] = mgraphics.size;

	let pattern = mgraphics.pattern_create_radial(100, 80, 0, 180, 160, 0);
	pattern.add_color_stop_rgba(0.0, 0.75, 0, 0.5, 1);
	pattern.add_color_stop_rgba(0.6, 0.5, 0.8, 0, 1);
	pattern.add_color_stop_rgba(1.0, 1, 0, 0, 1);

	mgraphics.set_source(pattern);
	mgraphics.rectangle(10, 10, width - 20, height - 20);
	mgraphics.fill();
}
Images
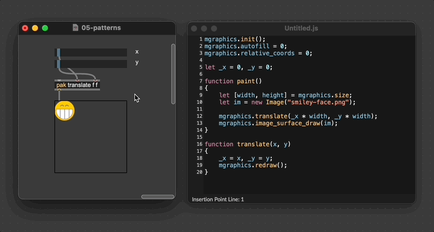
You can also create a pattern from an image, in order to render a path using a repeating image pattern. You can also draw the image right away, without creating a pattern first. In both cases, start by creating an Image from a file.
let im = new Image("smiley-face.png");
So long as the image file is in Max's search path, Max should be able to create a new image from the file. If you simply want to draw the image, you can call image_surface_draw(). You can adjust the position of the image using transformations like translate and scale.
The rotate transform is not supported with image_surface_draw(). To rotate an image, first create a Pattern from the image with pattern_create_for_surface, then rotate the pattern.
mgraphics.init();
mgraphics.autofill = 0;
mgraphics.relative_coords = 0;

let _x = 0, _y = 0;

function paint()
{
	let [width, height] = mgraphics.size;
	let im = new Image("smiley-face.png");

	mgraphics.translate(_x * width, _y * width);
	mgraphics.image_surface_draw(im);
}

function translate(x, y)
{
	_x = x, _y = y;
	mgraphics.redraw();
}
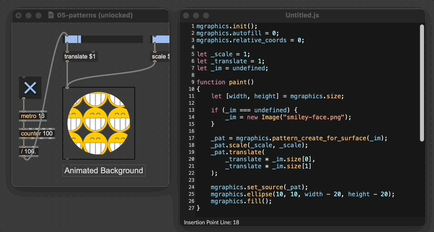
Beyond simply drawing an image, you can also create a pattern from an image. After creating a pattern in this way, you can use this image-based pattern in the same way that you would use a linear or radial gradient. Fill and stroke can both be styled using an image pattern. In addition, you can use transforms to scale, translate, and rotate the pattern relative to the graphics context.
mgraphics.init();
mgraphics.autofill = 0;
mgraphics.relative_coords = 0;

let _scale = 1;
let _translate = 1;
let _im = undefined;

function paint()
{
	let [width, height] = mgraphics.size;

	if (_im === undefined) {
		_im = new Image("smiley-face.png");
	}

	_pat = mgraphics.pattern_create_for_surface(_im);
	_pat.scale(_scale, _scale);
	_pat.translate(
		_translate * _im.size[0],
		_translate * _im.size[1]
	);

	mgraphics.set_source(_pat);
	mgraphics.ellipse(10, 10, width - 20, height - 20);
	mgraphics.fill();
}

function scale(s)
{
	_scale = s;
	mgraphics.redraw();
}

function translate(t)
{
	_translate = t;
	mgraphics.redraw();
}
Procedural Surfaces
Finally, it's also possible to use an offscreen MGraphics context itself as the source for a pattern. At any point, you can create an offscreen MGraphics context simply by calling new MGraphics(width, height), where width and height are the size of the offscreen context you want to create.
Keep in mind that the main MGraphics context may have more that one hardware pixel per logical pixel, if for example you're working with a HiDPI display. If your custom object has dimensions 100 by 100, you might need an offscreen context of 200 by 200 in order to cover it completely. See Retina and HiDPI Displays for more.
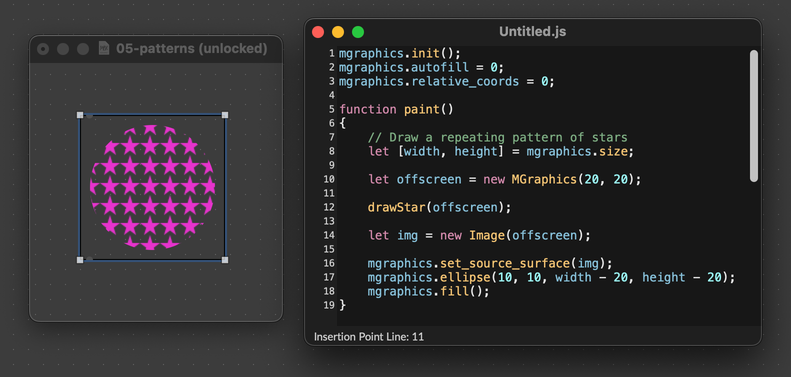
You can draw to this context just like you would a regular MGraphics context, by adding paths and filling/stroking them. If you want to see your offscreen context, you can create a new Image from it, and then draw that image.
The function set_source_surface is a quick way to create a new pattern from an image and use that pattern as your MGraphics source.
mgraphics.init();
mgraphics.autofill = 0;
mgraphics.relative_coords = 0;

function paint()
{
	// Draw a repeating pattern of stars
	let [width, height] = mgraphics.size;

  // Create an offscreen mgraphics context
	let offscreen = new MGraphics(20, 20);

  // Draw a shape to the offscreen context
	drawStar(offscreen);

  // Create a new image to render the offscreen context
	let img = new Image(offscreen);

	mgraphics.set_source_surface(img);
	mgraphics.ellipse(10, 10, width - 20, height - 20);
	mgraphics.fill();
}

function drawStar(context) {

	let [width, height] = context.size;

	context.move_to(0.5 * width, 0);
	context.line_to(0.8 * width, 1.0 * height);
	context.line_to(0, 0.4 * height);
	context.line_to(1.0 * width, 0.4 * height);
	context.line_to(0.2 * width, 1.0 * height);
	context.close_path();
	context.set_source_rgba(0.9, 0.2, 0.8, 1.0);
	context.fill();
}
Retina and HiDPI Displays
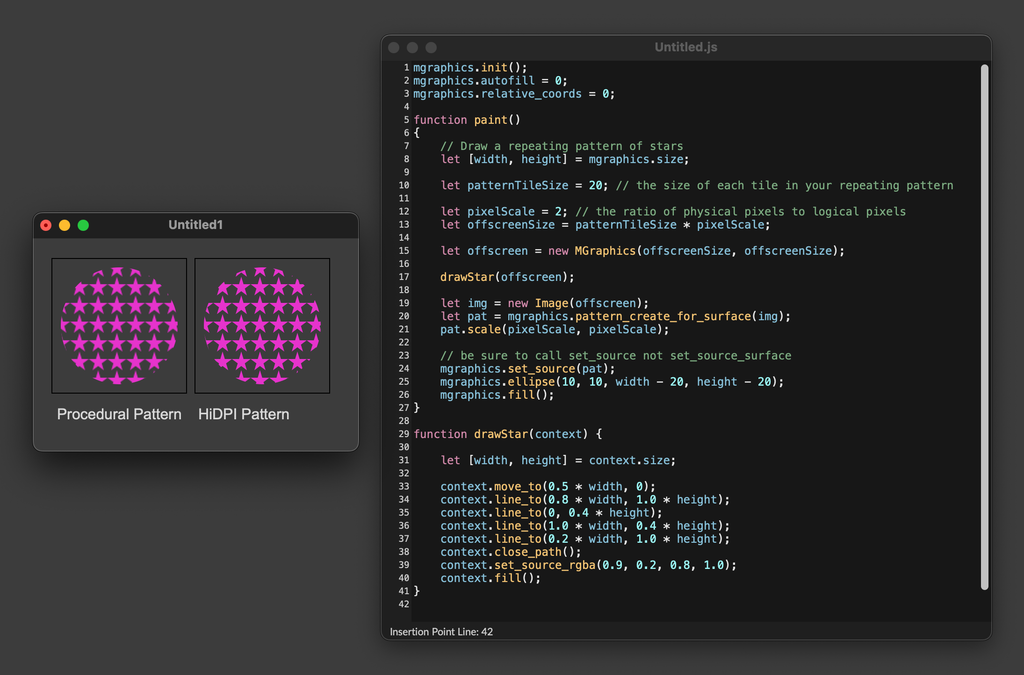
On a Retina or HiDPI (high pixel density) screen, you might notice that the image and pattern examples above look slightly blocky or pixelated, as compared to other examples in this series. This is because the main #js/mgraphics object passed to the paint() function defines its size in terms of logical pixels, not screen pixels. Each logical pixel may refer to a group of screen pixels, so a 50 by 50 graphics context might actually draw to a 100 by 100 group of physical pixels. Because of this, your custom drawing code will usually look good on any screen, without your needing to make any changes.
However, if you're drawing from a source with a fixed size in pixels, like an image or an offscreen context, then that source may be stretched over multiple physical pixels when you draw to the main MGraphics context. Luckily there's a simple solution: scale the image down, or draw to a large offscreen context and scale the pattern down.
On older, low resolution displays, the "HiDPI Pattern" and "Procedural Pattern" examples will look the same. However, on Retina or HiDPI displays, if you look closely, you will notice that the lines in the "HiDPI Pattern" example look less blocky.
mgraphics.init();
mgraphics.autofill = 0;
mgraphics.relative_coords = 0;

function paint()
{
	// Draw a repeating pattern of stars
	let [width, height] = mgraphics.size;

    let patternTileSize = 20; // the size of each tile in your repeating pattern

    let pixelScale = 2; // the ratio of physical pixels to logical pixels
    let offscreenSize = patternTileSize * pixelScale;

	let offscreen = new MGraphics(offscreenSize, offscreenSize);

	drawStar(offscreen);

	let img = new Image(offscreen);
    let pat = mgraphics.pattern_create_for_surface(img);
    pat.scale(pixelScale, pixelScale);

    // be sure to call set_source not set_source_surface
	mgraphics.set_source(pat);
	mgraphics.ellipse(10, 10, width - 20, height - 20);
	mgraphics.fill();
}

function drawStar(context) {

	let [width, height] = context.size;

	context.move_to(0.5 * width, 0);
	context.line_to(0.8 * width, 1.0 * height);
	context.line_to(0, 0.4 * height);
	context.line_to(1.0 * width, 0.4 * height);
	context.line_to(0.2 * width, 1.0 * height);
	context.close_path();
	context.set_source_rgba(0.9, 0.2, 0.8, 1.0);
	context.fill();
}
