Tutorial 22: Working With Video Output Components
This tutorial demonstrates how to use Jitter in conjunction with a QuickTime-compatible video output device—such as a DV camera—to send matrices and video sequences directly to hardware, bypassing your computer’s analog video output. We’ll explore the jit.qt.videoout object, and return to the jit.qt.movie object to explore its video output capabilities.
The patch examples in this tutorial assume that you have a DV camera attached to your computer’s FireWire port, powered on and in VTR mode. However, the techniques described will work with any device that has a QuickTime video output component.
End of the Line
You can place the jit.qt.videoout as the final object in a Jitter patch and send processed Jitter matrices directly to a video output device. You'll find that this process is very similar in operation to the jit.qt.grab object that we used in the previous tutorial.
The jit.qt.grab and jit.qt.videoout objects both require that you create a component connection before they can do their work. In the case of the jit.qt.videoout object, that means a connection to a video output device. And, as in the previous tutorial, we'll need to specify the settings we want to use by creating a listing of all our available devices and output modes and choose the settings we want before we use the jit.qt.videoout object. Since we're already familiar with that procedure from working with the jit.qt.grab object in the last tutorial, using the jit.qt.videoout object will be easy.

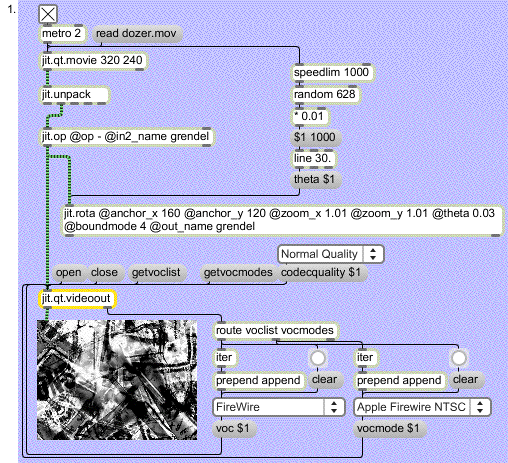
• Click the message box to read an example movie.
Take a moment and look at the patch. By now, you should be familiar with the processes we're using to transform the movie: we separate out a single plane of a matrix using the jit.unpack object, and sent it to the jit.op object. You'll notice that the jit.op and the jit.rota objects are using named matrices to communicate between the jit.rota object’s output matrix and the jit.op object’s right input matrix without using any patch cords. Yep—it's the cool Jitter feedback loop in action.
• Turn on the toggle attached to the metro object to start the patch. You’ll notice that jit.qt.videoout appears to have no effect. Until we send it an message, the object simply passes any matrix received via its inlet directly to its outlet. Don’t click the message box just yet—we still have some setup work to do.
• Click the message box that says . Sending a message to the jit.qt.videoout object causes it to send out its right outlet a list of messages preceded by the symbol . The items in this list refer to each available video output component — voc, for short. This list of available video outputs is routed through an iter object and from there into the umenu object on the left, from which we can easily make our selection. On our system, the list contains a single item: .
If the video output component is registered with the MacOS, it will appear in the and can be opened even if the hardware isn't available. If there is no hardware available, the jit.qt.videoout object will report a error in the Max window when you send matrices to it.
• Select the output component from the umenu. This causes the item’s index number (which is the same as its position in the umenu) to be sent to the jit.qt.videoout object, via the message. If you don't select anything, the first item in the list will be used as the default component. This is equivalent to sending the message to the jit.qt.videoout object.
• Click on the message box that says to retrieve a list of available modes for the output component you chose. The resulting list, preceded by the symbol , is routed through iter and into the righthand umenu object. Our list contains two items: and .
• Select the output mode you’d like to use from the umenu. Your selection will depend on your FireWire hardware—our camera is NTSC, so we’re using mode. This causes the item’s index number (which is the same as its position in the umenu), to be sent to the jit.qt.videoout object, via the message. If you don't select anything, the first item in the list will be used as the default mode. This is equivalent to sending the message to the jit.qt.videoout object.
• Now we’re ready to start sending data to our output device. Click the message box to start the component connection. After a few moments, you should see the same image on your device’s display as you see in the jit.pwindow in the patch.
If you are getting errors in the Max window, and not seeing any video on your hardware device, check to make sure that your device hasn’t gone to sleep.
• We have control over other aspects of the output, too. While the specific codec we use is hardware-specific (Apple FireWire always uses the Apple DV codec for output, for example), we do have control over the codec quality of our output. Try selecting different values in the umenu object connected to the message and compare the results on your output device. You should be able to improve speed at the expense of a small loss in image quality by using the Minimum Quality () or Low Quality () settings. The default is Normal Quality ().
Just Passing Through
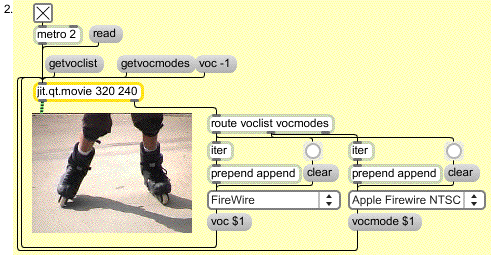
If you want to send a movie directly from your disk drive to an output device and you don't need to process any of your data using Jitter, you can use the jit.qt.movie object. You would typically want to do this only when the movie on your disk is already in the proper format for the video output component you're using—for example, if you're using a FireWire output device, the file should be already be compressed with the Apple DV codec at the standard image resolution and frame rate).

While using jit.qt.movie with output components doesn't look very different from using the jit.qt.videoout object, there is one important difference:
The jit.qt.movie object doesn’t use the or messages. You send the jit.qt.movie object a message with an argument of 0 or greater to open a component connection, and close the connection and return the jit.qt.movie to normal operation by sending the message . The argument to the message specifies the output component, just as with jit.qt.videoout.
• Other than that, the two objects access video output components identically.
• Click the message box that says to load a DV-encoded QuickTime movie from your disk drive. These usually have the file extension .dv at the end of their file name. Because these movies tend to be large, we’ve chosen to not include one with the tutorial package. If your computer came with Apple iMovie, there are sample DV movies in the iMovie Tutorial folder.
• Click on the toggle object attached to the metro. Your movie will be shown in the jit.pwindow. You may notice that the display is skipping frames; that's because DV movies contain a lot of data. Don’t worry—the playback will improve when we switch to the video output component.
Technical note: Playback improves when we switch to the video output component because the movie is no longer being decompressed in software before it's displayed—it's passing directly to the hardware where it is processed (as necessary) there.
• Use the and message boxes and the umenu objects to select your preferred device and output mode as we did in the previous chapter. When you set the output device (via the message box), the movie will stop playing in the jit.pwindow, and should begin playing on the display of your output device. If your DV movie includes sound, the sound will play on the output device, as well. If your movie is correctly encoded for your output device, playback will be smooth.
• Click the message box that says to disconnect from the output component. Playback will return to normal mode, and the movie should display in the jit.pwindow object again.
Important: You may have noticed that the jit.qt.movie object that we’ve created has dimensions of 320x240, even though DV movies are generally 720x480. When we switch to the output component, the movie is sent to your selected output device at the movie’s native size, without regard for the dimensions of the jit.qt.movie object’s output matrix.
Summary
The jit.qt.videoout object provides a way to send processed Jitter data directly to a device supported by QuickTime video output components—such as a DV camera—over FireWire. If you don’t require Jitter processing and would like to send a properly encoded QuickTime movie from your disk drive to a supported output device, use the message to the jit.qt.movie object.
See Also
| Name | Description |
|---|---|
| jit.op | Apply binary or unary operators |
| jit.pwindow | In-Patcher Window |
| jit.qt.grab | Digitize video from an external source |
| jit.qt.movie | Play or edit a QuickTime movie |
| jit.qt.videoout | Output video to QuickTime video output component |
| jit.rota | Scale/rotate in 2D |
| jit.unpack | Make multiple single plane matrices out of a multiplane matrix |