Tutorial 24: QuickTime Effects
This tutorial describes the basic operation of the jit.qt.effect object—Jitter’s interface to Apple’s QuickTime Effects architecture. We’ll learn how to set up and configure the object, discuss the difference and use of tweenable and non-tweenable parameters and apply a few effects to Jitter matrices. We’ll also learn how to create QuickTime Effects tracks inside of movies.
QuickTime contains a large number of built-in effects, including transitions (wipes and fades), filters and standalone (render) effects, collected under the general system known as QuickTime Effects. While QuickTime Effects are slow compared to many of Jitter’s transitions and filters, there are some unique effects available that Jitter does not include. The other difference between using QuickTime Effects and Jitter filters is that QuickTime Effects can be embedded as tracks inside a QuickTime movie, in a similar way as audio or video tracks.
The QuickTime Effects architecture uses a single interface to support a wide variety of different effects, each of which may require different numbers of parameters and parameter types—QuickTime Effects use the same interface to describe effects which don't use any input sources at all (such as the Fire or Cloud effects), effects which require a single input source (such as Blur or Gain) and effects that require two inputs (such as the Chromakey effect). So it should come as no surprise that the jit.qt.effect object is one of the most complex objects in the Jitter package. But don't worry—we'll be taking it one step at a time in this tutorial.
The Dialog Box Interface
The quickest and easiest way to access QuickTime Effects and to become acquainted with them is to use QuickTime’s standard Dialog Interface. The following patch will let you do just that.
• Open the tutorial patch 24jQTEffects in the Jitter Tutorial folder and look at the section labeled A. QuickTime Dialog.
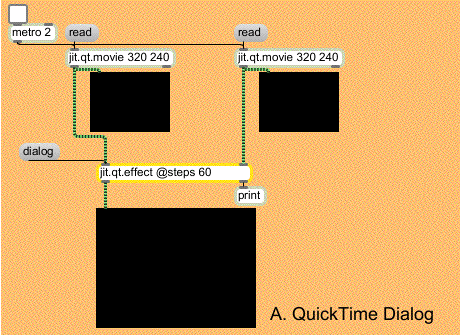
• By clicking on both of the message box objects that say , load QuickTime movies into the two jit.qt.movie objects.
• Turn on the toggle attached to the metro object to start the patch. You will see your movies in the two smaller jit.pwindow objects. On the larger jit.pwindow object, you should see the left-hand movie. Since we haven’t actually selected a QuickTime effect, the jit.qt.effect object is just passing the matrix received in its left inlet through its outlet.
• Click on the messagebox. This causes the jit.qt.effect object to display the standard QuickTime Effects Dialog Box. You can select any available effect, and set any of the parameters for it. Here's an example of what the Dialog box looks like under QuickTime—we've selected the Explode effect:
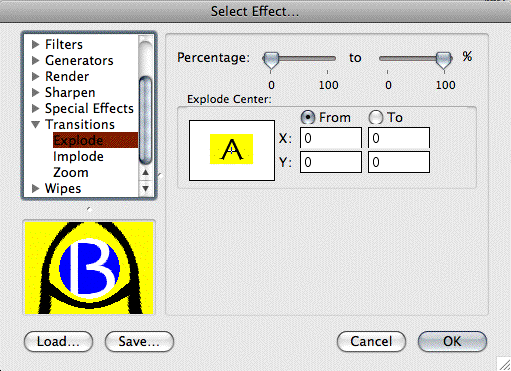
• All available QuickTime Effects are shown in the scrollable window on the left. Your list may look slightly different from this example—especially if you've added extra effects to your system. As you select different items from the list, the preview window on the bottom-left of the patch changes to show you an example of what the effect does. The adjustable parameters for the effect are shown on the right part of the window.
• Go ahead and try a few different effects, and experiment with different parameters. Choose an effect, set the parameters, and click on the OK button to see your changes in the patch. To try another effect, just click on the message box again and choose another effect. Note that some of the effects use both matrix inputs to jit.qt.effect, some only use one, and some don’t use the incoming matrix at all, except for timing purposes.
• You’ll notice that a number of effects offer two values for each parameter. For instance, in the Explode effect’s parameter panel shown above, all three parameters have two values. These are known as tweenable parameters, because the effect will interpolate between the two values entered. If you look at the jit.qt.effect object in our patch, you’ll notice that it has a typed-in value of for the attribute, indicating that any tweened parameters should interpolate over 60 steps (60 incoming matrices). We’ll discuss tweened parameters in more detail later on in this tutorial.
• When you’ve had your fill of the QuickTime Effects Dialog Box, click on the toggle to turn off the patch.
To the Max
Every effect and option that you saw in the QuickTime Effects Dialog Box is available when using Jitter, too. Here's where things become a little bit complicated, and here's where we can help you out. While you were experimenting with the last patch, you probably noticed that each effect had a different number of parameters, each with completely different parameter types. For example, let's compare the Blur and Cloud effects. The Blur filter effect has one parameter in the form of an enumerated list of values (the menu),while the Cloud render effect has three parameters—two of which specify RGB colors, and the third of which is a floating-point number representing the degree of rotation. How will you know how many QuickTime Effects parameters you need to control, and what kind of data you need to send for each one?
We've created a patch we hope you'll use if you want to use QuickTime Effects from with Jitter. Our patch handles all the QuickTime Effects information by listing all the variables on the fly, as you make selections in Jitter. We've created an interface in the Max patch that interprets this information in a clear way that you can use and adapt for your own purposes. You should feel free to use our patch—at least until you're comfortable enough to make something similar for yourself. We promise it will save you a lot of hassle and frustration.
In the jitter-examples folder installed with Jitter, you’ll find a whole set of QuickTime Effects helper patches, in the folder jit.qtfx.helpers. Each of these patches isolates and documents the functionality of a single QuickTime Effect—and we’ve made helper patches for all of them. You can use these helper patches as though they were normal Jitter objects, and ease your entry into the rich, but complex, world of QuickTime Effects.
Listing and loading effects
To generate a list of available effects using jit.qt.effect, we use the message. This causes a series of messages to be sent out the object’s right outlet, one message for each available effect. Each of these messages is in the format , where is an index number (starting at 0), is the plain English name for the effect, and is a 4-letter code used to describe the effect.
• Open the tutorial patch 24jQTEffects in the Jitter Tutorial folder and look at the section labeled B. QuickTime Effects Max Interface.
• Don’t worry about the jit.qt.movie objects for now. Let’s start by looking at the other parts of the patch first.
• Click on the message box that says . We’re using a route object to separate out messages beginning with the symbol , formatting the messages with sprintf, and then appending them to the umenu.
• Click on the umenu to see the list of available effects. It should contain the same items as the list that appeared on the left side of the QuickTime Effects Dialog Box.
• To load an effect for use in jit.qt.effect, we use the message. The message takes a single argument, which can be either the index number or the 4-letter code of the desired effect. In this example, we’re using the effect’s index number (which is the same as the item’s position in the umenu) to load effects into jit.qt.effect via the message.
Now that we've loaded our effect, it's time to list and specify the parameters for our effect.
Parameter types
Let’s take a moment and look over the various parameter types used by QuickTime Effects. When the jit.qt.effect object reports available parameters, it describes the type of each parameter and any limitations placed on the values. You’ll need this information to set the parameters properly.
The types are:
• long: (long integer) an integer value
• fixed: (fixed-point) floating-point value, usually between 0. and 1.0.
• double: (double-precision floating point) floating-point value
• rgb: (RGB color) 3 integers between 0 and 255, describing an RGB color
• bool: (Boolean) an integer value, 0 or 1
• enum: (enumerated list) a list of integer indices, in which each index is associated with a specific value (the indices are not necessarily consecutive)
• text: (text) This type is not currently supported from Max (you can use effects with text parameters from the Dialog Box)
• imag: (image) This type is not currently supported from Max (you can use effects with image parameters from the Dialog Box)
Listing parameters
To generate a list of available parameters for your selected effect, we use the message. This causes a series of messages to be sent out the jit.qt.effect object’s right outlet, one message for each available parameter, plus a "header message".
The header message is sent first. It is in the format , where is the plain English name for the effect, is the 4-letter code, is the number of parameters the effect has, and is the number of input sources used by the effect.
Although some QuickTime Effects report the ability to use 3 sources, the jit.qt.effect object only supports up to 2-source effects at present.
After the header message comes the series of parameter messages, in the format . The argument is the index number of the parameter (starting at 0), is the plain English name of the parameter, is the 4-letter code for the parameter, is an integer describing the parameter’s tweenability ( = always tween, = never tween, = optionally tween), is the type of parameter (from the list above), and is zero or more additional arguments which indicate permitted values, depending on the parameter type. They are:
• long: [min (optional int)] [max (optional int)]
• fixed: [min (optional float)] [max (optional float)]
• double: [min (optional float)] [max (optional float)]
• rgb: rgb_range (which is just a reminder that RGB values are from 0 - 255)
• bool: none
• enum: [index (int)] [value (int /symbol)] … (these repeat in pairs until all enumerated values are described)
• text: [max characters (optional int)] [max lines (optional int)]
• imag: none
In practice
• In our patch, when you select an effect from the umenu, a is automatically sent to the message box. The subpatcher p contains an algorithm that automatically takes the information we’ve just described and formats it for readability (If you’d like to see how it works, double-click on the patcher object).
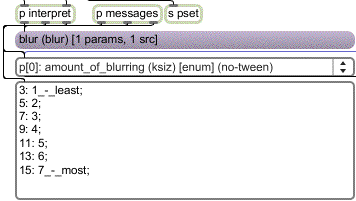
• Take a look at the portion of the patch shown above. The three outlets from the p patcher are attached to the inlets of the three objects below—the message box, umenu and textedit object. The message box contains the formatted message. The umenu contains the formatted messages. The textedit object displays the additional parameter data. Above, you see the information reported for the Blur effect. We see that it’s called ‘blur’, has a 4-letter code of ‘blur’, takes only one parameter and one source. Parameter 0, the first parameter, represents the amount of blurring, and has a 4-letter code of ‘ksiz’. This parameter is an enumerated list, and cannot be tweened. In the textedit object, we display the correspondence between the indices and their actual values.
• Choose a few other effects from the left-hand umenu, and see how the information displays change. Choose different parameters from the right-hand umenu to get a feel for how the different parameters are described.
Making changes to parameters
• Load some movies into the two jit.qt.movie objects by clicking on the message box objects and turn on the toggle attached to the metro to start the patch.
• In the left-hand umenu, choose the transition effect called ‘radial’ (in our umenu, it’s at index 24).
• Looking at the parameter display, we see that ‘radial’ has seven parameters and takes 2 sources. In the jit.pwindow, you should see your left-hand movie playing.
• The effect’s first parameter is called ‘percentage’. It’s a fixed-point parameter, and, by consulting the textedit object, we see that it takes a minimum value of 0, and a maximum value of 1.

• In the example patch, find the display pictured in the screen shot above. It’s located toward the upper right of the patch. This is our parameter editor. The value in the blue number box represents the parameter number. We’ll use the yellow number boxes to set values for the chosen parameter. Each time you change one of the yellow number boxes, the pak object sends a message to jit.qt.effect to set the parameter values.
We’ve set up the patch so that when you change the blue number box, the parameter information display automatically changes to display the parameter you’ve chosen. Behind the scenes, we’re using another message to jit.qt.effect called to retrieve the current values of the parameter.
• For now, let’s just edit the first parameter. Make sure the blue number box is set to . Now, adjust the first yellow number box to values between 0 and 1. You should see the image in the jit.pwindow change as you do. The right-hand screen shot, above, shows an example.
• Change the parameter number to 1. From the information display, we see that parameter 1 is an enumerated list that controls the wipe type. You can scroll down in the textedit object to see the full list of types. Try entering different indices in the leftmost yellow number box to try them out. You can always switch back to parameter 0 to see the effect at different percentage values.
• Let’s skip to parameters 4 and 5 (parameters 2 and 3 control horizontal and vertical repeat values—feel free to try them out). Change to parameter 4 (border width, which takes a fixed-point number between 0 and 20) and set the parameter value so that you see a border appear at the edge of the wipe. Now, change to parameter 5. This parameter sets the RGB color of the border. Using all three yellow number boxes, set the parameter to 0 255 0. The border should appear bright green, as pictured below.
• Finally, change to parameter 6, (soft edges). Parameter 6 is a Boolean value (the equivalent of a check box in the Dialog Box). If you set this parameter to 1 (on), the border will be drawn anti-aliased.
• You’ve now successfully negotiated jit.qt.effect and worked with every major parameter type.
Tweening
Like any other Jitter object, we use messages to control jit.qt.effect parameters using messages. Additionally, we can take advantage of QuickTime Effect’s built-in support automatic interpolation between parameter values, or tweening. As we saw in the first part of this tutorial, using tweened parameters is fairly straightforward. Now, we’re going to control them from Max.
You’ll recall that tweened parameters change from an initial value to a target value over a specified number of steps. Setting these values from a patch differs only slightly from the method we just used. Instead of setting parameters using the message, we use a pair of messages, and , which represent the initial and target values, respectively.
• Locate the portion of the patch shown in the screen shot, above.
• Select the ‘cloud’ render effect from the left-hand umenu. The parameter information display should indicate that ‘cloud’ has 3 parameters and takes no sources. If you quickly browse through the parameters, you’ll see that they are all marked ‘tween-optional’, which means that we can tween them all if we like.
• Let’s set our initial values. Click on the blue umenu, and change the selection to . This sets the first item in the pak object, so that any parameter changes are now sent to the jit.qt.effect object as a message.
• The ‘cloud’ effect’s first parameter, parameter 0, sets the RGB color of the cloud. Let’s go for red. Using the yellow number box objects, set this parameter’s value to .
• Parameter 1 sets the RGB color of the background. Anyone for black? Set this parameter to .
• Parameter 2 sets the cloud’s rotation. We’ll set up a full rotation for this example. Change this parameter to .
• Click on the blue umenu again, and select . We’ll set target values now.
• Set the cloud color to blue (), the background color to yellow () and the rotation to .
• To actually see our tweened parameters, change the number box connected to the message box that says . Look at that sky change!
Saving and Loading Parameter Files
QuickTime Effects supports a special file type that we use to save and retrieve effect parameters, called .qfx. We can use .qfx files to back up parameter configurations that we’d like to recall later, or to move a parameter set from one patch to another (or from one application to another—.qfx files use a standard file type that any program that utilizes QuickTime Effects should know how to read). In Jitter, we also use .qfx files to create QuickTime Effects tracks in the jit.qt.movie object.
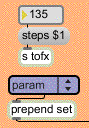
• Locate the message boxes shown in the screen shot below in the lower right of the patch. Since we’re confident that you’ll want to hold on to the settings we just entered for the ‘cloud’ effect, let's save them to disk.
• Click on the messagebox. A File Dialog box will appear. Enter a filename and click on the Save button to write your parameter file to disk. The message also accepts an optional filename as an argument, if you’d like to bypass the File Dialog box.
• We use the message to retrieve a .qfx file. Click on the message box that says . Make sure you have two movies running in the patch, and that your attribute is set to a value greater than 0. It’s a little present from us to you, because we love you so much.
If you are using the QuickTime Effects Dialog Box interface to set your effect parameters, you can access the functionality of the and messages with the Load and Save buttons at the bottom left of the Dialog Box.
Using QuickTime effects in QuickTime movies
QuickTime Effects can be used as special tracks inside of movies. A QuickTime Effects track uses existing video tracks as sources (if applicable) and renders the effect in real time, while the movie plays.
The jit.qt.movie object lets you add effect tracks to an existing movie by using .qfx files to describe the effect and its parameters.
Open the tutorial patch 24jQTEffects in the Jitter Tutorial folder and look at the section labeled C. QuickTime Effects Track.

• Click on the message box to read in an example movie.
• To determine the number of tracks this movie contains, click the message box that says . This causes one or more messages to be sent out the jit.qt.movie object’s right outlet, beginning with the symbol , followed by several arguments. The format of the message is .
Let’s take a moment to look at this message. It reads . Since there is only one message, we know there is one track in track1.mov, at index 1. It is an unnamed video track. It’s enabled, and at layer 0.
QuickTime layers are numbered from –32768 to 32767. Tracks at lower layers are displayed in front of tracks at higher layers. If two tracks are at the same layer, the track with the higher track index is displayed in front. When you create a new track, QuickTime assigns it a layer of 0.
• Click on the message box that says . This message finds the movie track2.mov, and copies its first track (which we happen to know is a video track) to a new track in our current movie (the tells jit.qt.movie to create a new track). Because the new track has the same layer as the existing track (0, in this case), it is displayed in front.
If we wanted to know, without a doubt, what the track layout of track2.mov is, we could send the message to jit.qt.movie. Most track query commands—messages beginning with —accept a remote source (a file on disk, a URL or data on the clipboard) as an initial argument.
• Click on the message box again. You should see two messages printed in the Max Window, indicating that we now have two tracks in our movie:
1 ‘unnamed video’ video 1 0print: trackinfo 2 ‘unnamed video’ video 1 0
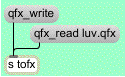
• Let’s insert luv.qfx as an effect track in this movie. Take a look at the message:

A argument of causes jit.qt.movie to calculate a maximum duration for the effect. For a 0-source effect, this value is the length of the movie (minus any ). For a 1-source effect, it’s the length of the source track (minus any ). For a 2-source effect, the value is the length of the shortest of the two source tracks (minus any ).
• Click the message box that says . Find luv.qfx and click the Open button in the File Dialog Box.
• You should immediately see the luv.qfx effect applied to the two movie tracks as the movie plays.
• Click the message box one last time. You should see the following in your Max window:
print: trackinfo 1 ‘unnamed video’ video 1 0print: trackinfo 2 ‘unnamed video’ video 1 0
print: trackinfo 3 ___effect_src2 video 1 0
print: trackinfo 4 ___effect_src1 video 1 0
print: trackinfo 5 ___effect_track video 1 –32768
Apparently, our movie has acquired some new tracks, hasn't it? Applying an effect track to a movie will create between one and three new tracks—one track for the effect itself (named ), and one track for each of the source tracks (named ).
You shouldn't change the names of these tracks— the jit.qt.movie object relies on these track names for the message, as we'll see.
• We use the message to remove effects tracks from a movie. Click on the message box that says . This will remove any tracks with the reserved names discussed above.
Summary
The jit.qt.effect object provides an interface to Apple’s QuickTime Effects architecture. The object permits control over QuickTime Effects using a standard Dialog Box, or with Max messages. The jit.qt.effect object permits control over tweenable parameters, and offers import and export with the .qxf file format. The jit.qt.movie object can use .qxf files to generate effect tracks for QuickTime movies.
See Also
| Name | Description |
|---|---|
| jit.pwindow | In-Patcher Window |
| jit.qt.effect | QuickTime Effects for Jitter matrices |
| jit.qt.movie | Play or edit a QuickTime movie |