Intro
While being able to control individual cells in a matrix can be useful, there are a lot of other ways to fill a matrix with data. We’ll look at filling a matrix from a few other sources in this chapter.
Setup
Filling a Matrix
This example uses the message in combination with an uzi object to rapidly fill a matrix.
Lock the patch and double-click the patcher fillmatrix object to open up the subpatcher.
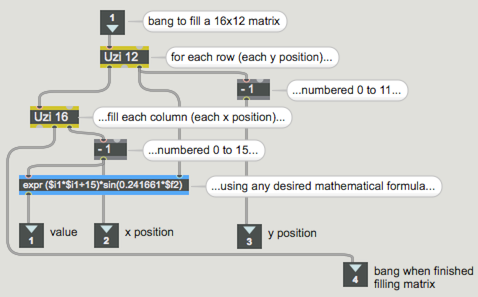
When you click the button on the main patcher labeled fill, it sends a message to the uzi 12 object, causing it to rapidly send values from 1 - 12 out the right outlet. These values correspond to the y (row) values. Each time a row is selected, another uzi object then sends a message to uzi 16 object which in turn sends out numbers for each x position or column. The x and y values are used both to determine which cell is being set and to calculate a value for each cell based on the mathematical equation in the expr object. The equation is relatively unimportant. It could be any formula that generates interesting data. In this case, we've chosen a formula that will produce a sinusoidal gradation of brightness in each column, and then cause the overall brightness of the columns to increase from left to right (i.e., as x increases). The important thing is that the method generates properly formatted messages, with x and y coordinates and a valid value (0-255) for each cell.
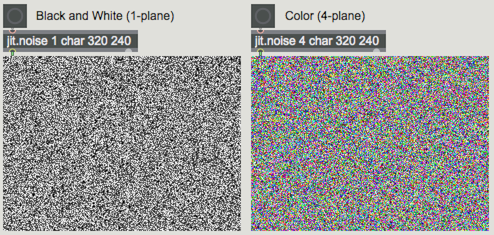
The next method uses jit.noise, a great way to generate random values for every cell in a matrix. Each time it receives a message, the jit.noise object creates a random matrix of the specified dimensions and plane count. The result is a totally random arrangement of pixels.
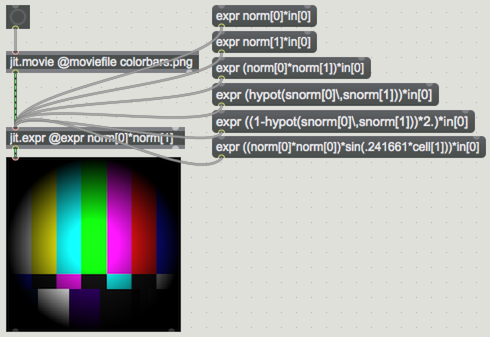
The third method uses a special object - jit.expr. The jit.expr object takes an input matrix and processes it based on the supplied expression. In the first example we are using jit.noise to supply the input matrix. Notice that the first set of expressions basically ignore the input values, only using the incoming matrix to determine the data type, plane count, and dimensions.
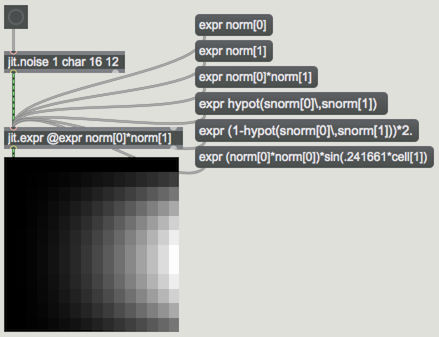
The second set uses the colorbars image and the in[0] argument, which tells the object to use the value information for each cell of the incoming matrix (in this case, colorbars) as part of the calculation. For more on using jit.expr, check out the Demystifying Expressions in Jitter tutorial.
Copying Matrix Data - srcdim and destdim
When we send a message to another Jitter object, we tell the object to look up the matrix data somewhere in memory. By default, this usually means we are copying the entire matrix and then processing it with the same constraints. A 320x240 matrix going out is still a 320x240 matrix when it comes into the next destination. We’re going to look now at how to copy specific portions of a source matrix into a specific region of a destination matrix.
Here we use the jit.matrix attributes usesrcdim and dstdim to control how the matrix coming from jit.movie is copied into the jit.matrix object.
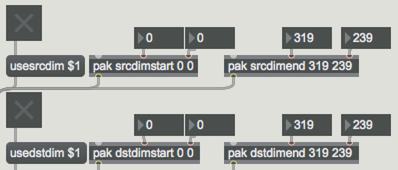
As you explore the patch, switch between the colorbars and sunset images to get a better sense of how it works. Try enabling usesrcdim then manipulating the srcdimstart and srcdimend attribute values to select a portion of the color bars image to copy over. Next, try enabling usedstdim and adjusting the start and end points to determine where in the matrix the image will be displayed. As you adjust the values, you may notice portions of the previous image are left behind. You can remove them by using the message or by opening the gate next to the "auto clear" bubble.
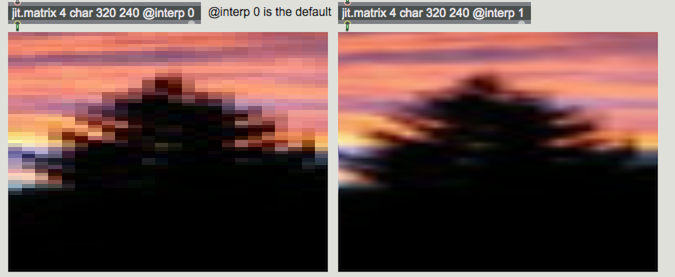
Finally, when you are using a different number of pixels from one matrix to the next (either more or less), you will usually see some distortion or pixelation. Enabling the on interp attribute (i.e. @interp 1) will minimize this effect by interpolating or smoothing the data.
Explore Further
This patch uses the srcdim and dstdim attributes to combine two images into a single jit.matrix. The secret here is that both jit.matrix objects share the same name and are triggered in sequence. The data from the righthand image is copied into the jit.matrix object before the data on the left, which then triggers the output and display. Notice how the lefthand image supersedes (covers) the one from the right when overlapping coordinates are given. This is one of many cases in Jitter where you’ll want to make sure one thing happens before another. For this reason, the trigger object is well-known among advanced Jitter users as an essential tool.
For even more matrix filling options, take a look at jit.gradient, jit.bfg, jit.gen jit.pix.