MIDI Tutorial 2: MIDI Synthesizer
In this tutorial we show how to create and work with a simple 4-voice MIDI-controllable synthesizer. Along the way, we discuss simple methods of polyphonic routing as well as using a variety of common MIDI messages to control synthesis parameters.
Playing our synthesizer
Our tutorial patcher deals with MIDI through a number of methods. Let's look through these one at a time.
Our tutorial patcher is capable of playing four sounds at the same time, due to there being four different copies of the abstraction in our patch. In order to take advantage of the polyphony however, we need to figure out how to route our MIDI values to the different voices so that the appropriate copy of the abstraction receives each message. The poly object takes MIDI pitch and velocity and performs voice assignment on the values based on the arguments to the object. The first note the object receives will be given voice number , the second note voice , and so on. Once we exceed the polyphony the object is programmed for (in our case, voices), the object will roll around and start again at voice . Note-off events will map to the same voice as their corresponding note-on events, guaranteeing that the message to stop a MIDI event goes to the same destination as the one that started it.
The second argument to poly () tells it to steal voices if the polyphony is exceeded. If we attempt to sound more notes than the poly object allows for, the oldest note will be dropped and its voice will be recycled.
The output for our poly object is sent into a pack object and then through a route object to send the remaining lists of pitches and velocities to the appropriate copy of our abstraction.
To create our pitch bend value, we take the MIDI pitch bend wheel and split its range to two different scale objects. The left-hand scale object takes the lower half of the MIDI range and scales it from to ; the right-hand object scales the upper range between and This guarantees that the center value in the range () maps to a value of in all cases.
The MIDI CC# and the real-time messages are sent in by the ctlin and rtin objects, respectively, to work together controlling a low-frequency oscillator (LFO). The real-time messages that define the beat clock control the rate of the LFO; the controller messages change the depth. MIDI beat clock typically runs at 96 PPQ; the timer object measures the intervals between ticks, which are then scaled to derive the rate of the LFO so that it lasts one measure. MIDI real-time message (the 'start' message on a sequencer) resets the phase of the cycle~ object so that the LFO will re-synch with a sequence if it starts on a barline.
Note how the output of the LFO is scaled so that even with the depth sending a signal of , the signal sent into the abstraction is guaranteed to be centered around Let's take a look at what's in that patch.
The abstraction
Our abstraction has three inLets. The first inlet takes lists of pitch and velocity values from our MIDI keyboard input. The pitch value is sent to drive a constant signal (sig~) which has the signal from inlet #2 added to it (+~). This value is then interpreted as a MIDI number and converted to a frequency in the signal domain by an object called mtof~, which behaves just like the mtof object but operates on continuous MSP signals instead of Max numbers. This frequency value then feeds two band-limited oscillators: a square wave (rect~) and a sawtooth wave (saw~) which are mixed together. The frequency of the rect~ object is multiplied by the LFO signal coming in inlet #3 so that a rich, chorused tone can be acheived when the depth of the LFO is increased.
Standard synthesizer envelopes: adsr~
Meanwhile, the velocity output of the MIDI notes is scaled between and and sent to an object called adsr~. The object stands for Attack, Decay, Sustain, Release, and generates signal ramps in a standard configuration borrowed from analog synthesizer design:
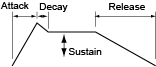
The arguments to adsr~ are interpreted as an attack time, a decay time, a sustain level, and a release time. The sustain level is a multiplier of the overall amplitude which the object outputs during a sustaining note.
The adsr~ object takes a value and interprets it as an envelope trigger of a certain amplitude. Any number higher than triggers the attack, decay, and sustain phases, scaled to match the amplitude of the trigger (e.g. an input value of will trigger a softer envelope than a trigger of ). The object then stays at the sustain phase, putting out a constant value until it receives a It then continues to the release phase of the envelope and ramps to .
Summary
Within a patcher, MIDI note events can be routed polyphonically to different copies of the same abstraction using a poly object. Objects such as bendin and ctlin can be scaled to match different synthesizer parameter ranges, and real-time MIDI commands can be used to derive tempo data for LFOs and sequencers within Max. The adsr~ object generates envelope ramps based on triggers for a note-on and a note-off, making it ideal for use with MIDI note-based systems.
See Also
| Name | Description |
|---|---|
| poly | Allocate notes to different voices |
| mtof~ | Convert a MIDI note number to frequency at signal rate |
| adsr~ | ADSR envelope generator |