Tutorial 21: Working With Live Video and Audio Input
This tutorial demonstrates how to use Jitter in conjunction with a QuickTime-compatible image capture device—such as a webcam, a DV camera, or a PCI video input card—to grab video sequences and use them as matrices, or record them directly to disk. We can also use Jitter to record sound directly to disk as a QuickTime movie.
The patch examples in this Tutorial assume that you have a QuickTime-compatible image capture device powered on and attached to your computer.
A Note For Windows Users: The jit.dx.grab object offers many of the same capabilities of the jit.qt.grab object. The main difference is that the object works natively with DirectX-compatible devices and doesn't require a QuickTime VDIG. Please refer to the Reference and help patch for the jit.dx.grab object for more information
The Basics of Sequence Grabbing
When we capture video images from an input device, we are actually working with a sequence of images. In Tutorial 20, we created a sequence of images using the operation of the jit.qt.movie object. This time, we'll use the jit.qt.grab object to grab a sequence of images.
The jit.qt.grab object provides an interface to one of QuickTime's components—the general mechanism used by QuickTime to extend its functionality. Components can include software modules that provide interfaces for new video codecs, or an interface between software and various kinds of hardware, or tasks like image capture and sound output. We've already used a QuickTime component in Tutorial 20 when we used the message, and we'll be looking at other QuickTime component-based Jitter objects in the next several tutorials.
First grab
in the Jitter Tutorial folder.
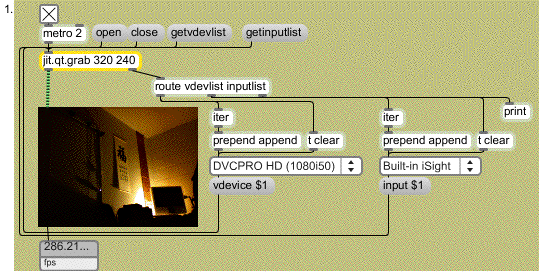
Notice that the jit.qt.grab object takes two arguments ( and ) that specify the width and height of the matrix output by the object. They also represent the dimensions of the internal buffer into which any captured data will be placed. The matrix will always be a 4-plane char matrix).
• Click the message box that says . This message causes the jit.qt.grab object to search for available video capture devices. The jit.qt.grab object will then send the names of any devices it finds out the right outlet in the form of a list preceded by the symbol . In our patch, we're using iter to break the list up, and placing the device names in an umenu. Our list only has one item, DV Video, but yours may include different items.
• Click on the umenu and select the device you'd like to use. This causes the message box that says to send the index of the selected video capture device (which is the same as its position in the umenu) to jit.qt.grab. If you don't explicitly choose a , jit.qt.grab defaults to the first selection in the list (equivalent to sending a message) when it opens the component connection.
• Click on the message box that says . The message tells jit.qt.grab to open a connection to the sequence grabber component—to create a component instance—for the video capture device you've selected. Until you send the message, jit.qt.grab will simply output its last matrix when you send it a or message—no sequence grabbing will occur.
• Click on the toggle attached to the metro object, to start sending s to jit.qt.grab. You should now see your captured video signal in the jit.pwindow.
If you don't see your video signal, check the Max Window and see if jit.qt.grab reported any errors. It may be possible that your device is in use by another application, or that it has gone to sleep (our video camera sleeps after about 3 minutes of non-use, for example). If your device supports multiple inputs, read on.
• If you have multiple devices connected to your computer, you can use the attribute to switch between them, even after sending the message to jit.qt.grab.
• To close the component connection, click on the message box that says . Leave this patch open; we'll return to it in a moment.
Switching between inputs
The video capture device you're using may support several different inputs. For instance, a CapSure Card supports s-video and composite inputs, and an ATI Rage 128 Pro supports s-video, composite and tuner inputs. FireWire DV generally supports a single input. In this section, we'll learn how to list those inputs and switch between them.
• Re-open the jit.qt.grab object's component connection by clicking on the message box that says .
• Click on the message box that says . This causes jit.qt.grab to send a list of available inputs for your chosen device out the right outlet preceded by the symbol . The patch breaks this list up using the iter object and sends it to the umenu on the right of the patch.
• Click on the rightmost umenu to see a list of inputs available to your device. Our DV camera reports that it has one input: . Our CapSure card reports and inputs, as shown in the screen shot:
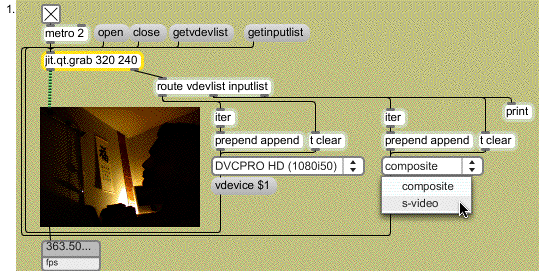
• To change your input, select an item from the umenu. This causes the message box that says to send the index of the selected input (which is the same as its position in the umenu) to jit.qt.grab, which will switch to your selection. If you don't explicitly choose an , jit.qt.grab defaults to the first selection in the list (equivalent to sending an message) when it opens the component connection.
• You should now see your captured video signal (from your chosen input) in the jit.pwindow.
• When you're done, click the message box that says to close the component connection.
Some video capture devices don't work properly in the jit.qt.grab object's default mode (, or sequence grabber mode). If you find that jit.qt.grab is acting erratically, try sending it the message (vdig mode). This enables a method of video capture that is more reliable on certain capture devices.
Grabbing for quality
For webcams, the normal operating mode of jit.qt.grab provides speed and good quality. For other higher resolution capture devices such as analog video-capture boards or DV cameras, we'd like to be able to adjust the quality of the sequence grabber to get the most out of them.
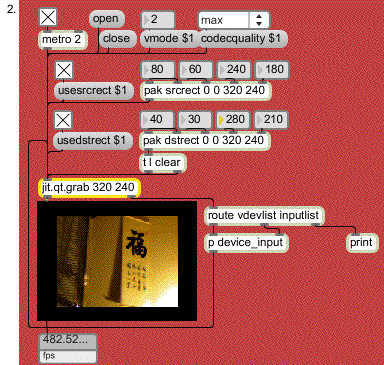
• Double-click on the p subpatcher. The Patcher window that opens contains everything you need to set your and settings. Once you've done this, close the subpatch window.
• Click the message box that says to start the component connection. Click on the toggle attached to the metro object. You should now see your captured video signal (from your chosen input) in the jit.pwindow.
• To enable high quality mode, we need to send the message to jit.qt.grab. Enter the numeral in the number box attached to the message box that says . If your capture device supports a high quality mode, you'll probably see the image in the jit.pwindow change slightly.
If your device does not support high quality mode (), you may see no change, or some undesirable result, like distorted image proportions or noise. Should this occur, return to sequence grabber or vdig mode ( or).
• To compare the different quality modes and settings, let's zoom in on a detail of the captured signal. Click on the toggle attached to the message box that says . Sending the message causes jit.qt.grab to capture only the portion of the input signal specified by the source rectangle attribute, . By default, the attribute is set to the full frame of the input signal.
• Change the values of the number boxes attached to the pak object. This will generate a message to set the attribute. The message arguments refer to the left x, top y, right x and bottom y coordinates of the input frame, respectively. You should see the image changing to reveal only the portion of the input frame you specify. For best results, choose two numbers that have the same 4:3 aspect ratio as the input frame.
• Let's do some comparisons. First, switch the setting back to 0 or 1, depending on what you were using before (reminder: (vdig mode) is only necessary and supported on specific capture devices). Compare the image quality to (high quality mode). On our system, using a DV camera, the image becomes noticeably crisper, and aliased edges are tightened up.
• Click on the umenu object. The object contains a list of available quality settings for (the settings have no effect in sequence grabber and vdig modes). Choosing an item from the umenu will cause the item's index number to be sent to jit.qt.grab, via the message box that says . Select some different quality settings, and observe the changes—both in terms of image quality and frame rate (displayed on the jit.fpsgui object). The default setting for is (equivalent to sending a or message to jit.qt.grab).
You should experiment with your hardware to determine the best settings for your system. For example, using the in conjunction with the and modes actually looks worse than on our system. While offers control over the capture quality, it will not necessarily improve the image quality over the jit.qt.grab object's default capture mode.
• You can also specify the portion of the output matrix the captured frame will occupy—a destination rectangle—with the attribute. To enable the destination rectangle, click on the toggle attached to the message box that says . By default, the destination rectangle is set to the dimensions of the jit.qt.grab object's output matrix.
• Change the values of the number boxes attached to the pak object. As with the message, the message arguments refer to the left x, top y, right x and bottom y coordinates of the output matrix. You should see the image changing to occupy only the portion of the output matrix you specify. Notice that the pak object is connected to a t object, which causes a message to be sent to jit.qt.grab before sending the message. You could modify the patch to see what happens if you don't send the message.
• When you're done, click the message box that says to close the component connection.
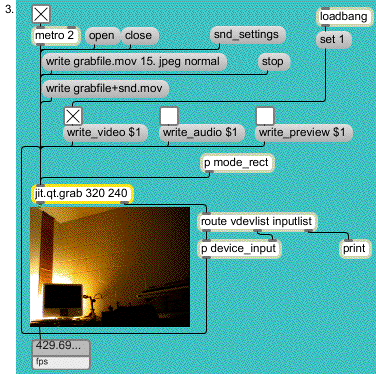
Grabbing to disk
You can save grabbed sequences directly to disk as a QuickTime movie, if you prefer. When you do this, jit.qt.grab writes straight to the hard disk without sending out any matrix output. With only a few minor differences, this process is similar to the one described in Tutorial 19. But this time, we'll be recording audio, too.
You should quit or disable any applications or settings that interrupt processing on your machine while recording to disk, such as Internet applications or AppleTalk.
We've encapsulated the , and settings we just looked at in the
p subpatch. You can access them by double-clicking on the object if you'd like to change them. Note, however, that the attribute does not affect the grab to disk operation.
p subpatch. You can access them by double-clicking on the object if you'd like to change them. Note, however, that the attribute does not affect the grab to disk operation.
• Double-click on the p patcher. The Patcher window that opens contains everything you need to set your and settings. Once you've done this, close the subpatch window.
• Click the message box to start the component connection. Click on the toggle attached to the metro object. You should now see the captured video signal from your chosen input in the jit.pwindow.
• The jit.qt.grab object, by default, has its attribute set to on (). To reflect this, we've used loadbang to turn on the toggle attached to the message box that says . If you wanted to disable writing video and only write audio, you would send a message and a message to jit.qt.grab. For now, leave the toggle connected to the message box that says turned off (by default, the attribute is set to off ()).
• Click on the messagebox. You've probably noticed that this message looks like the message that we send to jit.qt.record object to start recording. Except for the lack of a argument, the message to jit.qt.grab is formatted identically— is the file name, refers to the output movie's frame rate, specifies the Photo-JPEG codec, and specifies normal codec quality. All of the arguments are optional; if we omit the file name, a file Dialog Box will appear. The remaining settings, if omitted, will retain their previous values. If there are no previous values, the default values for the capture device will be used.
Technical detail: There is an important difference in the formatting of the message to jit.qt.grab if you plan to record separate video and audio (split) files. For more information, consult the Object Reference entry and help file for the jit.qt.grab object.
• Recording begins immediately after you send the message. While we are recording, the jit.qt.grab object doesn't output any matrices. We can tell because the jit.fpsgui object's display isn't changing. You can use the attribute to switch matrix output on and off while recording. The attribute is off (set to ) by default. Click on the toggle attached to the message box that says to enable matrix output while recording. Your recordings will be smoother if you leave off.
• Click the message box that says to stop the grab to disk operation, but leave the patch open.
The jit.qt.grab object sends a message out its right outlet after a operation to confirm that the movie was successfully recorded. Since we've connected that outlet to a print object in our patch, we can see the results by looking at the Max Window. If everything went as expected, you should see in the Max Window.
We can also record sound to disk using the technique just described. There are two ways to choose the sound device for jit.qt.grab.
1. Use the and messages to set sound device and sound device input. This method is very similar to the method we used to list the video devices and inputs, except that we use the and messages instead of the and messages.
2. Use the QuickTime Sound Settings Dialog Box to adjust all of the device and input settings at once.
We're going to use the Sound Settings Dialog Box for this tutorial, but you might find it instructive to try making an altered copy of the example patch for the message-based method. You can use the p subpatcher as a model.
There is a Video Settings Dialog Box available for changing video device and input settings, as well. You can access it by sending the message to jit.qt.grab.
• Click the message box that says . The Sound Settings Dialog Box will appear. Using the pop-up menus and other controls, adjust the sound input settings to your preference. Close the Dialog Box by clicking OK.
• Click on the toggle attached to the message box that says to enable audio for the grab to disk operation.
• Click the messagebox. The recording will begin immediately as before, but sound will also be recorded to the movie.
• Click the message box that says to end the recording. Locate the movie on your hard drive, and open it in QuickTime Player (or Max, if you prefer) to verify that sound was recorded with the movie.
• Click the message box to close the component connection.
If you investigate the Sound and Video Settings Dialog Boxes, you will notice that both offer numerous options for controlling the input settings of each device—brightness, saturation, gain, etc. All of these parameters may be modified directly from Max/Jitter, although it's beyond the scope of this Tutorial to describe their operation. Please refer to the Object Reference entry and help file for jit.qt.grab for more information.
Summary
The jit.qt.grab object allows you to grab images from any QuickTime-compatible video input device. The object offers both Max-based and Dialog Box interfaces for listing devices and inputs, switching between them, and controlling image quality. The and attributes can be used to crop and position a captured image within a Jitter matrix. The jit.qt.grab object also provides a mechanism for recording video and sound directly to disk as a QuickTime movie.
See Also
| Name | Description |
|---|---|
| jit.pwindow | In-Patcher Window |
| jit.qt.grab | Digitize video from an external source |
| jit.qt.grab | Digitize video from an external source |
| jit.qt.movie | Play or edit a QuickTime movie |