Tutorial 47: Using Jitter Object Callbacks in JavaScript
In the last two tutorials, we've looked at some of the possibilities and advantages of using Jitter objects and matrices within JavaScript code. In this tutorial we'll encapsulate an entire Jitter OpenGL patch inside of JavaScript, using many of the techniques we've already seen. Most importantly, however, we'll learn how to "listen" to the output of Jitter objects that have been encapsulated in JavaScript in order to design functions that respond interactively to these objects.
A number of Jitter objects (such as jit.movie, jit.pwindow, and jit.window) output messages from their status (right-hand) outlets in response to processes initiated by the user in a Max patcher. For example, when you read a movie file into jit.movie, the object outputs the message followed by the movie's filename and a status number out its status outlet. Similarly, the jit.pwindow and jit.window objects can respond to mouse events in their windows by sending messages out their status outlet. Because Jitter objects instantiated within JavaScript have no inlets and outlets per se, we need to explicitly create an object (called a JitterListener) to catch those messages and call a function (called a callback function) in response to them.
This Tutorial assumes you've looked at the earlier JavaScript tutorials, as well as the first OpenGL tutorial Tutorial 30: Drawing 3D Text.
The first thing we notice about this tutorial patch is that there is very little in it, in terms of Max objects. Virtually all the work done in the patcher is accomplished inside the js object in the patch.
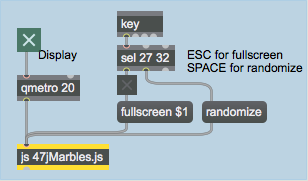
Our js object contains a complete set of Jitter objects performing an OpenGL rendering (including a jit.window object).
Our js file not only draws our OpenGL scene, but also handles interactive events from the mouse. This is done through a listening and callback mechanism (called a JitterListener) that we'll learn about in the JavaScript code.
Creating OpenGL objects in JavaScript
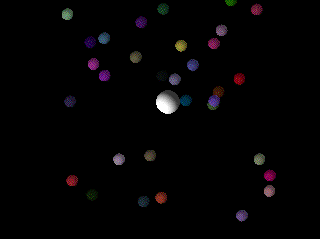
Our JavaScript code creates all the JitterObject objects we need to render our scene: a jit.window object to display the drawing context, a jit.gl.render object to perform the rendering, and a number of jit.gl.gridshape objects to draw and animate the spheres in the scene. These objects are instantiated in the global block of code at the beginning of the JavaScript file.
This line declares a variable (OBJECT_COUNT) that determines the number of smaller spheres in our scene.
// create a [jit.window] object for our display
// (this is the object we'll listen to):
var mywindow = new JitterObject("jit.window", "ListenWindow")
// turn off depth testing... we're using blending instead:
mywindow.depthbuffer = 0
// turn ON idlemousing... we want to listen for it:
mywindow.idlemouse = 1
Next, we create a jit.window object to display everything. We'll refer to it in our JavaScript code by the variable mywindow. Just as in a Max patch, the jit.window needs a name ("ListenWindow") that must match the OpenGL drawing context we're using. We've turned off the and turned on the attribute, which allows the jit.window object to track mouse events in the window regardless of whether we've clicked our mouse down or not.
// create a [jit.gl.render] object for drawing into our window:
var myrender = new JitterObject("jit.gl.render", "ListenWindow")
// use a 2-dimensional projection:
myrender.ortho = 2
// set background to black with full erase opacity (no trails):
myrender.erase_color = [0, 0, 0, 1]
Our jit.gl.render object (assigned to the variable myrender) defines a drawing context called "ListenWindow". The jit.window object (above) and the jit.gl.gridshape objects (below) share this name. We've decided to use an orthographic projection (by setting the attribute to ). This means that the z axis of our drawing context is ignored in terms of sizing objects based on their distance from the virtual camera. This essentially creates a 2-dimensional rendering of our scene. We've set the background to black (with a full erase between successive drawing) by setting our to .
// create a [jit.gl.gridshape] object for use to control with the mouse
var mywidget = new JitterObject("jit.gl.gridshape", "ListenWindow")
mywidget.shape = "sphere"
mywidget.lighting_enable = 1
mywidget.smooth_shading = 1
mywidget.scale = [0.1, 0.1, 0.1]
mywidget.color = [1, 1, 1, 0.5]
mywidget.blend_enable = 1
mywidget.position = [0, 0] // no z necessary in orthographic projection
The first jit.gl.gridshape object we create (assigned to the variable mywidget) corresponds to the large sphere moved by our mouse in the jit.window. After creating it, we set all the relevant attributes we want the sphere to have, just as we would in a Max patcher. Note that in setting the attribute we only use two arguments (x and y). In an orthographic projection the z axis is irrelevant to how the shapes are drawn.
// create an array of [jit.gl.gridshape] objects
// randomly arrayed across the window
var mysphere = new Array(OBJECT_COUNT)
Rather than naming our smaller spheres individually, we're treating them as an Array (called mysphere). Each element in this array will then be a separate jit.gl.gridshape object that we can access by array notation (e.g. mysphere[5] will be the sixth sphere, counting up from 0).
// initialize our little spheres with random colors and positions (x,y)
for (var i = 0; i < OBJECT_COUNT; i++) {
  mysphere[i] = new JitterObject("jit.gl.gridshape", "ListenWindow")
  mysphere[i].shape = "sphere"
  mysphere[i].lighting_enable = 1
  mysphere[i].smooth_shading = 1
  mysphere[i].scale = [0.05, 0.05, 0.05]
  mysphere[i].color = [Math.random(), Math.random(), Math.random(), 0.5]
  mysphere[i].position = [Math.random() * 2 - 1, Math.random() * 2 - 1]
  mysphere[i].blend_enable = 1
}
This code actually creates the individual jit.gl.gridshape objects as individual JitterObjects that are members of the Array mysphere. We use a JavaScript for() loop to set the initial attributes of all these objects in one block of code. We give them random initial and attributes, scattering them over the screen and coloring them all differently.
// create a JitterListener for our [jit.window] object
var mylistener = new JitterListener(mywindow.getregisteredname(), thecallback)
Finally, we create a variable called mylistener that we assign to be a JitterListener object. JitterListener objects take two arguments: the object that they listen to, and the function that will be called when the object triggers an event. Our JitterListener object is set to listen to our jit.window object (mywindow). The getregisteredname() property of a JitterObject object returns the by which that object can be accessed by the JitterListener (in the case of jit.window objects, this will be the same as name of the drawing context). Whenever our jit.window object generates an event, a function called thecallback() will be triggered in our JavaScript code. Now that we've instantiated a JitterListener, we can (in most cases) leave it alone and simply deal with the mechanics of the callback function it triggers in response to an event from the object it listens to.
function randomize() {
  // reorient the little spheres
  for (var i = 0; i < 32; i++) {
    mysphere[i].color = [Math.random(), Math.random(), Math.random(), 0.5]
    mysphere[i].position = [Math.random() * 2 - 1, Math.random() * 2 - 1]
  }
}
Our randomize() function takes our little spheres and scatters them randomly, changing their colors. This allows us to basically restart our simulation whenever we like.
The callback function
The jit.window object responds to a variety of mouse events. When the attribute is set to (as it is in our code) the jit.window object outputs mouse information (the message) when you drag the pointer over the window. It also tells us when the pointer has left the window area (the message). Regardless of the setting of the attribute, the jit.window object also responds to mouse clicks inside the window (the message).
function thecallback(event)
// callback function to handle events triggered by mousing
// in our [jit.window]
{
	var x,y,button; // some local variables for the callback function
The event constructor stores the message sent by the jit.window object to the JitterListener object in our patch. We also declare a few local variables (x, y, and button) to store information about the pointer derived from the event message's arguments.
We then use JavaScript if() statements based on the property of the event that triggered the callback function. The property will contain the name of the message (, , etc.) that triggered the function.
if (event.eventname="="mouse")" {
// we're entering, dragging within, or leaving a "mouse click" event
This part of the code handles a mouse click event (a click down, dragging of the mouse, and the release of a click).
// arguments are (x,y,button,cmd,shift,capslock,option,ctrl)...
// we only care about the first three
x = event.args[0]
y = event.args[1]
button = event.args[2]
The first three arguments to the event contain the position of the mouse (x and y) and a flag telling us whether the mouse button is down () or up (). We store these settings into variables (x, y, and button) for use later on.
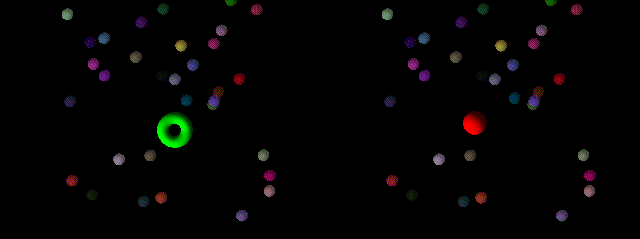
if (button) // we're clicked down
   {
      mywidget.color = [0,1,0,1]; // color our control object green
      mywidget.shape = "torus"; // change it to a donut shape
   }
   else // we've just unclicked
   {
      mywidget.color = [1,0,0,1]; // color our object red
      mywidget.shape = "sphere"; // change back to a sphere
   }
   // move our control object to the drawing context's
   // equivalent of where our mouse event occurred:
   mywidget.position = myrender.screentoworld(x,y);
}
If our button is down, we turn our jit.gl.gridshape object mywidget from a white sphere into a green torus. When we release the mouse, we turn it into a red sphere.
Finally, we update the position of the jit.gl.gridshape object controlled by our mouse by updating the attribute of the JitterObject object mywidget. Because our drawing context works in OpenGL world coordinates (where the default center of the space is (0, 0) and positions are expressed in decimal values), we need to convert our x and y values into numbers that make sense for our drawing context. The screentoworld() method to a jit.gl.render object will convert those values from pixel coordinates on the display to world coordinates for the rendering.
else if (event.eventname="="mouseidle")" {
   // we're mousing over the window with the mouse up
   x = event.args[0];
   y = event.args[1];
   mywidget.color = [1,1,1,1] ; // color our object white
   mywidget.position = myrender.screentoworld(x,y);
}
This code executes whenever we drag our pointer across the jit.window object without clicking the pointer. First we store the variables x and y based on the pointer position, we turn our jit.gl.gridshape object (mywidget) white, in case the previous callback had turned it a different color, and again we reposition mywidget.
else if (event.eventname="="mouseidleout")" {
   // we're no longer mousing over the window
   mywidget.color = [1,1,1,0.5] ; // make our object translucent
}
When our pointer leaves the jit.window, the property of our callback will be "mouseidleout". All we do is change the alpha to 0.5, leaving the sphere where it was.
}
// don't allow this function to be called from Max
thecallback.local = 1;
Because our thecallback() function is intended to be executed by our JitterListener object, we set its property to to prevent it from being executed directly by a Max message sent to the js object.
Drawing the scene
Now that we've seen how to respond to mouse events and update our mywidget object's position, color, and shape accordingly, we need to look at how we perform the actual rendering of our scene in response to a message from the qmetro object in our Max patcher. The bang() function in our JavaScript code handles the drawing as well as the animation of the little spheres in response to the new position of our large sphere.
The majority of our bang() function iterates through the positions of all the little spheres and compares them to the position of the large one. If the distance between them is small enough that the spheres would overlap when drawn, we move the little sphere away the minimum amount necessary to have the spheres touch. This type of processing is known as collision detection and is a ubiquitous technique in the field of computer animation.
function bang()
// main drawing loop... figure out which little spheres to move
// and drive the renderer
{
  // collision detection block. we need to iterate through
  // the little spheres and check their distance from the control
  // object. if we're touching we move the little sphere away
  // along the correct angle of contact.
  for(var i = 0;i<OBJECT_COUNT;i++) {
We enter a JavaScript for() loop to check the position of our large sphere against every small sphere, one at a time.
// cartesian distance along the x and y axis
var distx = mywidget.position[0] - mysphere[i].position[0]
var disty = mywidget.position[1] - mysphere[i].position[1]

// polar distance between the two objects
var r = Math.sqrt(distx * distx + disty * disty)
// angle of little sphere around control object
var theta = Math.atan2(disty, distx)
By subtracting the x and y positions of the two spheres (large and small) from one another, we get their Cartesian distance. We can convert this to polar (absolute) distance by applying the Pythagorean theorem to derive the hypotenuse (stored in the variable r). We then derive the angle of the small sphere around the large one by taking the arctangent of the rise (x) over the run (y).
// check for collision...
if(r<0.15)
// control object is size 0.1, little spheres are 0.05,
// so less than 0.15 and it's a hit...
{
Because our large sphere has a attribute of and our small spheres have attributes of , we can infer that the objects are overlapping if the distance between them is less than 0.15. This triggers a block of code that deals with the collision.
// convert polar->cartesian to figure out x and y displacement
   var movex = (0.15-r)*Math.cos(theta);
   var movey = (0.15-r)*Math.sin(theta);

   // offset the little sphere to the new position,
   // which should be just beyond touching at the
   // angle of contact we had before. the result
   // should look like we've "pushed" it along...
   mysphere[i].position = [mysphere[i].position[0]-movex, mysphere[i].position[1]-movey];
}
We use the polar distance and angle, combined with the minimum allowable distance between the objects (0.15), to derive how far we need to nudge the little sphere along the x and y axes to stop it from overlapping the large sphere. We figure out these values by converting the polar coordinates back into Cartesian values stored in the variables movex and movey. We then subtract these two variables' values from the current position of the small sphere, pushing it out of the way.
// rendering block...
  myrender.erase(); // erase the drawing context
  myrender.drawclients(); // draw the client objects
  myrender.swap(); // swap in the new drawing
}
This last block of code does the actual rendering. Just as you would when working with Jitter OpenGL objects in a Max patcher, you send an message to the jit.gl.render object (myrender). The drawclients() method to jit.gl.render collects all the relevant information from the OpenGL objects attached to our drawing context and draws them; any OpenGL objects with an attribute set to will have to be drawn manually here. The swap() method then replaces the old rendering with the new one in the jit.window object, showing us the updated scene. The drawclients() and swap() method are combined into one operation when you send a message to a jit.gl.render object in a Max patcher.
function fullscreen(v) {
  // function to send the [jit.window] into fullscreen mode
  mywindow.fullscreen = v
}
The fullscreen() attribute of a jit.window JitterObject object behaves just as the message sent to a jit.window object in a Max patcher.
Summary
An entire OpenGL Jitter patch can be encapsulated in JavaScript by instantiating jit.gl.render, jit.window, and other OpenGL objects within procedural code written for the js object. These objects have all their messages and attributes exposed as corresponding methods and properties. You can use a JitterListener object to respond to events triggered by a Jitter object within JavaScript. The JitterListener then executes a callback function, passing the calling message to it as its argument. This allows you to write JavaScript functions to respond to mouse interactivity in a jit.window object, file reading in a jit.movie object, and other situations where you would want to respond to an event triggered by a message sent by a Jitter object out its status outlet in a Max patcher.
Code Listing
// 47jMarbles.js
//
// Demonstrates how to set up a JitterListener object to listen
// to the output of a Jitter object instantiated within [js].
//
// rld, 7.05
//

var OBJECT_COUNT = 32; // number of little spheres

// create a [jit.window] object for our display
// (this is the object we'll "listen" to):
var mywindow = new JitterObject("jit.window","ListenWindow");
// turn off depth testing... we're using blending instead:
mywindow.depthbuffer = 0;
// turn ON idlemousing... we want to listen for it:
mywindow.idlemouse = 1;

// create a [jit.gl.render] object for drawing into our window:
var myrender = new JitterObject("jit.gl.render","ListenWindow");
// use a 2-dimensional projection:
myrender.ortho = 2;
// set background to black with full erase opacity (no trails):
myrender.erase_color = [0,0,0,1];

// create a [jit.gl.gridshape] object for use to control with the mouse
var mywidget = new JitterObject("jit.gl.gridshape","ListenWindow");
mywidget.shape = "sphere";
mywidget.lighting_enable = 1;
mywidget.smooth_shading = 1;
mywidget.scale = [0.1,0.1,0.1];
mywidget.color = [1,1,1,0.5] ;
mywidget.blend_enable = 1;
mywidget.position = [0,0]; // no z necessary in orthographic projection

// create an array of [jit.gl.gridshape] objects randomly arrayed across the window
var mysphere = new Array(OBJECT_COUNT);

// initialize our little spheres with random colors and positions (x,y)
for(var i=0;i<OBJECT_COUNT;i++) {
  mysphere[i] = new JitterObject("jit.gl.gridshape","ListenWindow");
  mysphere[i].shape = "sphere";
  mysphere[i].lighting_enable = 1;
  mysphere[i].smooth_shading = 1;
  mysphere[i].scale = [0.05,0.05,0.05];
  mysphere[i].color = [Math.random(),Math.random(),Math.random(),0.5] ;
  mysphere[i].position = [Math.random()*2.-1, Math.random()*2.-1];
  mysphere[i].blend_enable = 1;
}

// create a JitterListener for our [jit.window] object
var mylistener = new JitterListener(mywindow.getregisteredname(), thecallback);

function randomize() // reorient the little spheres
{
  for(var i=0;i<32;i++) {
   mysphere[i].color = [Math.random(),Math.random(),Math.random(),0.5] ;
   mysphere[i].position = [Math.random()*2.-1, Math.random()*2.-1];
  }
}


function thecallback(event)
// callback function to handle events triggered by mousing
// in our [jit.window]
{

  var x,y,button; // some local variables for thecallback
  if (event.eventname="="mouse")" {
  // we're entering, dragging within, or leaving a "mouse click" event

   // arguments are (x,y,button,cmd,shift,capslock,option,ctrl)...
   // we only care about the first three
   x = event.args[0];
   y = event.args[1];
   button = event.args[2];
   if (button) // we're clicked down
   {
      mywidget.color = [0,1,0,1]; // color our control object green
      mywidget.shape = "torus"; // change it to a donut shape
   }
   else // we've just unclicked
   {
      mywidget.color = [1,0,0,1]; // color our object red
      mywidget.shape = "sphere"; // change back to a sphere
   }
   // move our control object to the drawing context's
   // equivalent of where our mouse event occurred:
   mywidget.position = myrender.screentoworld(x,y);
  }
  else if (event.eventname="="mouseidle")" {
  // we're mousing over the window with the mouse up
   x = event.args[0];
   y = event.args[1];
   mywidget.color = [1,1,1,1] ; // color our object white
   // move our control object to the drawing context's
   // equivalent of where our mouse event occurred:
   mywidget.position = myrender.screentoworld(x,y);
  }
  else if (event.eventname="="mouseidleout")" {
  // we're no longer mousing over the window
   mywidget.color = [1,1,1,0.5] ; // make our object translucent
  }


}
// don't allow this function to be called from Max
thecallback.local = 1;

function bang()
// main drawing loop... figure out which little spheres to move
// and drive the renderer
{
  // collision detection block. we need to iterate through
  // the little spheres and check their distance from the control
  // object. if we're touching we move the little sphere away
  // along the correct angle of contact.
  for(var i = 0;i<OBJECT_COUNT;i++) {
   // cartesian distance along the x and y axis
   var distx = mywidget.position[0]-mysphere[i].position[0];
   var disty = mywidget.position[1]-mysphere[i].position[1];

   // polar distance between the two objects
   var r = Math.sqrt(distx*distx+disty*disty);
   // angle of little sphere around control object
   var theta = Math.atan2(disty,distx);

   // check for collision...
   if(r<0.15)
   // control object is size 0.1, little spheres are 0.05,
   // so less than 0.15 and it's a hit...
   {
      // convert polar->cartesian to figure out x and y displacement
      var movex = (0.15-r)*Math.cos(theta);
      var movey = (0.15-r)*Math.sin(theta);

      // offset the little sphere to the new position,
      // which should be just beyond touching at the
      // angle of contact we had before. the result
      // should look like we've "pushed" it along...
      mysphere[i].position = [mysphere[i].position[0]-movex, mysphere[i].position[1]-movey];
   }
  }

  // rendering block...
  myrender.erase(); // erase the drawing context
  myrender.drawclients(); // draw the client objects
  myrender.swap(); // swap in the new drawing
}

function fullscreen(v)
// function to send the [jit.window] into fullscreen mode
{
  mywindow.fullscreen = v;
}
See Also
| Name | Description |
|---|---|
| JavaScript Usage | JavaScript Usage |
| jit.gl.gridshape | Generate simple geometric shapes as a grid |
| jit.gl.render | Render Jitter OpenGL objects |
| jit.window | Display data in a window |
| js | Execute Javascript |