Tutorial 6: Adjust Color Levels
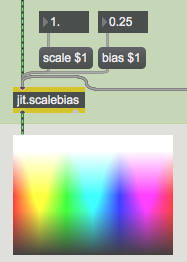
jit.scalebias
This tutorial elaborates on the color discussion of the previous chapter, and introduces an object that is specially designed for modifying the ARGB color planes of a matrix: jit.scalebias.
The term scale in this instance refers to the process of scaling values by a certain factor; that is, multiplying them by a given amount. The term bias refers to offsetting values by adding an amount to them. By combining the processes of multiplication and addition, you can achieve a linear mapping of input values to output values.
Because jit.scalebias is concerned with modifying ARGB color information in an image, it handles only 4-plane matrices of the char data type. (See Tutorial 5 for a discussion of ARGB color and char data.)
Math with char data
As mentioned in the previous chapter, 8-bit char data can be represented as whole number values from 0 to 255 or as fractional values from 0 to 1. In Tutorial 2, for example, we saw that the jit.print object reports char data as integer values from 0 to 255. However, in many cases where we modify char values within a matrix (by changing one of its attributes), the Jitter object will expect to receive the attribute value as a . Because this can be a little confusing, we've provided a demonstration in this tutorial patch.
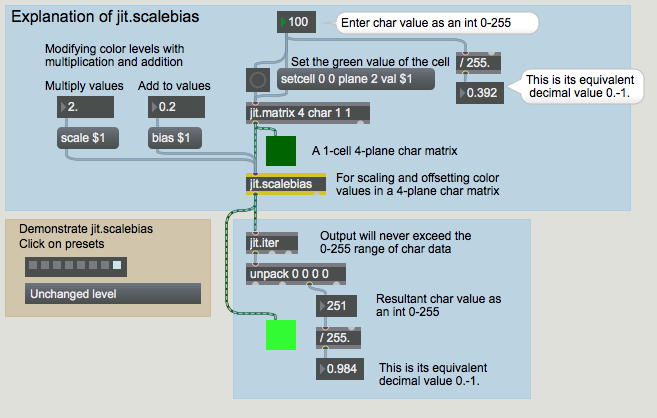
In the above example, we have created a very small matrix. It has 4 planes of char data, but it has only a single cell. This will to allow us focus on what happens to a single numerical value in the matrix. You can see that we have set the value in plane 2 (the green plane) to . At the left side of the example, you can see how this whole number value would be represented as a fractional value between 0 and 1: in this case it's , which is 100/255 of the way from 0 to 1.
The jit.scalebias object will multiply the values by a certain amount—specified by the attribute—and then will add a certain amount to the values—specified by the attribute. When that matrix is altered by the jit.scalebias object, all of the values will be treated as s for purposes of calculation, then will be re-stored in the matrix as char data.
The and attributes are set here with the and messages. The scaling factor (the multiplier)is 2.0 in this case, and the bias (the offset that gets added afterward) is 0.2. So, to understand what is going on inside jit.scalebias, we have to think of the green value as 0.392 times 2.0 plus 0.2, which equals 0.984. The jit.iter object reports the values in each plane of each cell (there's only one cell in this matrix), and we can see that the value (when stored in the matrix as a char) is (or 0.984 on a scale from 0 to 1).
(Just as a mental exercise, can you calculate the values jit.scalebias will produce in the red and blue planes in the above example? Since the values in those planes in the original matrix are 0, the values in the resultant matrix will be 0 times 2.0 plus 0.2, which equals 0.2, which is equal to 51 on a scale from 0 to 255. So the RGB values being displayed by the jit.pwindow object at the bottom are 51 251 51.)
More examples
If the preceding explanation was crystal clear to you, you might want to skip over these additional examples. But in case you're still not totally clear on how math operations with char data (and jit.scalebias in particular) work, here are a few more examples.
- The value in the green plane of the original matrix is 255. (This is equal to 1.0 on a scale from 0 to 1.) The jit.scalebias object multiplies this by 0.5, which results in an internal value of 127.5; however, when storing the value as a char, jit.scalebias truncates (chops off) the fractional part, and stores the value as 127.
- The original value is 100, and we double it (scaling factor 2.0) and get the expected result of 200. There is no loss of precision in this case.
- The original value is 100 (0.392). We scale it by a factor of 1.0, which leaves it unchanged, then we add -0.2 to it—that is, we subtract 0.2 from it—to get a result of 49 (that is, 0.192).
- 0.392 times 2.0 plus 0.2 = 0.984. On a scale from 0 to 255, that's 251.
- This example and the next one show what happens when the result of the multiplication and addition operations exceeds the capacity of an 8-bit char. jit.scalebias will simply clip (limit) the result to the maximum or minimum limit of a char. Here, 0.392 times 4.0 equals 1.568 (that is, 100 times 4 equals 400), so the result is set to the maximum allowable, 255.
- In the other direction, 0.392 minus 0.5 equals -0.108, so the result is set to 0.
It's noteworthy that these imprecisions and limits only occur at the point when the result is re-stored as a char. Up until then, the values are calculated internally as floats, so the precision is retained. Even though the multiplication takes the internal value beyond the 0-1 range, no limiting occurs internally, and the addition operation can bring it back into range. Here, 0.392 times 3.0 (= 1.176) minus 0.5 equals 0.676. When this is stored as a char, however, a small imprecision occurs. 0.676 on a scale from 0 to 255 equals 172.38, but the fractional part is truncated and the stored value is 172 (i.e., 0.675). For no change, the scaling factor should be 1 and the bias offset should be 0.
Try some more values yourself, until you're satisfied that you understand jit.scalebias and the results that occur with 8-bit char data. When you have finished, close the [explain_scalebias] window.
Adjust Color Levels of Images
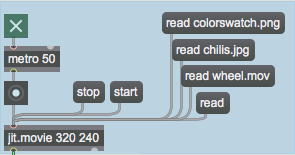
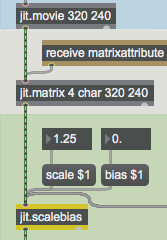
Now let's apply jit.scalebias to color images. In the top left corner of the tutorial patch, you can see a familiar configuration: a jit.movie object with a message box to load in a movie and a metro object to trigger messages from jit.movie. In this patch we'll modify the matrices with multiplications and additions in jit.scalebias.
The output of jit.movie will go to jit.scalebias for processing, and will then be displayed in the jit.pwindow. (You can ignore the jit.matrix object for now. We'll discuss its use later in this chapter.) The scale and bias values can be changed by modifying the and attributes of jit.scalebias.
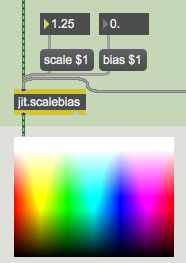 Boost the brightness of the image; with , higher values get boosted more.
This will increase all non-zero values in all four planes of the image by a factor of 1.25 (a 25% increase). Note that multiplication has the effect of increasing larger values by a greater amount than smaller values. For example, if the red value of a particular cell in the original matrix is 200, it will be increased to 250 (a net increase of 50), while the blue value of the same cell might be 30 and would be increased to 37 (a net increase of 7).
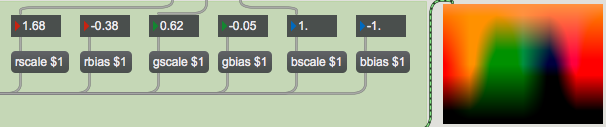
Adjust planes individually
You can adjust the levels in each plane individually in jit.scalebias, using the attributes , , , , etc.
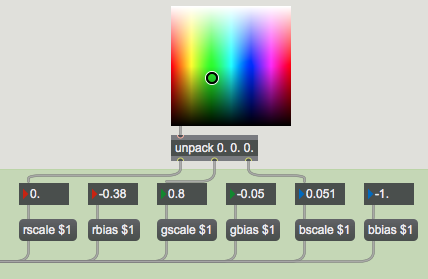
We've made the process a bit more interactive by giving you a controller that lets you adjust the scaling of all three color planes at once. When you click or drag in the swatch object, it sends out a three-item representing the RGB color values at the point where your mouse is located. Those values were once expressed on a scale from 0 to 255, but this has been changed to produce values from 0.0 to 1.0. (There is a checkbox in the inspector to provide the old style output if desired.) We use unpack to break that into three separate , and we use those values to alter the , , and attributes of jit.scalebias.
Reassign planes of a matrix
In the previous tutorial we used jit.unpack and jit.pack to reassign the planes of a matrix. There is another way to do that, using the attribute of the jit.matrix object. In this example, we pass the matrix output of jit.movie through a jit.matrix object just to demonstrate the attribute.
The attibute of jit.matrix allows us to map (assign) any plane of the incoming matrix to any plane of the outgoing matrix. The word is followed by as many numbers as there are planes in the matrix (four in this case). Each place in the list stands for an output plane (the first place stands for output plane 0, the second place for output plane 1, etc.), and the value of that number states the input plane that will be assigned to it. By default, the values are (etc.), so that each plane in the input matrix is assigned to the same plane in the output matrix. But we can change those assignments as we like. For example, if we send jit.matrix the message , we are assigning input plane 3 to output plane 1 (since the value 3 is in the list location for output plane 1), and input plane 1 to output plane 3. Effectively, we're swapping the red and blue color planes of the image.
In the next tutorial chapter, you'll see how to rotate image hue in a subtler way, using jit.hue, and you'll see other ways to adjust color levels with the jit.brcosa object.
Reading and Importing Images
In this tutorial patch, we loaded three different kinds of images into the jit.movie object: PICT and JPEG still images, and a movie. It may seem a little strange to read still images into an object made for playing movies, but in fact QuickTime can read many types of media files, and jit.movie knows how to read them all. (You could even read an AIFF audio file into jit.movie, listen to it with and messages, jump to different locations with the attribute, etc.! Of course, you won't see any visual matrix info in that case.)
For still images, it's just as easy to load them directly into a jit.matrix object with the message, as demonstrated in Tutorial 3. If you import a movie that way, only one frame of the movie will be stored in the jit.matrix.
In this patch, we used jit.movie to load in all the images. The first reason is because one of the things we wanted to load was a movie (not just one frame of the movie). The second reason is because we wanted to demonstrate the attribute of jit.matrix. The attribute is only appropriate if there is an actual input matrix (a message coming in the left inlet). If we imported the images directly into jit.matrix with , the attribute would have no effect.
Summary
The jit.scalebias object uses multiplication and addition to modify all the values in a particular plane of a 4-plane char matrix—or all planes at the same time. The attribute is a factor by which each value in the matrix will be multiplied; the attribute is an amount to be added to each value after the multiplication takes place. The and attributes affect all four planes of the matrix. To affect only one plane at a time, use the attributes for that particular plane, such as , , , , etc.
You must supply the values for these attributes as s (numbers containing a decimal point). To perform the multiplication and addition operations, jit.scalebias treats the char values as fractional values in the range 0 to 1, performs the math with floats, then converts the results back to chars (whole numbers from 0 to 255) when re-storing them. Results that exceed the range 0 to 1 will be limited to 0 or 1 before being converted back to char.
You can reassign planes of a matrix using the attribute of jit.matrix. The arguments to are the output planes listed in order, and the values in the list are the input planes to be assigned to each output plane. So, for example to assign the plane 1 of an input matrix to all four planes of the output matrix, the attribute setting should be .
jit.scalebias provides a powerful tool for adjusting color levels in a 4-plane char (ARGB color) matrix. More such tools are presented in the next tutorial chapter.
See Also
| Name | Description |
|---|---|
| Working with Video in Jitter | Working with Video in Jitter |
| Video and Graphics Tutorial 9: Building live video effects | Video and Graphics 9: Building live video effects |
| jit.iter | Iterate a matrix as lists or values |
| jit.matrix | The Jitter Matrix! |
| jit.pwindow | Display Jitter data and images |
| jit.movie | Play a movie |
| jit.scalebias | Multiply and add |
| metro | Output a bang message at regular intervals |
| preset | Store and recall settings |
| swatch | Choose a color |
| vexpr | Evaluate a math expression for a list |