Parameter Mode
Some Max objects can define a Parameter, which is a simple representation of the current state of that object. Parameters define an interface between a Max patcher and some outside system for the purpose of presetting, automation and modulation. In a Max for Live device, parameters can be saved and recalled in the form of presets, and are exposed to Live Automation and Modulation. Even outside of Live, parameters let you set the initial value of an object, and can be saved and recalled by interacting with the pattr family of objects or Snapshots. They can also map to MIDI events and the computer keyboard through Max's Mapping System.

Most Max UI objects and Max for Live UI objects support Parameter Mode. The pattr and vst~ objects can also participate.
The Parameters Window shows all parameters currently associated with a patcher (or device), and permits you to change parameter attributes in a single place. You can also change parameter attributes for individual objects by using the Parameter tab of the Inspector.
Enabling Parameter Mode
Many objects that support Parameter Mode will have an attribute @parameter_enable or "Parameter Mode Enable". The Max for Live UI objects always have their parameter enabled, and don't display that attribute.

Activating Parameter Mode for an object will create a parameter for that object. The object owns that parameter, and you can customize the behavior of the parameter through the parameter-related attributes on that object. Enabling the Parameter Mode Enabled attribute will reveal all of the parameter-related attributes in the Inspector.
Parameter Attributes
| Name | Description |
|---|---|
| Visible to Mapping | When enabled, the parameter will be available for mapping to keyboard or MIDI input using Max Mapping |
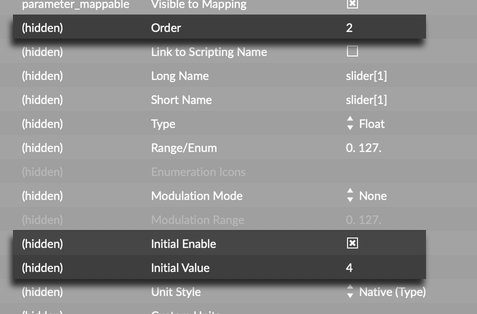
| Order | Sets the order of recall of this parameter. Lower numbers are recalled first. See Initial Value. |
| Link to Scripting Name | When enabled, the Scriping Name attribute is linked to the Long Name attribute. See Parameter Names. |
| Long Name | The internal, programmatic name of the parameter. Must be unique within the patcher hierarchy. See Parameter Names. |
| Short Name | The display name of the parameter, used in the user interface. See Parameter Names. |
| Type | Type of the parameter. In general this will be Int (0-255), Float (32-bit float), Enum, or Blob. Some parameter types are disabled for certain objects. |
| Range/Enum | The range of the parameter (for Int or Float) or the members of the enumeration (for Enum types). Unsupported for Blob type parameters. See Parameter Data Types. |
| Enumeration Icons | Image files to be used in place of text on the Ableton Push controller, for parameters with the Enum type. |
| Modulation Mode | See Parameter Modulation |
| Modulation Range | The Modulation Range of the parameter, if enabled. |
| Initial Enable | If enabled, the parameter will be set to an initial value when the patcher or device is loaded. When you turn this on, the current value of the parameter is stored as the initial value. See Initial Value. |
| Initial Value | The parameter's initial vlaue, if Initial Enable is enabled. See Initial Value. |
| Unit Style | Changes how the value of the parameter will be displayed. For example, the Pan style will display negative numbers as panning left, positive numbers as panning right, and zero as center pan. |
| Custom Units | The format string used to to display the parameter's value, if Custom is selected for Unit Style. Accepts sprintf-style format strings. See Custom Units. |
| Exponent | Scales the exponential weight of the parameter's range. Values above 1 give the parameter more fine grained control near the low end of the parameter's range, while values between 0 and 1 give more fine grained control near the top end. |
| Steps | The number of discrete steps between the minimum and maximum values of the parameter's range. Values are inclusive, so steps 4 with a range 10 40 will have the possible values 10, 20, 30, and 40. |
| Update Limit (ms) | Limits the rate of updates when new values are triggered by automation. |
| Defer automation output | When enabled, value updates that are triggered by automation are sent to the back of the low priority queue. |
| Parameter Visibility | Determines whether parameters are hidden (to a host like Live), and whether their values are automatable. See Parameter Visibility. |
Initial Value
With Parameter Mode enabled, you can turn on the "Initial Enabled" attribute in order to set an initial value for the object. The object will restore this value when the patcher loads, as well as sending this value to any connected objects. For Live UI objects, you can also double-click on the object to restore its initial value. The "Order" attibute affects the order in which parameter-enabled objects are initialized. Objects with a lower value for their "Order" attribute will be initialized first.

Reinitialize
Select Reinitialize from the Edit menu to set all parameters in the current patch to their Initial Value. See the patching guide for more information.
Parameter Names
Parameter-enabled objects have three names associated with them: a Scripting Name, a Short Name, and a Long Name. The Long Name and Short Name attributes only affect the display of Live UI objects, and the visible name of the parameter when working in Live.
- Scripting Name: The name of the object as it appears to Max, this is a unique identifier that can be used to refer the object when you're scripting or using pattr. Must be unique to the patcher.
- Long Name: The name of the parameter attached to the object. If you set up MIDI or Keyboard Mapping for the parameter, this is the name that you'll see in the Mappings Sidebar. It is also how the parameter will appear in Live. Must be unique to the entire patcher hierarchy.
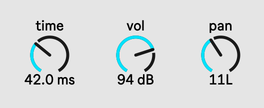
- Short Name: The display name of the parameter. This affects the display of Live UI objects like live.slider and live.dial, which have a visible text label.
Parameter Modulation
The "Modulation Mode" and "Modulation Range" attributes determine how Modulation from Live affects the value of the parameter (for more about Modulation, see Live's documentation). When the parameter is modulated, the modulation value is combined with the current value of the parameter and scaled by the modulation range to determine its final value.
Unipolar
Modulation is between 100% and 0%. At 100%, the parameter isn't modulated at all. At 0%, the parameter takes on its minimum modulation value value.
Bipolar
Modulation is between -50% and 50%. The range of modulation depends on the current value of the parameter. The range shrinks as the parameter approaches its minimum or maximum value, so that even as it modulates it never exceeds those values.
Additive
Additive modulation is the same as Bipolar, except the range of modulation never changes. Instead, modulation that would cause the parameter value to exceed its minimum or maximum value instead clips to that value.
Absolute
Absolute modulation is not based on a percentage but rather the units of the parameter. No matter the range of the parameter, a modulation by 10 absolute units will always modulate by the same amount. Absolute modulation cannot be negative.
Parameter Data Types
The Data Type of a Max Parameter determines the internal storage format for the data.
- Float: Can take on any value, including floating-point values, and can participate in Modulation from Live. The default storage type, and perfect for most applications.
- Int: Can represent 256 distinct values, with a default range 0 to 255.
- Enum: A list of items with user-configurable names. Cannot be modulated (but can be automated).
- Blob: Parameters that cannot be automated or modulated, but can be stored in presets. These non-automatable parameters may be any type of data you can store with a pattr object: single values, lists, dictionaries, arrays or symbols.
The Data Type only affects the internal storage format of the parameter, and does not change how the parameter's value is displayed. A parameter with the "Data Type" Int and the "Unit Style" Float will appear to be a decimal number, even though the value after the decimal will always be zero. Similarly, a parameter with the "Data Type" Float and the "Unit Style" Int will still display as if it were a whole number. In fact, this is the way to have a parameter with more than 256 values that still appears to be a whole number.
Custom Unit Styles
The "Unit Style" attribute lets you change the units associated with your parameter, which for some objects will affect the way the value is displayed.

If you like, you can define your own custom Unit Style. Select Custom as the value for the "Unit Style" attribute. The "Custom Units" attribute now lets you create your own units to follow the parameter value. You can use C-style format strings here, so %0.2f Bogon(s) would cause a parameter value of 15.5678 to display as 15.56 Bogon(s).
Parameter Visibility
You can change the visibility of a parameter by changing the Parameter Visibility attribute in the Inspector. If this attribute is set to Automated and Stored, the parameter will be stored in the Live Set and presets, and will be available for automation. If this attribute is set to Stored Only, the value will be stored, but it will not be visible to Live's automation system. If this attribute is set to Hidden, it will neither be stored nor available for automation.
You may want to have a parameter Hidden when it affects other Max for Live parameters. This will prevent problems with overloading Live's undo buffer, and will also limit issues with preset storage.
Parameter Window
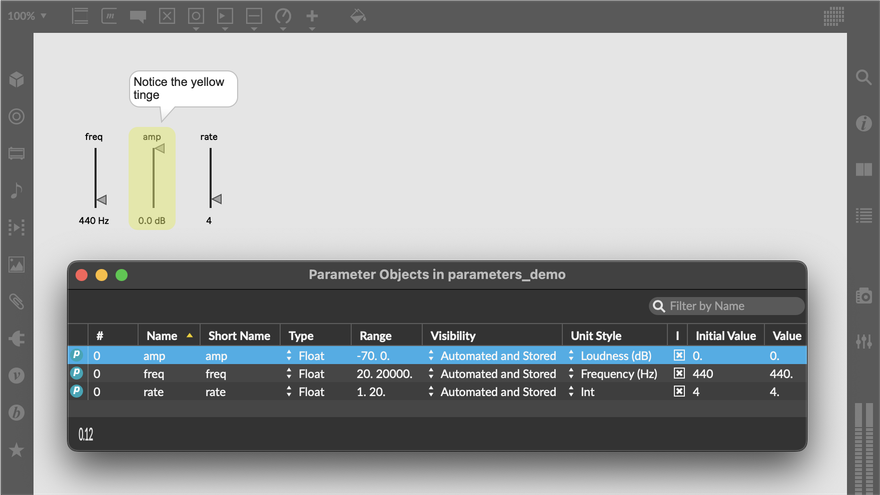
From the View menu, select Parameters to open the Parameter Window (this option will be disabled if your patcher does not contain any parameter-enabled objects). This window lists every parameter in the given patcher hierarchy.

Updating parameters from the list
Because the Parameter Window lists all parameters in your patcher, it's a convenient place to change the name, range, initial value, and many other attributes of parameters in your patcher, without you needing to find the specific object that owns the parameter. Double-click on any cell in the parameter table to update the corresponding value for that parameter.
Filtering and ordering parameters
In the top-right of the window, the Filter Field lets you filter parameters by name. For example, typing "freq" into this field would show only parameters whose names contained the text string "freq".
Along the top of the parameter list, the table headers identify the kind of information displayed in each column. Click on a table header to sort parameters by the values in that column. Click again on the same header to toggle between an ascending and descending order. You can also drag on these column headers to reorder them.
Customizing column headers
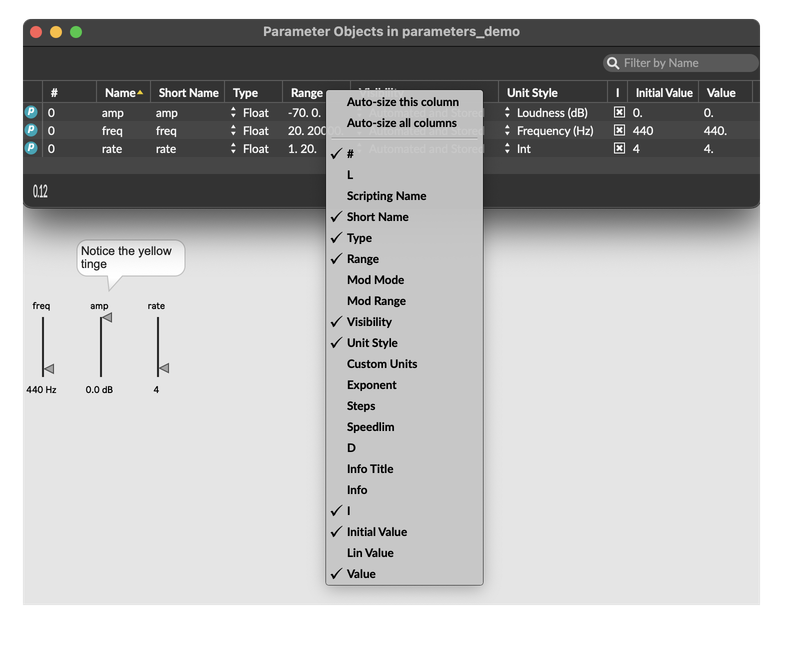
Right click on any column header to bring up a customization menu for column headers.

The commands "Auto-size this column" and "Auto-size all columns" will shrink the width of the column or columns to fit the text in the respective column.
Below these, the other menu options let you customize which columns will appear in the parameter list. Some columns have abbreviated names, for example the list option "I" refers to the parameter attribute "Initial Enable". You can hover over the header of any column to see the full name of that header, even if the title is abbreviated.
Finding parameter objects
When you click to select a row in the parameter table, the object that owns that parameter will get a yellow highlight. You can also click the blue "P" button in that parameter's row and select "Reveal in Patcher" to show the same yellow highlight.
