Patch Cords
The inlets and outlets Max objects are connected together using patch cords.
Types of patch cords
There are six kinds of patch cords:
- Event - Messages sent between Max objects, handled by the scheduler
- Signal - Audio processed in blocks
- MC - Multichannel signals
- Jitter matrix - Video and other multidimensional data, processed on the CPU
- GL texture - Multidimensional data residing on the GPU, part of graphics processing
- Jitter geometry - Half-edge geometry structures
Patcher cords can be distinguished by their stripe patterns and colors.

Creating Patcher Cords
You can connect objects with patch cords in a few ways:
- Clicking on an inlet/outlet and dragging the mouse to another inlet/outlet
- Clicking on an inlet/outlet and then clicking on another inlet/outlet
- Hovering or selecting a patch cord, and then using the green or red circles by clicking or dragging to new inlets/outlets
To disconnect patch cords, you can:
- Select a patch cord and use the backspace or delete key on your keyboard
- Hovering or selecting a patch cord, and then dragging the green or red circle to an empty spot on the patcher window
When creating patch cords, if you hold shift as you finalize a connection, Max will automatically start a new connection from the same inlet or outlet. This can be extremely useful when creating many patch cords from the same inlet/outlet.
Editing Patcher Cords
Selecting patch cords
Click on a single patch cord to select it. To select multiple patch cords, hold down Option (macOS) or alt (Windows) while drawing a selection rectangle. This will select objects as well as patch cords.
Re-connecting patch cords
When a patch cord is selected, a green and red circle will appear next to the inlet and outlet. Click and drag on either of these to move the patch cord, leaving either the inlet or outlet connected.

With this same technique, you can move multiple connections from one object to another.

You can also shift patch cords along the inlets or outlets of an object.

Inserting/removing objects from a patch cord
Insert an object into the middle of a patch cord by holding Shift while dragging the object.
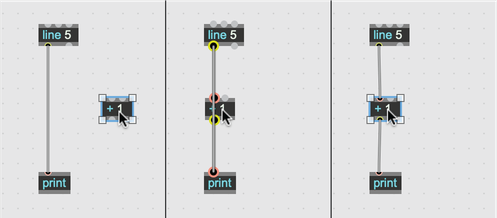
You can also drag an object out of a patch cord by holding shift while dragging the object. This will only work if the object has a single connection to the first inlet, and a single connection to the first outlet.
Patching mechanics
For mouse-free patching, Max supports Patching Mechanics. With this feature activated, you can do things like create and delete patch cords without using the mouse.
Disabling patch cords
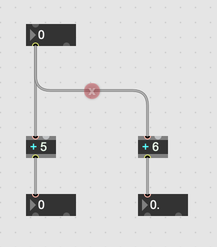
Right-click on any patch cord and select Disable Patcher Cord in the contextual menu to disable it. Select Enable Patcher Cord from the contextual menu to re-enable the patch cord.
Viewing Patcher Cord Contents
Enabling probing
With Probing enabled, you can view the contents of a patch cord by hovering over it. Max supports Event Probing, Signal Probing, and Matrix Probing.
Debugging patch cords
With Debugging enabled, you can attach Break Points and Watch Points to a patch cord. These will show the contents of a patch cord in a separate window, and pause execution when a message flows through a patch cord.
Illustration Mode is another helpful way to visualize the flow of messages along patch cords.
Extracting a message from a patch cord
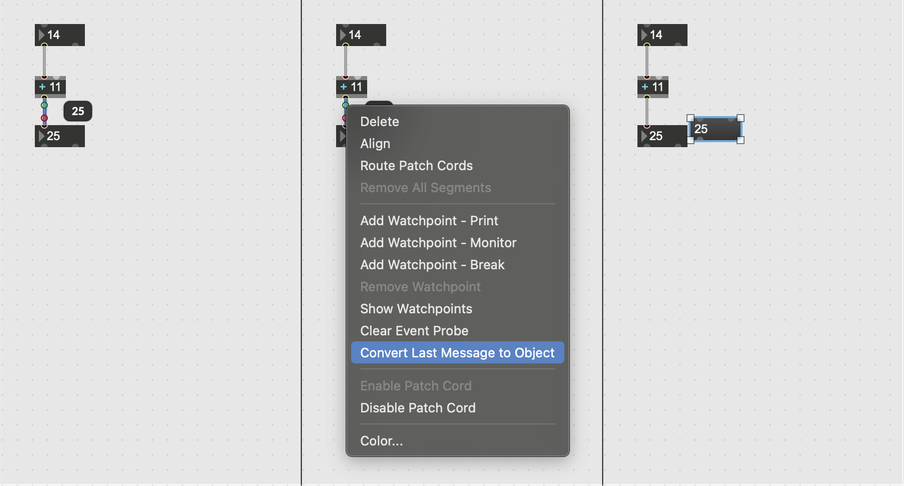
With the Event Probe enabled, right-click on an event patch cord and select Convert Last Message to Object. This will create a message box containing the contents of the last message to pass through that patch cord.
Styling Patcher Cords
Segmented Patcher Cords
By default, patch cords are drawn in a curved style, but it is also possible to use a "segmented" style which has joints and corners. You can change the default style in the Max Preferences with the Segmented Patcher Cords option. To create a segmented patch cord when the Segmented Patcher Cords option is not checked in the Max Preferences menu (or to create a curved patch cord when Segmented Patcher Cord is enabled), hold the Shift key down when clicking on an outlet.
When creating segmented patch cords, click at each point where you want the patch cord to bend, and then click on the inlet/outlet of the other object.
To correct a segmented patch cord while you draw, Option-click (macOS) or Alt-click (Windows) to erase the most recent patch cord line segment. To remove a patch cord completely, command-click (macOS) or control-click (Windows) anywhere in the Patcher window.
To automatically create a segmented patch cord from a curved patch cord, right click on the patch cord and select Align. To automatically create route a segmented patch cord around objects, instead, select Route Patch Cord. To change a segmented patch cord to a curved one, right click on the patch cord and select Remove All Segments.
If you are making a segmented patch cord and want to make a corner over an object, hold down the control key to disable the normal auto-connection feature.
Coloring patch cords
Patch cords can be individually colored, or styled as a whole using the Format Palette.
To color an individual patch cord, or a selection of patch cords, select all of the patch cords that you want to color and right-click on one to open the contextual menu. Select Color... to open the color picker.
To style all of the patch cords in a patcher at once, open the Format Palette and edit the Patchline Color.
Aligning and routing patch cords
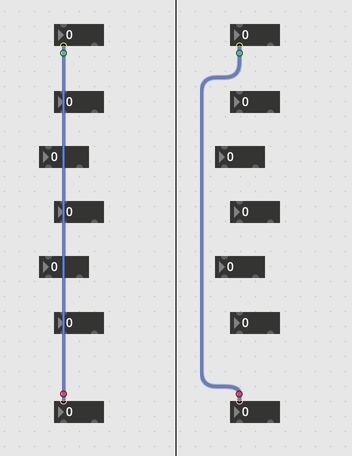
With one or more patch cords selected, open the Arrange menu and select Auto Align to create aligned, segmented patch cords.
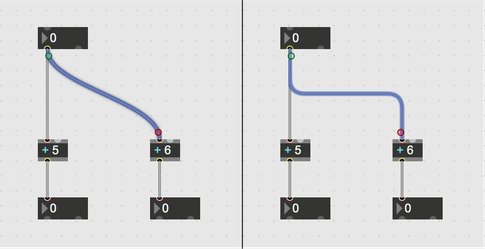
You can also route patch cords automatically, creating segmented patch cords that move between objects. With one or more patch cords selected, open the Arrange menu and select Route Patcher Cords.
Hiding patch cords
To hide patch cords in locked patcher mode, right click on a patch cord and select Hide on Lock. To make hidden patch cords visible again, right click on the patch cord and select Show on Lock.