MSP Delay Tutorial 2: Delay Lines with Feedback
Delay emulates reflection
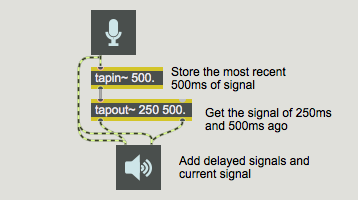
You can delay a signal for a specific amount of time using the tapin~ and tapout~ objects. The tapin~ object is a continually updated buffer that stores the most recent signal it has received, and tapout~ accesses that buffer at one or more specific points in the past.

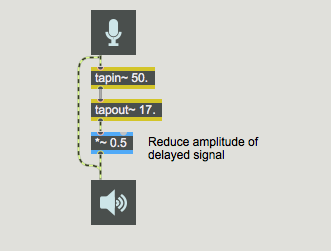
Combining a sound with a delayed version of itself is a simple way of emulating a sound wave reflecting off of a wall before reaching our ears; we hear the direct sound followed closely by the reflected sound. In the real world some of the sound energy is actually absorbed by the reflecting wall, and we can emulate that fact by reducing the amplitude of the delayed sound, as shown in the following example.

Technical detail: Different materials absorb sound to varying degrees, and most materials absorb sound in a way that is frequency-dependent. In general, high frequencies get absorbed more than low frequencies. That fact is being ignored here.
Delaying the delayed signal
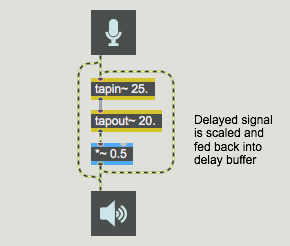
Also, in the real world there's usually more than one surface that reflects sound. In a room, for example, sound reflects off of the walls, ceiling, floor, and objects in the room in myriad ways, and the reflections are in turn reflected off of other surfaces. One simple way to model this ‘reflection of reflections’ is to feed the delayed signal back into the delay line (after first ‘absorbing’ some of it).

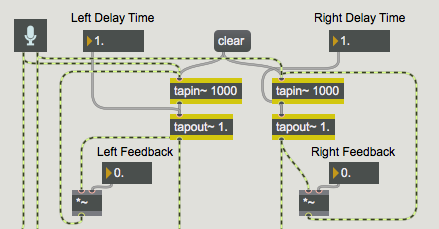
A single feedback delay line like the one above is too simplistic to sound much like any real world acoustical situation, but it can generate a number of interesting effects. Stereo delay with feedback is implemented in the example patch for this tutorial. Each channel of audio input is delayed, scaled, and fed back into the delay line.

- Set the number box marked ‘Output Level’ to
0.25, and move the slider to its middle position so that the ‘Direct Level’ and ‘Delay Level’ number box objects read0.5. Turn audio on, and send some sound into the audio input of the computer. Experiment with different delay times and feedback amounts. For example, you can use the settings shown above to achieve a blurring effect. Increase the feedback amounts for a greater resonant ringing at the rate of feedback (1000 divided by the delay time). Increase the delay times to achieve discrete echoes. You can vary the Dry/Wet mix with the slider.
Note that any time you feed audio signal back into a system, you have a potential for overloading the system. That's why it's important to scale the signal by some factor less than 1.0 (with the *~ objects and the ‘Feedback’ number box objects) before feeding it back into the delay line. Otherwise the delayed sound will continue indefinitely and even increase as it is added to the new incoming audio.
Controlling amplitude: normalize~
Since this patch contains user-variable level settings (notably the feedback levels) and since we don't know what sound will be coming into the patch, we can't really predict how we will need to scale the final output level. If we had used a *~ object just before the ezdac~ to scale the output amplitude, we could set the output level, but if we later increase the feedback levels, the output amplitude could become excessive. The normalize~ object is good for handling such unpredictable situations.
The normalize~ object allows you to specify a peak (maximum) amplitude that you want sent out its outlet. It looks at the peak amplitude of its input, and calculates the factor by which it must scale the signal in order to keep the peak amplitude at the specified maximum. So, with normalize~ the peak amplitude of the output will never exceed the specified maximum.

One potential drawback of normalize~ is that a single loud peak in the input signal can cause normalize~ to scale the entire signal way down, even if the rest of the input signal is very soft. You can give normalize~ a new peak input value to use, by sending a number or a reset message in the left inlet.
- Turn audio off and close the Patcher window before proceeding to the next chapter.
Summary
One way to make multiple delayed versions of a signal is to feed the output of tapout~ back into the input of tapin~, in addition to sending it to the DAC. Because the fed back delayed signal will be added to the current incoming signal at the inlet of tapin~, it's a good idea to reduce the output of tapout~ before feeding it back to tapin~.
In a patch involving addition of signals with varying amplitudes, it's often difficult to predict the amplitude of the summed signal that will go to the DAC. One way to control the amplitude of a signal is with normalize~, which uses the peak amplitude of an incoming signal to calculate how much it should reduce the amplitude before sending the signal out.