Tutorial 28: Audio Control of Video
This tutorial references the patcher 28jAudioControl.maxpat
Audio as a Control Source
This tutorial demonstrates how to track the amplitude of an MSP audio signal, how to use the tracked amplitude to detect discrete events in the sound, and how to apply that information to trigger images and control video effects. In the upper-right corner of the patch we've made it easy for you to try out either of two audio sources: the audio input of the computer or a pre-recorded soundfile.
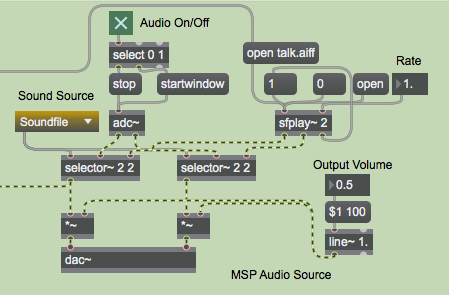
We've used a loadbang object (in the upper-middle part of the patch) to open an AIFF soundfile talk.aiff and a movie dishes.mov, and to initialize the settings of the user interface objects with a preset. So, in the above example, the umenu has already selected the sfplay~ object as the sound source, the soundfile has already been opened by the open talk.aiff message, the rate of sfplay~ has been set to 1, and the output volume has been set to 0.5. The left channel of the sound source (the left outlet of the left selector~ object) is connected to another part of the patch, which will track the sound's amplitude.
Tracking Peak Amplitude of an Audio Signal
To track the sound's amplitude for use as control data in Max, we could use the snapshot~ object to obtain the instantaneous amplitude of the sound, or the avg~ object to obtain the average magnitude of the signal since the last time it was checked, or the peakamp~ object to obtain the peak magnitude of the signal since the last time it was checked. We've elected to track the peak amplitude of the signal with peakamp~. Every time it receives a bang, peakamp~ reports the absolute value of the peak amplitude of the signal it has received in its left inlet. Alternatively, you can set it to report the peak amplitude automatically at regular intervals, by sending a non-zero time interval (in milliseconds) in its right inlet, as shown in the following example.
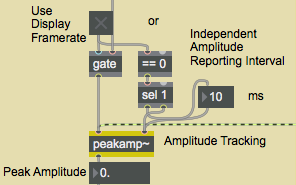
Every 10 milliseconds, peakamp~ will send out the peak signal amplitude it has received since the previous report. We've given ourselves the option of turning off peakamp~ 's timer and using the metro that's controlling the video display rate to bang peakamp~, but the built-in timing capability of peakamp~ allows us to set the audio tracking time independently of the video display rate.
Using Decibels
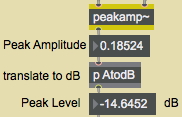
We actually perceive the intensity of a sound not so much as a linear function of its amplitude, but really more as a function of its relative level in decibels. This means that more than half the sound pressure level we're capable of hearing from MSP resides in the bottom 1% of its linear amplitude, in the range between 0 and 0.01! For that reason, it's often more appropriate to deal with sound levels on the logarithmic decibel scale, rather than as a straight amplitude value. So we convert the amplitude into decibels, using the pAtodB subpatch (which is identical to the atodb object).
![The contents of the [AtodB] subpatch The contents of the [AtodB] subpatch](/images/4c28684e90b96c93f878f24d66701c4d_290.webp)
The [AtodB] subpatch takes the peak amplitude reported by peakamp~ and converts it to decibels, with an amplitude of 1 being 0 dB and all lesser amplitudes having a negative decibel value .
Technical Detail: The formula for conversion of amplitude into decibels is:

where A0 is a reference amplitude and A is the amplitude being measured.
The decibel scale is discussed in the How Digital Audio Works and MSP Tutorial 4 sections of the MSP tutorials.
Focusing on a Range of Amplitudes
In many recordings and live audio situations, there's quite a bit of low-level sound that we don't really consider to be part of what we're trying to analyze. The sound we really care about may only occupy a certain portion of the decibel range that MSP can cover. (In some recordings the music is compressed into an extremely small range to achieve a particular effect. Even in many uncompressed recordings, the most important sounds may all be in a small dynamic range.) The level of the soft unwanted sound is termed the noise floor. It would be nice if we could analyze only those sounds that are above the noise floor.
The patcherdBexpander subpatch lets us control the dB level of the tracked amplitude and set a noise floor threshold beneath which we want to ignore the signal. The subpatch takes the levels we do want to use, and expands them to fill the full range of the decibel scale from 0 dB down to –120 dB. In the following example, we have specified a noise floor threshold of –36 dB. The amplitude of the MSP signal at this moment is 0.251189, which is a level of –12dB. The subpatch expands that level (originally –12 in the range from 0 down to –36) so that it occupies a comparable position in the range from 0 down to –120. The resulting level is –40 dB, which is sent out the right outlet of the subpatch. The level relative to the noise floor is sent out the left outlet expressed on a scale from 0 to 1, which is a useful control range in Jitter. In this example, the input level of –12 dB is 24 dB greater than the noise floor; that is, it's 2/3 of the way to the maximum in the specified 36 dB range.
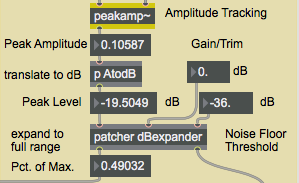
- You can apply this value as control data for Jitter. Turn on the toggle labeled Use Display Framerate. This will temporarily turn off the internal timer of peakamp~ and will use the
bangs from the metro instead. Turn on the toggle labeled Audio On/Off to start MSP audio processing. Click on the message box containing the number1above the sfplay~ object to start the playback of the sound file. Turn on the toggle labeled Display Movie to start the video playback. The peak amplitude of the audio is reported at the same rate as the movie matrix is displayed—every 25 milliseconds. The tracked decibel level—40 values per second—is displayed in the green and black multislider labeled expanded level. The level, mapped into the range 0 to 1, is used to change thevalattribute of the jit.op object, affecting the displayed video. You can scale the range of that value up or down with the number box labeled Effect Strength. Values in the range 0.5 to 1.5 have the most effect on the image.
Audio Event Detection
In the preceding section we tracked the amplitude envelope of the sound and used the peak amplitude to get a new control value for every frame of the video. We can also analyze the sound on a different structural level, tracking the rhythm of individual events in the sound: notes in a piece of music, words in spoken text, etc. To do that, we'll need to detect when the amplitude increases past a particular threshold, signifying the attack of the sound, and when the sound has gone below the threshold for a sufficient time for the event to be considered over. We do this inside the patcherdetectevent subpatch. In the main patch, we provide three parameters for the [detectevent] subpatch: the Note-on Threshold (the level above which the sound must rise to designate an event or note), the Min. Note Duration (a time the subpatch will wait before looking for a level that goes back below the threshold), and the Min. Off Time (the amount of time that the level must remain below the threshold for the note to be considered ended). In the following example a note event will be reported when the level exceeds –30 dB, and the note will only be considered off when the level stays below –30 dB for at least 25 milliseconds. Since the subpatch will wait at least 50 ms before it even begins looking for a note-off level, the total duration of each note will be at least 75 milliseconds.
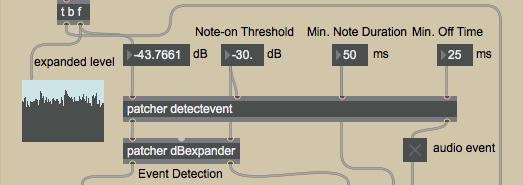
- To see the contents of the subpatch, double-click on the patcher
detecteventobject.
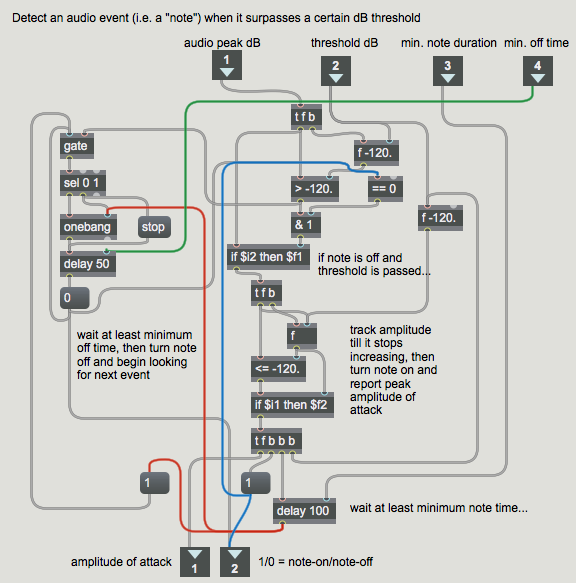
The comments in the subpatch explain the procedure pretty succinctly. When a new level comes in the left inlet, two conditions must be satisfied: the level must be greater than the threshold and there must not already be a note on. If both those conditions are met, then we keep watching the amplitude until it stops increasing, at which point we consider the note to be fully on so we send the number 1 out the right outlet and send the peak level out the left outlet. We wait the minimum note time, then open the gate to begin looking for indications (from the > object) that the level has gone below the threshold. Once such a level has been detected, we wait the minimum off time before deciding that the note is off. If another level above the threshold comes before the minimum off time has elapsed, the delay object is stop ped and a new note-off level must detected. When the note is truly off, a 0 is sent out the right outlet, the fact that the note has been turned off is noted (in the ==0 object), and the gate is closed again. It's now ready for the next time that the threshold is passed.
- Close the [detectevent] subpatch window. For this event-detector to work well on fast-changing sounds, the peak amplitude should usually be tracked at a fairly rapid rate. Turn off the Use Display Ratetoggle so that the peakamp~ object will use its internal timer at an interval of every 10 ms.
In the main patch you can see three demonstrations of ways to use the output of the [detectevent] subpatch. In the bottom right corner of the patch we use the 1 from the right outlet of patcherdetectevent to trigger another subpatch, patcherflashbulbs, which places random colored dots in a display window. We take the value out of the left outlet of patcherdetectevent and expand its range just the way we did for the original audio level, so that the value signifying the note amplitude can cover the full available range. We use that to trigger MIDI notes, and also to choose different pictures to display. Let's look at each of those procedures briefly.
Using Audio Event Information
The simplest use of an audio event is just to trigger something else when an event occurs. Whenever an audio event is detected, we trigger the patcherflashbulbs subpatch. That subpatch generates a 16x12 matrix of random colors, then uses scaling to turn most of the colors to black, leaving only a few remaining cells with color. When that matrix goes out to the main patch, those cells are upsampled with interpolation in the jit.pwindow and look like flashes of colored light. Subsequent level values from peakamp~ are used in the [flashbulbs] subpatch to bang a bline object, causing the colors to fade away after 20 bang s.
![The [flashbulbs] subpatch The [flashbulbs] subpatch](/images/1774f50de6b971ae46f43136694784fe_407.webp)
In the patcherpickpicture subpatch, we simply divide the event amplitudes up into five equal ranges, and use those values to trigger the display of one of five different pictures.
In the following example, you can see the use of audio information to trigger MIDI notes.
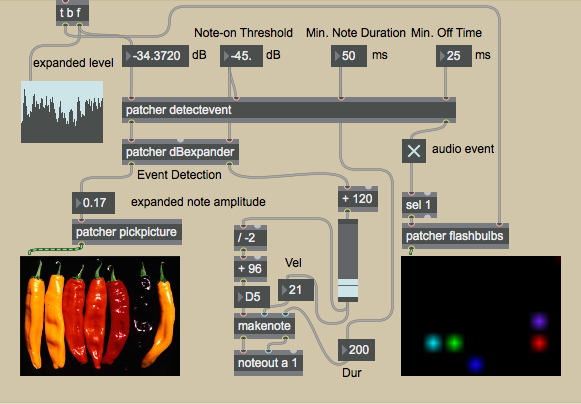
We use the expanded decibel value coming out of the right outlet of the patcherexpander to derive MIDI pitch and velocity values. We first put the values in the range 0 to 120, then use those values as MIDI velocities and also map them into the range 96 to 36 for use as MIDI key numbers. (Note that we invert the range so as to assign louder events to lower MIDI notes rather than higher ones, in order to give them more musical weight.) The note durations may set by the Min. Note Durationnumber box, or they may be set independently by entering a duration in the number box just above makenote 's duration inlet.
- You can experiment further with this patch in a number of ways: by changing the rate of the audio file with the Ratenumber box, by opening different soundfiles and movies, by choosing Sound Input from the umenu to use live sound input, and by changing the various tracking parameters such as Reporting Interval, Noise Floor Threshold, Note-On Threshold, and Min. Note Duration.
Summary
We've demonstrated how to track the peak amplitude of a sound with peakamp~, how to convert linear amplitude to decibels, and how to detect audio events by checking to see if the amplitude level has exceeded a certain threshold. We used the information we derived about the amplitude and the and peak events to trigger images algorithmically, select from preloaded images, play MIDI notes, and alter video effects.