Standalones and Collectives
A Standalone lets you turn your Max patcher into an application that can run on its own, without needing to have the main Max application installed. The resulting file looks and acts like a standard macOS or Windows application. This can be a handy way to share your work with someone who doesn't have Max on their machine, or to run your work in a context like an art installation.
Under the hood, a standalone is a bundle containing the Max runtime along with a Collective. A collective contains all of the dependencies, including media files and Max externals, that a patcher needs to run. Most of the time, collectives are only used internally by a standalone, and you won't need to work with them directly. However, you can still open a collective using Max.
If you want to share work with another Max user, consider using a Project. In particular, a project is the ideal document for collaboration when using Max with a version control tool like Git.
Building Standalones
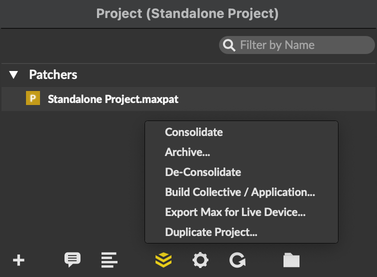
The simplest way to build a standalone is to start with a Max project. From the Project window, click the Manage Project button in the bottom toolbar and select Build Collective / Application...

In the dialog box that appears, be sure to select Application from the Filetypes dropdown. From there, simply press Save. After Max finishes bundling up your project, you'll see the exported application appear in your file browser.
You can also build a standalone by selecting Build Collective / Application... from the File menu. If you build a standalone this way, without a Max project open, Max will open the Collective Editor.
Customizing Your Standalone
To configure options for your standalone, place a standalone object in your toplevel patcher. Open the inspector for this object to see all of the configuration options available.
Adding a custom application icon
Add a standalone object to your top level patcher. Find the @appicon_mac attribute, and specify the path to the app icon image to use for macOS. Use the attribute @appicon_win to specify an app icon for Windows.
Managing standalone size
By default, standalone export includes the whole Max runtime. By setting attributes on the standalone object, you can include or exclude certain parts of the Max application, which can reduce the size of your exported standalone. See the standalone object reference for a full description, but some options you can configure include:
- @gensupport - Enable support for gen~, jit.gen, jit.pix, and jit.gl.pix. Disable to reduce standalone application size.
- @cefsupport - Enable support for the jweb object. Disable to reduce application size.
Standalone Applications for MacOS
Max builds universal binary standalone applications on macOS. The standalone is an application package , which is also a folder that looks like a file in the Finder. Double-clicking on the file's icon launches the application. Right-click on the application file and select Show Package Contents from the contextual menu to look inside the application bundle.
YourApplication.app [ note: the .app is not shown in the Finder ]/
└── Contents [ folder ]/
    ├── Frameworks [ folder ] – needed for external object support
    ├── Info.plist [ copied from your Info.plist if included in a collective build script ]
    ├── MacOS [ folder ]/
    │   └── YourApplication [ actually the Max Runtime executable ]
    └── Resources [ folder ]/
        ├── [ custom icon file goes here ]
        └── C74 [ folder containing all supporting files]
Manually including Max resources (macOS)
If you disabled the @copysupport attribute on your toplevel standalone object, Max will not copy its Resources folder into the standalone application. If you need support for certain features, you can try to manually copy Max resources into your application bundle.
Including Jitter components in your Mac standalone application
Although they are included by default, if you are not including the C74 Resources, be sure to add any shader, material, model, passes, or volume-dataset files that your application uses, copying to <package>/Contents/Resources/C74/media/jitter/*. Many of the included image-processing shaders rely on one of the "passthru" vertex shader programs that reside in the shared folder inside the jitter-shaders folder.
Including Java components in your Macintosh standalone application
Although they are included by default, if you are not including the C74 Resources, copy any necessary Java class files to <package>/Contents/Resources/C74/java-classes/classes.
Distributing your Mac standalone application
In most cases, Max standalone apps will be distributed outside of the Mac App Store. In order for the application to open properly, the standalone can be signed (if one pays the $99/year developer membership) or users of the standalone can informed that the Security and Privacy settings in System Preferences must be set to 'Allow apps downloaded from Anywhere'. To read more about signing your application, visit the Apple Developer Site.
For distribution on macOS versions starting with Big Sur (macOS 11), the developer will need to code sign their standalone application with the appropriate Entitlements in order to avoid the user being asked for microphone, camera, and disk access every time the app is launched. Learn more in this article.
Standalone Applications for Windows
When you create a standalone application on Windows, you’re actually creating a folder containing the Max Runtime executable plus a .mxf collective file containing your patches and files. In addition, the standalone folder contains a support folder with files necessary to run your application.
YourApplication [ folder ]
├── YourApplication.exe [modified MaxRT.exe – launch this to launch your app ]
└── YourApplication.mxf [ collective containing your patches ]
    └── support [ folder ]
        ├── ad [ folder containing MSP audio driver objects ]
        ├── mididrivers [ folder containing Max midi driver objects ]
        ├── MaxAPI.dll [ Max API for external objects ]
        ├── MaxAudio.dll [ MSP library ]
        └── interfaces [ folder containing menu specifications, icons, etc. ]
Runtime library dependency
Max depends on the Microsoft C Runtime Library. To use a standalone on a computer that has not run the Max installer you must first run the Microsoft Visual C++ 2013 Redistributable Package. This can be downloaded from Microsoft. An alternative is to simply download and install Max. The Microsoft redistributable files can be found at this URL:
https://www.microsoft.com/en-us/download/details.aspx?id=40784
Manually including Max resources (Windows)
If you disabled the @copysupport attribute on your toplevel standalone object, Max will not copy its Resources folder into the standalone application. If you need support for certain features, you can try to manually copy Max resources into your application bundle.
Including Jitter components in your Windows standalone application
- Copy the file
/Program Files/Cycling '74/Max 9/support/jitlib.dllto{standalone folder}/support/jitlib.dll
Including Jitter shader components in your Windows standalone application
- Copy the file
/Program Files/Common Files/Max 9/Cycling '74/jitter-shadersto{standalone folder}/support/jitter-shaders. Be sure to include any shader files that the included shaders depend on; many of the included image-processing shaders rely on one of the "passthru" vertex shader programs that reside in the/Program Files/Common Files/Max 9/Cycling '74/jitter-shaders/shared/ folder. - Copy the file
/Program Files/Cycling '74/Max 9/support/cg.dllto{standalone folder}/support/cg.dll - Copy the file
/Program Files/Cycling '74/Max 9/support/cgGL.dllto{standalone folder}/support/cgGL.dll
Including Java components in your Windows standalone application
- Copy the file
/Program Files/Common Files/Max 9/Cycling '74/java/lib/max.jarto{standalone folder}/support/java/lib/max.jar. - Copy any other necessary jar files (e.g.
jitter.jar) to{standalone folder}/support/java/lib/max.jar - Copy /
Program Files/Common Files/Max 9/Cycling '74/java/classes/*.class to{standalone folder}/support/java/classes/*.class(all your necessary class files).
Search Paths in Standalones
A standalone application you create with Max searches for files in a slightly different order than that used in the Max search path when you’re editing patches. If you want to include non-standard Max objects or other types of files, you’ll need to understand how search paths and File Preferences work in standalone applications.
In a standalone application, here is the order in which folders in the standalone package (Macintosh) or folder (Windows) will be searched:
- The collective file (and any other open collective files)
- The support folder
You can add additional locations to this list by checking the Utilize Search Path option in the standalone object's Inspector.
On Macintosh systems, checking the Utilize Search Path option, does the following for the search path of a standalone:
- Adds all of the folders inside of the folder containing the standalone application (i.e., the Contents folder and all of its subfolders).
- Adds the Cycling '74 folder. A Cycling '74 folder at the same location as the application is used if it exists. If it does not, the location /Library/Application Support/Cycling ’74 is used if it exists.
On Windows systems, checking the Utilize Search Path option, does the following for the search path of a standalone:
- Adds all of the folders inside of the application folder (i.e. the folder containing YourApplication.exe).
- Adds the Cycling '74 folder. A Cycling '74 folder at the same location as the application is used if it exists. If it does not, the location c:\Program Files\Common Files\Cycling '74\ is used if it exists.
You can use the Utilize Search Path option to aid in testing your standalone application.
If some of the supporting files used by Max objects in your patcher will not be included in the collective itself, check the Search for Missing Files option. (It is checked by default.) Unchecking this option can be useful for ensuring that you have included all necessary files in the collective that you are making into a standalone application. If you create your application with this option turned off, your application will not look outside the collective for any files it cannot find, such as missing sequences or coll files that your application attempts to load. So, you can make your application with Search for Missing Files unchecked, and then run it to see if it works properly. If your application is unable to find a file that it needs, you will get an error message to that effect, and you will know that you have to rebuild your standalone application. In some cases, however, you may want your application to look for a file outside of the collective. For example, you may want it to look for a MIDI file that can be supplied by the user of your application. In that case, you will naturally want the Search for Missing Files option to be on. Please also note that this feature restricts itself to looking in folders nested only three levels deep.
When your application searches for files outside the collective, you can control where it looks with the Utilize Search Path in Preferences File option. If this option is on (which it is by default), your application will use the search path settings stored in the Max Preferences file instead of using the default search path. You can instruct your application to use its own Preferences file instead of the default Max Preferences by supplying a preferences file name in this field. If the Utilize Search Path in Preferences File is checked and you type in a name other than the default Max Preferences, your application will make its own unique preferences file (in ~ /Library/Preferences , where ~ represents your home directory) the first time it is run. From then on, your application will use that preferences file to recall the settings for options such as Overdrive or All Windows Active (Windows systems only).
On Macintosh systems, the Finder uses a four-character ID to distinguish one application from another. When you create a standalone, a default generic creator (????) is assigned to the application automatically. You can use the standalone object Inspector to change this to a unique ID.
Testing your standalone search path
Open the inspector for your toplevel standalone object. Disable the Utilize Search Path setting, and build your application. If you see any errors indicating no such object or can’t find files in the Max Console when you launch the program, you will know which supporting files you have not properly included.
Checking the current file paths in use
Add a message box containing the message ; max paths to your patcher and then activate the message box. The current file paths in use will be printed to the Max Console.
The Collective Editor
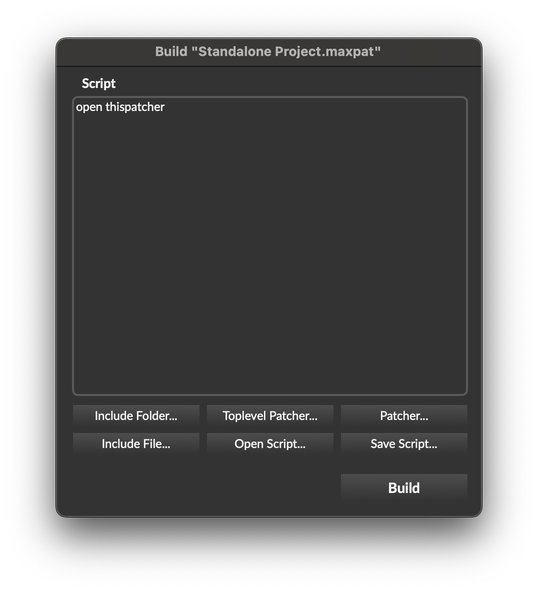
The Collective Editor window lets you define the steps that Max will take when it bundles together a collective. You can include patchers, files, and folders, so you can be sure that all your dependencies will be included in your standalone or collective.

The Collective Editor window includes a script area, and a number of buttons for configuring your collective. The script shows each of the steps involved in building the collective. The first entry in the script open thispatcher is added for you. This tells the collective to include the patcher that was the topmost window when the collective editor was opened. The open keyword means that the patcher will be opened when the collective file is opened.
If you're managing a complex system with lots of potential dependencies, it's often easier to work with a project than to configure your collective manually using the collective editor. When you build a standalone from a project, Max will automatically use the implicit and explicit dependencies of the project to define your collective.
Collective dependencies
For your main toplevel patcher, and for any other patchers that you include in your standalone/collective, Max will try to automatically include any dependencies of that patcher. Any object with an explicit dependency will be able to share that dependency with the standalone builder.

If you load a file dynamically, or include the name of a dependency in a message box, that dependency might not be registered automatically. In this case, you would need to add the dependency manually when defining your collective.

Adding toplevel patchers
A Toplevel patcher window opens when the collective opens. You can have more than one toplevel patcher (you need at least one, however). To add a toplevel patcher, plick the Toplevel Patcher... button in the Collective Editor window and choose a patcher file from the open file dialog that appears.

Once you select the file, a new line using the open keyword is added to the script. If you were to open this standalone or collective, both of the files listed with the open keyword would initially be visible.
Adding files to a standalone/collective
- Click the Include File... button in the Collective Editor window and select the file you want to add from the open file dialog.
- The full path of the file chosen will be added to the build script, preceded by the
includekeyword.
Adding folders to a standalone/collective
If you have an entire folder of data files you want to include, you can include all the files at once.
- Click the Include Folder... button in the Collective Editor window and select the folder you want to add from the open file dialog.
- The full path of the folder chosen will be added to the build script, preceded by the
includekeyword.
Including a folder will only include files in the folder itself. Folders inside the folder (subfolders) will not be included.
Saving and reloading the build script
After you've configured your standalone/collective by adding files and folders, you can save your configuration to a build script. This lets you load that script later if you want to make changes to your configuration.
- Click the Save Script... button in the Collective Editor window and type in a name for your script in the file dialog box. A copy of the current build instructions will be written to a text file.
If you have previously saved a build script for your collective, you can open the file and use it for quick editing and/or rebuilding.
- Click the Open Script... button in the Collective Editor window and choose the build script you have created for your standalone/collective.
- The Collective Editor window will display the contents of the file you have loaded. At this point, you can click the Build button to build your collective, or modify the script if necessary.
Since a collective script uses absolute path names to refer to files, the script is not necessarily transferrable from one machine to another.